


About
Ooooh... Shiny.
I had many messages from my last two creations, about me making a tutorial. So here it is! :-D This is my 2nd time making a tutorial, but the first one making a "craft" one (not a recipe) so bear with me, and if you have any questions, feel free to message me, or post a comment and i'll help you out the best i can! :-D
(Also, i apologize for the random switch between table and pillow background, but i had to finish this on a deadline, so i had to stay up and finish it in my room. Also the lighting's a little bad in a few pictures -- again, because i had to finish it in my room, i only had my lamp to work by, lol.)
-
 Shirin L. favorited Pop Tab Purse!!
01 May 15:45
Shirin L. favorited Pop Tab Purse!!
01 May 15:45
-
 Dorothy R. favorited Pop Tab Purse!!
06 Jun 18:09
Dorothy R. favorited Pop Tab Purse!!
06 Jun 18:09
-
 Carolyn K. commented on Pop Tab Purse!!
05 May 01:43
Carolyn K. commented on Pop Tab Purse!!
05 May 01:43
-
 deb Π. favorited Pop Tab Purse!!
27 Sep 15:54
deb Π. favorited Pop Tab Purse!!
27 Sep 15:54
-
 Key West Witch favorited Pop Tab Purse!!
07 May 16:00
Key West Witch favorited Pop Tab Purse!!
07 May 16:00
-
 Carol K. added Pop Tab Purse!! to Recycle reuse
27 Apr 00:51
Carol K. added Pop Tab Purse!! to Recycle reuse
27 Apr 00:51
-
Key West Witch added Pop Tab Purse!! to Pop Tab Everything
19 Mar 07:57
-
 Trisha J. favorited Pop Tab Purse!!
27 Nov 02:36
Trisha J. favorited Pop Tab Purse!!
27 Nov 02:36
-
Rose C. favorited Pop Tab Purse!!
14 Jun 00:05
-
Marlene A. favorited Pop Tab Purse!!
02 Jan 23:27
-
 Step 1
Firstly, Cut your plastic yarn (or leather, or yarn, or what-have-you) into equal parted segments. (You will need 16 segments the same length, four segments HALF the length of the 16, and whatever's left (long!) will be your handle)
(Sorry i didn't have a yardstick handy when i was doing this, so i'm not sure *how* long to make the strips! T.T)
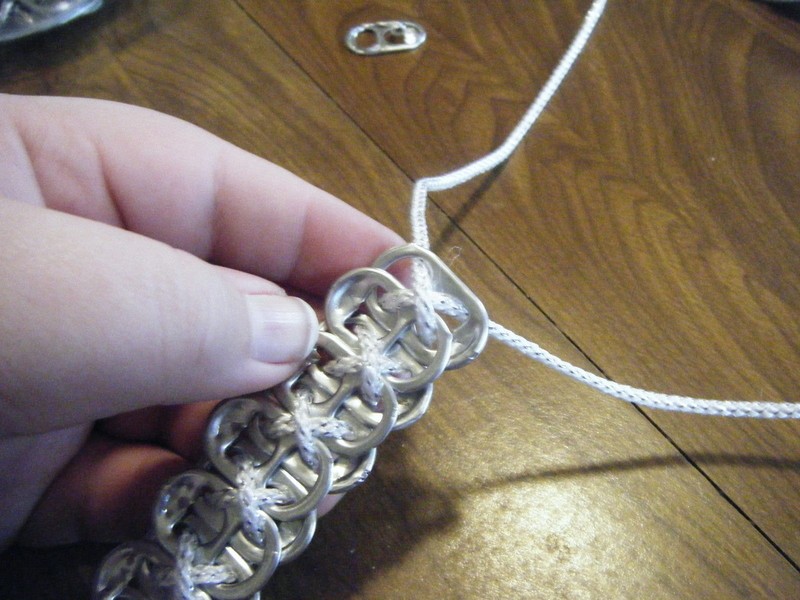
Take one tab (fat side pointing down, smooth side facing you) and pull the end of the string through, so that it looks like the first picture.
Lay the 2nd tab on top, staggered, and opposite direction (fat end pointing up). Take the top string, and place it through the bottom hole (and also through the hole behind it) and the bottom string through the top hole (and the one behind it) creating an X pattern. (Picture two)
Place the 3rd tab, behind the 2nd tab, (do NOT make an X!) Pull the top string through the top two tabs (behind first, then top), and same with the bottom. (Picture 3).
Repeat until you have a strip 27 tabs long (13 on top, 14 behind)
-
 Step 2
When you come to the end of the strip, you should have one tab on bottom. Create an X pattern (as if there were a tab on top) and turn over.
-
 Step 3
Once turned over (and the underside's up) The back should look like this. (Dashes rather than X's as you can see...)
Tie those two strings into a double-knot. (If you're using plastic yarn, use a lighter to melt the knot so it won't come undone. Or slather in Super-glue but be careful! Either way it stinks like burnt Celery!)
When the knot is secured, cut off the excess string so you have a single "bracelet"
-
 Step 4
Continue making these "bracelets" until you have 16 of them. They should all face the same direction, and be the same length long (14 on bottom, 13 on top).
Go ahead and create the side panels (Which should be 15 tabs each -- you'll need 4. They're 8 on bottom, 7 on top). And the strap (which can be as long as you like. with 540 tabs, whatever you have left will make you a small handle. The longer you want it, the more tabs (and string!) you'll need. Tie and Glue/melt them at the ends the same way as before.
-
 Step 5
Thread a needle of your choice (I used one that's kind of bent and flat on the end -- not sure what it's called o.O) with some thicker thread or string (I used a kind of kite-string stuff my mum had lying around).
You'll need about a yard of string for each panel, so measure that out and snip it. No need to knot the end of the string (unless yours frays?) as we'll be tying knots in a second anyways. <3
-
 Step 6
Turn your bracelets over, so that they're facing the same direction and lined up as so. (Fat end to skinny end)
-
 Step 7
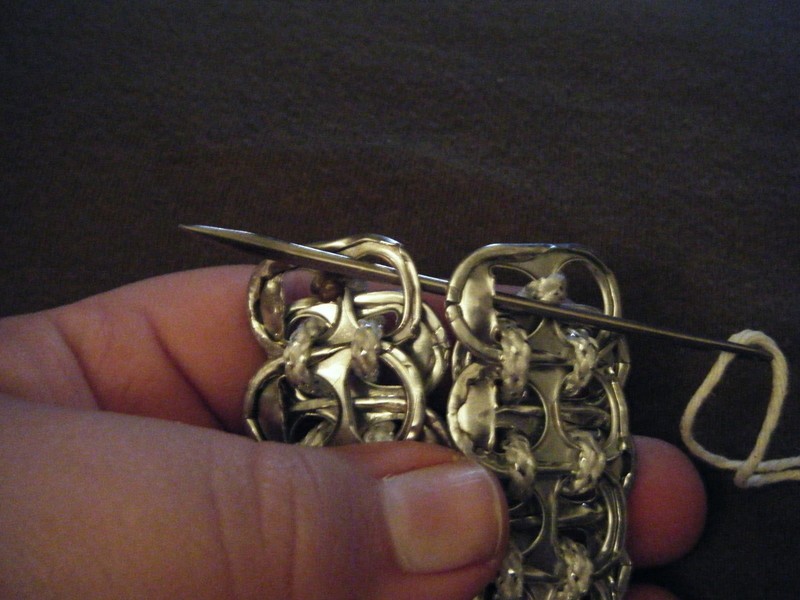
Insert your needle like so, through the back two tabs (see picture). Pull the string through to the very end, and tie it into a knot. (Double knot it to be sure it doesn't come loose!)
-
 Step 8
Take your needle and stick it through the 2nd two tabs (this will make a \ from the top left tab, to the 2nd row right tab, this is good!). Pull through. DO NOT KNOT. (well, i mean you *can* but there's no point to it.. lol)
Continue down the row this way (from the right tab, to the left tab evenly) until you have completed the row.
-
 Step 9
tie the end off like so, but DON'T cut the string! you're going to continue it on to the next bracelet!
-
 Step 10
Take your string from the last row, and repeat the steps 7-9 but backwards. (knot it, and to right to-left UP instead of down) until you get to the top.) Knot the end, and move on to the next panel, making a zig-zag pattern up and down until you have 5 bracelets sewn together.
-
 Step 11
When you're finished tie it off completely and cut off the extra little dangly threads at each end. Your first panel is done! :-D
-
 Step 12
Continue doing this to the rest of the bracelets. you should end up with 9 bracelets in this panel.
-
 Step 13
Don't forget your little side Panels! Take two, of the four you've made, and sew them together up the middle. Once you've done that, knot them off. We won't need to continue sewing on bracelets. (Repeat for the other two bracelets. You'll end up with two side panels)
-
 Step 14
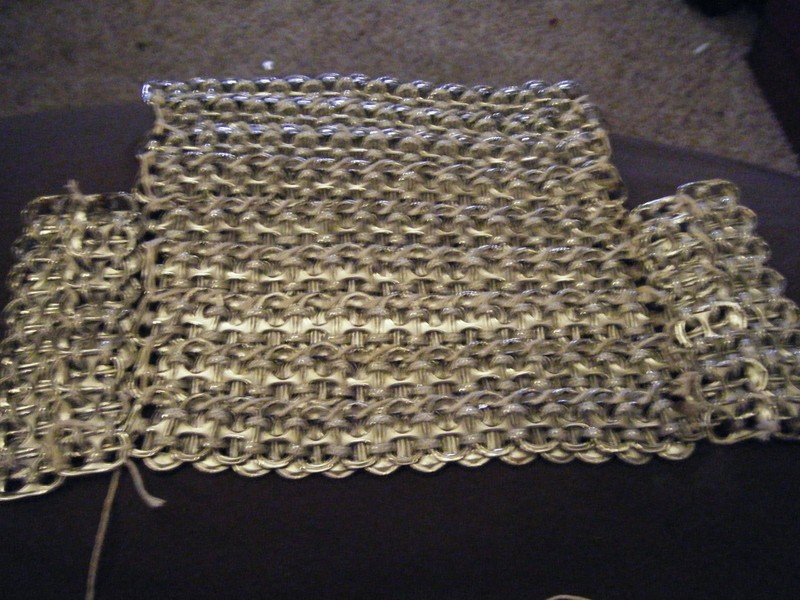
Now to begin assembling everything!
Take the Largest Panel, and face all the fat points downward. Take 1 side panel (whichever way you want it facing) and place it beside it like so. Knot together the two bottom tabs like in the picture.
-
 Step 15
(you might want to bend the panel like in the picture to get it to stay a stiff corner rather than try and bend it later making it all loose)
This part's a little tricky. Unlike sewing the other panels together, you can't really match up the tabs like before. So this one you'll kind of have to eye it... Just sew it together as best you can from bottom to top. Knot it at the top, and move on!
-
 Step 16
Repeat the same process on the other side so that you've got a butterfly-type look to it.
Now for the bottom! :-D
-
 Step 17
Short easy stitches here! (and they match XD) Sew the corner together from the side panel to the bottom.
Being quick and Ninja-like, turn the purse and take your stitches and sew across the bottom/large panel until you reach the other side panel. Sew those together and move on to step 18 for the pic of the finished steps.
-
 Step 18
When you're finished (so far) this is what the purse should look like.
Time to attach the last panel!
-
 Step 19
Place the Panel on top of the others like so, and starting from one corner (Top of the purse opening on a side panel) Stitch your way across the side panel, and around the corner... down the bottom panel, and up the other side panel until you have a finished box-shape! :-D
-
 Step 20
Take your purse and set it upright. You might want to go ahead and help your top panel fold over so that your purse will close. (If you want to add any beading, now might be a good time to do so while you don't have an annoying handle in the way!) Also, if you want to attach a latch, Simply find the center of the purse, and sew a button, or another tab (i used a square beer tab my uncle collects for me) on the bottom middle, and then sew a loop of matching plastic yarn to the underside of the top panel (middle) so that it'll loop closed. (Or you can buy a fancy latch but i chose to keep it simple).
-
 Step 21
To attach the handle, (again, it's tricky because it doesn't match up quite as well...) Take the end of your strap, and stagger it over the side panel so that you have an empty hole on either side of the strap.
Use your needle/thread to knot your way around it (do this a few times to make it secure!). Knot it off, and repeat on the other side.
-
 Step 22
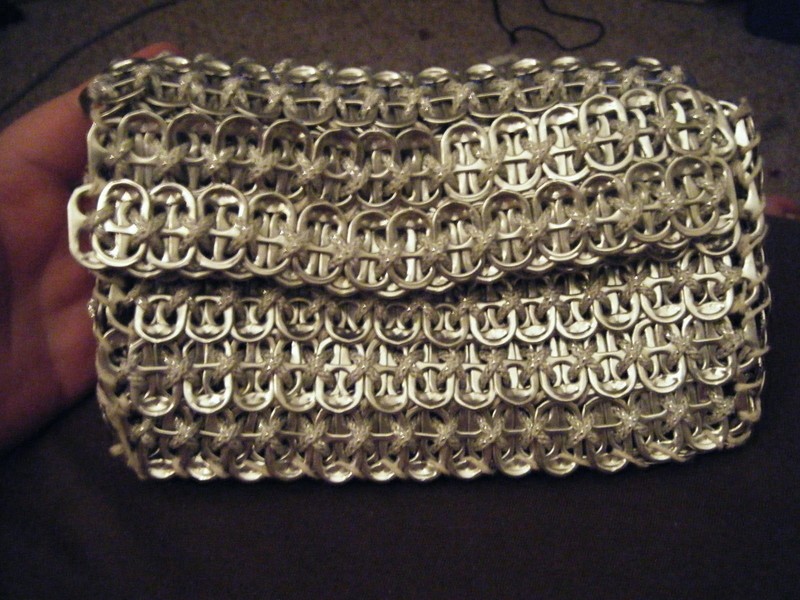
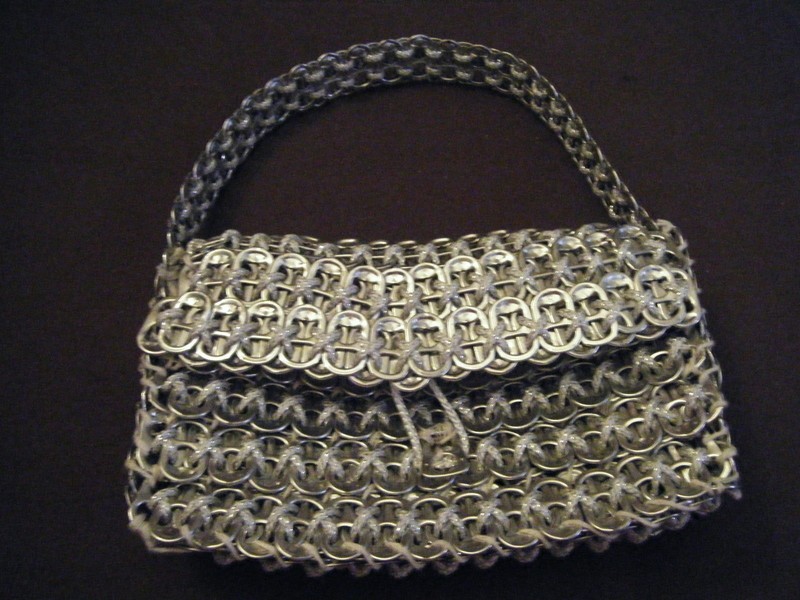
Ta-da! A finished Purse! :-D
Don't be afraid to change the strap size, thickness of the side panels (just remember to make it the same size as the bottom piece) or how tall/wide the front/pack panels are! :-D be creative, have fun, and make sure you let me know so i can stalk you >:D <3


Versions
See all 7 »


Comments


