About
Roll up your crafty tools and take them with you in style!
Here is a handy little organizer that you can customize to fit your craft needs. Mine was made to hold sewing essentials, but yours can hold artist brushes, pencils, knitting needles, crocheting hooks, or other crafty stuff. It is even good for makeup on the go.
Tags
-
 Rachel B. favorited Pillowcase Roll Up Carrier
15 Aug 18:56
Rachel B. favorited Pillowcase Roll Up Carrier
15 Aug 18:56
-
 Michelle M. favorited Pillowcase Roll Up Carrier
26 Jul 15:39
Michelle M. favorited Pillowcase Roll Up Carrier
26 Jul 15:39
-
 Lucky Threadneedle favorited Pillowcase Roll Up Carrier
12 Mar 14:08
Lucky Threadneedle favorited Pillowcase Roll Up Carrier
12 Mar 14:08
-
Sarah C. favorited Pillowcase Roll Up Carrier
22 Jul 18:40
-
 Ada B. added Pillowcase Roll Up Carrier to Bags
14 Apr 11:46
Ada B. added Pillowcase Roll Up Carrier to Bags
14 Apr 11:46
-
 Staci Fowler favorited Pillowcase Roll Up Carrier
14 Dec 18:19
Staci Fowler favorited Pillowcase Roll Up Carrier
14 Dec 18:19
-
Ada B. favorited Pillowcase Roll Up Carrier
19 Jul 22:08
You Will Need
-
 Step 1
Fold up the bottom (seamed) of your pillowcase. Place the items that are going to be rolled in the case on the folded up edge at the bottom to check the heighth of your pockets.
-
 Step 2
Lay out the pillowcase and cut off the amount needed to make your pockets the correct height when turned up. (Save this strip for another project soon to come)
-
 Step 3
Pin the bias binding to the top of the pocket area. (The cut edge)
-
 Step 4
sew the bias binding to the top. I used a zig-zag stitch to make it firm and secure.
-
 Step 5
Fold up your pocket area and determine how much fabric to cut off. Cut off the excess. (Save this for another project, how-to coming soon)
-
 Step 6
Pin bias binding to the top of the carrier where you just cut off the excess fabric, and sew in place.
Pin and sew bias binding to the top of the carrier.
-
 Step 7
Place two coordinating ribbons on the right side of the carrier and pin in place between the pocket area. (The ribbons are about 12" long.) Sew down each side of your carrier with a zigzag stitch, this will take care of those nasty raw edges of bias binding. Trim binding if necessary and apply some fray check.
-
 Step 8
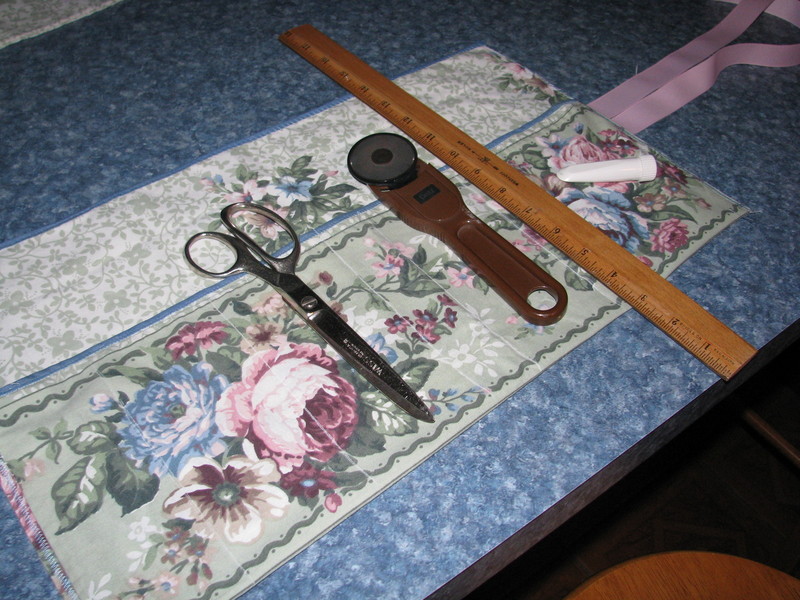
Lay out your tools and determine the width of your pockets. Use a straight ruler and marking chalk to make straight lines for sewing.
-
 Step 9
Sew on the lines you made with a straight stitch. Trim all threads.
-
 Step 10
Place your tools in the pockets. Get ready, you're almost rolling!
-
 Step 11
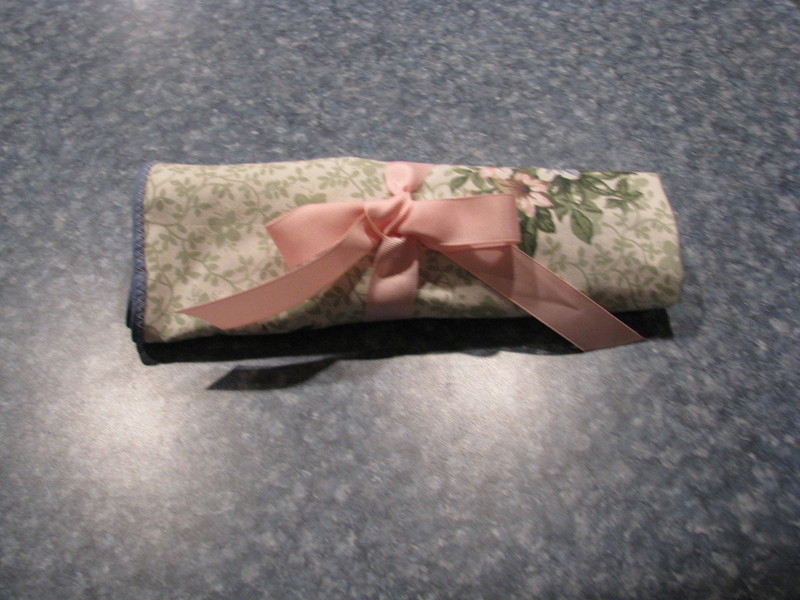
Start rolling! Place one ribbon to the left and one to the right, then tie in a pretty, pretty bow! If you want extra security for your tools, fold over the top before you roll!
-
 Step 12
There now, isn't that all tidy and sweet? I know you are all so clever that you will think of many other uses for this handy little item. Have fun making this!