About
Peg Bag with Personal Message
These peg bags are 36cm x 27cm so have plenty of room to store your pegs. They are made from bold contrasting fabrics and are great for using up fabric remnants. The peg bags are personalised and have a hand embroidered message label.
The pattern is designed to be made with a plastic straight armed hanger but can easily be adjusted to accommodate most small hangers.
I have made this batch of peg bags to give friends and family this Christmas.
-
 Caz entered her project Personalised Peg Bag to Mum's
14 Mar 16:52
Caz entered her project Personalised Peg Bag to Mum's
14 Mar 16:52
-
 charlene c. added Personalised Peg Bag to sewing peg bagz
26 Jun 14:05
charlene c. added Personalised Peg Bag to sewing peg bagz
26 Jun 14:05
-
 AustinLLS favorited Personalised Peg Bag
01 Feb 21:16
AustinLLS favorited Personalised Peg Bag
01 Feb 21:16
-
patricia o. favorited Personalised Peg Bag
12 Dec 23:29
-
Caz entered her project Personalised Peg Bag to Secret Santa
09 Dec 21:55
-
Caz published her project Personalised Peg Bag
08 Dec 21:07
-
 Step 1
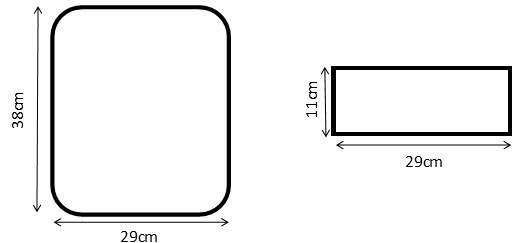
Making the pattern: Cut a rectangle with curved edges 38cm tall by 29cm wide from cardboard. This will be used for the main bag section. Next cut out a rectangle 11cm tall by 29cm wide for the name panel rectangle.
-
 Step 2
Cutting main bag section: Using your cardboard pattern pieces, cut out 2 large rectangles from your main fabric. Put the back piece to one side for later. Lay the front piece flat and mark a line across the width of the fabric, 13cm and 14cm from the top edge. Cut across the two lines to create your opening.
-
 Step 3
Name panel: If you are using a bold patterned fabric for the main body you may wish to double your fabric for the name panel to stop the pattern coming through. Cut 1 or 2 name panel rectangles from your chosen name panel fabric. Pin the fabric pieces along the top edge of the lower front main piece section. Sew around panel.
-
Step 4
Making the trim: From your chosen trim fabric cut out 3 rectangles measuring 6cm x 30cm. Iron one rectangle piece in half long wards, then open piece back up. Fold outer long edges inwards to meet along centre line and iron flat. With edges still folded inwards, fold in half again long wards, finally iron flat to create your edging trim. Repeat process with two remaining pieces.
-
 Step 5
Attaching trim: Sew one trim piece over the join between the name panel and main piece. Place top edge of lower main piece inside one trim piece and sew in place. Repeat process with remaining trim piece and lower edge of top main piece.
-
Step 6
Lettering: Iron Bondaweb to the back of your chosen letter fabric. Cut out letters and iron in place across name panel.
-
 Step 7
Back of bag: Cut out a large rectangle piece from your chosen liner fabric. Lay back main piece flat with the wrong side up. Place hanger along top of back piece making sure the hook is in the centre and leaving enough room around the edge to sew the bag together. Place the liner piece on top right side up. Pin the hanger in place between the two pieces of fabric. Using Taylor’s chalk draw a line under the hanger. Sew across this line, this will stop the hanger slipping down into the peg bag when completed.
-
 Step 8
Sewing together: Place back section piece right side up. Place top front and top bottom bag pieces on top with right sides facing down. Pin together. ***The hanger hook will need to be pushed through the top of the peg bag when its turned the right way so make sure you leave a big enough opening when sewing together*** Starting at the top sew around the bag. Cut off any extra cotton and trim. Handstitch approx. 3cm of the top and bottom opening edges together on both sides. Turn bag right side out, gently pulling the hanger hook through opening. Tuck in seam allowance around hook opening and sew closed.
-
 Step 9
Tag: Cut out tag shape from calico fabric. Hand embroider a ’Love From’ message. Use Bondaweb or glue to attach the tag to the lower right corner of the peg bag. Sew a button onto the tag to finish.