


About
Give the simple plaited bracelet a new look with this chain design.
The hardest part of this tutorial is getting to grips with plaiting into chain. The trick is to leave the tension pretty loose and get into a rhythm. We also have links to a video tutorial on the blog if your getting really confused!
Tags
-
 Stephanie R. favorited Ombre Plaited Bracelet
17 Feb 00:12
Stephanie R. favorited Ombre Plaited Bracelet
17 Feb 00:12
-
 Jennifer C. favorited Ombre Plaited Bracelet
20 Jun 00:37
Jennifer C. favorited Ombre Plaited Bracelet
20 Jun 00:37
-
 Lara L. favorited Ombre Plaited Bracelet
27 Feb 21:28
Lara L. favorited Ombre Plaited Bracelet
27 Feb 21:28
-
Jennifer G. favorited Ombre Plaited Bracelet
24 Sep 15:10
-
 claire.dixon.581 favorited Ombre Plaited Bracelet
18 Jul 12:21
claire.dixon.581 favorited Ombre Plaited Bracelet
18 Jul 12:21
-
Julie A. added Ombre Plaited Bracelet to jewelry
20 May 07:48
-
 daniela.adamo.5 favorited Ombre Plaited Bracelet
01 May 15:57
daniela.adamo.5 favorited Ombre Plaited Bracelet
01 May 15:57
-
Tina S. favorited Ombre Plaited Bracelet
08 Feb 15:38
-
 getsuandhoshi favorited Ombre Plaited Bracelet
14 Jan 04:10
getsuandhoshi favorited Ombre Plaited Bracelet
14 Jan 04:10
-
 Alex B. favorited Ombre Plaited Bracelet
25 Dec 22:31
Alex B. favorited Ombre Plaited Bracelet
25 Dec 22:31
-
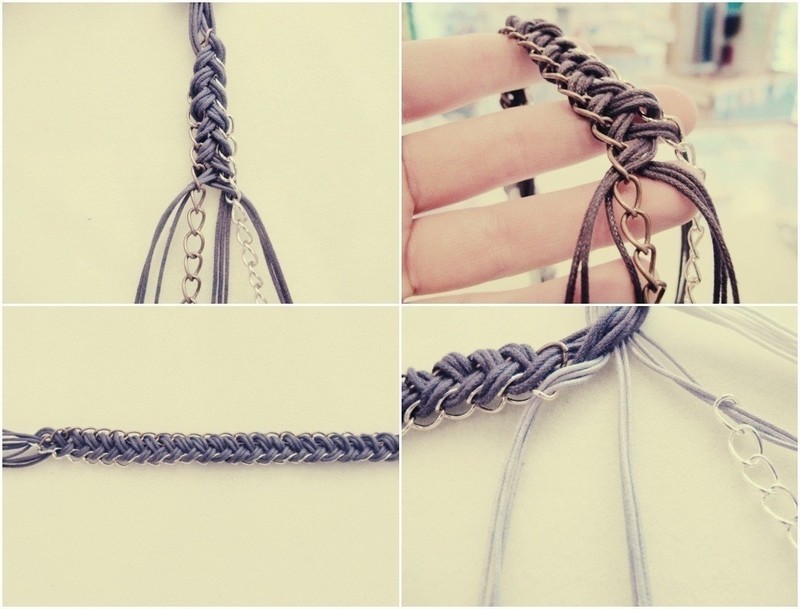
 Step 1
Cut each metre of cord into 3 section (giving you 9 pieces in each colour) / Put them all together and glue into the bell closer / Section off one colour and begin to plait into two of the chain pieces.
-
 Step 2
Make sure you keep to the same pattern. I have chosen to go from one side (right or left) under the middle cords, over the other side and into the chain from underneath.
-
 Step 3
Continue until the end of the chain, then do the same with the second colour of cord, plaiting into the second and third chains.
-
 Step 4
Once at the end of the chain, take the third colour cord and plait that into only the third chain. trim the cords and glue into the other bell closer.
-
 Step 5
Avoiding the urge to wear, leave the glue to dry ( half an hour max) and your done!


Comments

