About
MUFF MUFF MUFF
Ooh, I do love that word. It’s just so much fun to say! Say it out loud three times, go on. Muff muff muff.
Anyway, the real reason for this post is to show off my muff. (don’t worry, it’s not rude!)
My friends Louise and Nathan are getting married in three weeks, and I decided I was going to wear this red PPQ dress (I was so happy when I managed to get it on sale from Oli, after lusting after it for about a year!) with black accessories, such as my faux fur capelet, which I don’t have enough opportunities to wear. (Honestly, if I could get away with wearing it with jeans and a t-shirt, I would. Actually, I might do that at the weekend.)
The only thing that would have completed the look was a hand warmer. Or, indeed, a “muff”
I found this tutorial via the Craftster forums, and bought some excellent faux fur from John Lewis. (When the little old lady at the till asked what I was planning to make, I couldn’t bear to say muff to her!) A metre of faux fur cost £4.85, and was enough fabric to make two muffs. Or actually, one muff, and one mistake (I thought it looked wrong and an odd shape once I had stitched the smaller sides together, so ended up using the other bit of material, which also looked wrong.)
I made a slight modification to the pattern, sewing in a felt pocket into the seam so I will be able to stash my hip flask and iPhone inside it.
Here’s some pictures of the making of the muff…
-
 Key West Witch favorited Muff
28 Jun 23:00
Key West Witch favorited Muff
28 Jun 23:00
-
 Kay T. favorited Muff
13 Nov 08:48
Kay T. favorited Muff
13 Nov 08:48
-
 Joe N Judy G. favorited Muff
08 Dec 17:47
Joe N Judy G. favorited Muff
08 Dec 17:47
-
 Belinda C. favorited Muff
30 Nov 18:28
Belinda C. favorited Muff
30 Nov 18:28
You Will Need
-
 Step 1
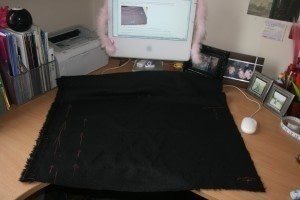
Measuring out the fur. Cutting the fur was so much fun, really. Who doesn’t want to be covered in black fluff? I am very glad I was wearing old clothes!
-
 Step 2
This is the pocket that went inside the muff. In the tutorial linked above, it says about leaving a gap so you can turn the muff right side out. This is where I sewed the pocket into. To the top of the picture you can see my iPhone with my hipflask underneath. The curve in the hipflask is quite neatly the same size as the curve of the back of the iPhone. Hoorah.
-
 Step 3
Sewing the sides together. The arrows show which way the fur went. Also, look at my lovely old school sewing machine! Its ancient, and was given to me through Freecycle 3 years ago but it still works, and I love it so much more.
-
 Step 4
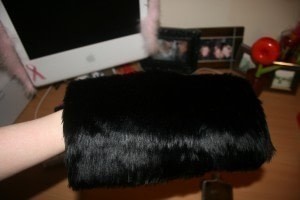
The finished item. Its a pretty difficult thing to photograph, especially one handed!
-
 Step 5
Oh, and theres the hip flask making a special appearence again. Sneaky little git.