Movement Underground Duct Tape Bag
Extract from Duct Tape Bags • By Richela Fabian Morgan • Published by GMC Publications

About
Duct Tape Bags
You can draw inspiration from the subterranean transportation lines of Paris, London, Tokyo, or New York City. In addition to helping you navigate the transit system, subway maps are designed to be aesthetically pleasing, with boldly colored lines that harmoniously intersect and form geometric shapes. Movement Underground takes the subway map motif and elevates it to a fashion statement.
Tags
© 2024 Richela Fabian Morgan / GMC Publications · Reproduced with permission. · Duct Tape Bags by Richela Fabian Morgan, published by Clarkson Potter (£12.99, available from www.thegmcgroup.com)
-
 Rebecca favorited Movement Underground Duct Tape Bag
15 May 10:24
Rebecca favorited Movement Underground Duct Tape Bag
15 May 10:24
-
 Luna D. favorited Movement Underground Duct Tape Bag
25 Apr 06:43
Luna D. favorited Movement Underground Duct Tape Bag
25 Apr 06:43
-
Deb E. favorited Movement Underground Duct Tape Bag
07 Dec 18:58
-
 Ellen R. favorited Movement Underground Duct Tape Bag
01 Sep 16:08
Ellen R. favorited Movement Underground Duct Tape Bag
01 Sep 16:08
-
Patricia A. favorited Movement Underground Duct Tape Bag
28 Apr 21:32
-
 Ruth O. added Movement Underground Duct Tape Bag to DIY Look
09 Nov 17:56
Ruth O. added Movement Underground Duct Tape Bag to DIY Look
09 Nov 17:56
-
 Sarah W. favorited Movement Underground Duct Tape Bag
01 Dec 00:57
Sarah W. favorited Movement Underground Duct Tape Bag
01 Dec 00:57
-
 PineconePrincess favorited Movement Underground Duct Tape Bag
28 Nov 00:24
PineconePrincess favorited Movement Underground Duct Tape Bag
28 Nov 00:24
-
 Trisha J. favorited Movement Underground Duct Tape Bag
27 Nov 03:29
Trisha J. favorited Movement Underground Duct Tape Bag
27 Nov 03:29
-
 Crafterella featured Movement Underground Duct Tape Bag
24 Nov 23:00
Crafterella featured Movement Underground Duct Tape Bag
24 Nov 23:00
You Will Need
-
Step 1
Place the 16½" × 19" (42cm × 48.5cm) piece of parchment paper on the worktable in the landscape position and make a duct tape fabric (see page 10) using 10 strips of 20" (51cm) white heavy-duty duct tape for the back side and 7 strips of 17½" (44.5cm) white linen duct tape for the front side. Trim the fabric to 16½" × 19" (42cm × 48.5cm).
-
Step 2
Place the 13½" × 21½" (34.5cm × 54.5cm) piece of parchment paper on the worktable in the portrait position and make a second duct tape fabric using 15 strips of 14½" (37cm) white heavy-duty duct tape for the back side and 9 strips of 22½" (57cm) green duct tape for the front side. Trim the fabric to 21½" × 13½" (54.5cm × 34.5cm). Trim off a piece vertically that measures 5" × 13½" (12.5cm × 34.5cm). Set aside the smaller piece. The remaining fabric should measure 16½" × 13½" (42cm × 34.5cm) high.
-
 Step 3
Place the fabric from step 1 on the worktable in the portrait position with the white heavy-duty duct tape side facing up. Place the green and white heavy-duty duct tape fabric from step 2 directly below it, white heavy-duty duct tape side facing up, in the landscape position so that the 16½" (42cm) edges touch and create a middle seam. // A Place a 16½" (42cm) strip of white heavy-duty duct tape horizontally over the seam, connecting the 2 fabrics.
-
Step 4
TO MAKE THE BAG SIDES, cut the 5" × 13½" (12.5cm × 34.5cm) piece of fabric from step 2 into 2 pieces that measure 2½" × 9½" (6.5cm × 24cm) each. Discard any extra duct tape.
-
 Step 5
To attach the sides to the main bag, place one bag side each vertically along both the left and right edges of the bottom connected fabric so they touch, lining up the bottom edges and creating a seam between them. // B Cut 2 strips of 9½" (24cm) white heavy-duty duct tape and place a strip over each seam to connect the sides to the fabric.
-
 Step 6
Cut 2 strips of 2½" (6.5cm) white heavy-duty duct tape. Place a strip lengthwise over each bottom edge of the bag sides. Be sure that only half of the strips are on the fabric lengthwise. // C On the left bag side, fold the strip back so the sticky half is facing up.//
-
 Step 7
Align the bottom edge of the left bag side with the left edge of the main fabric. // D Press down the strip of tape, connecting the left bag side to the main fabric. Repeat this step on the right bag side.//
-
 Step 8
Place a strip of 9½" (24cm) white heavy-duty duct tape vertically along the remaining long edge of the left side piece. Be sure that only half of the strip is on the fabric lengthwise. Fold it back so the sticky half is facing up. Align the left edge of the side piece with the left edge of the main fabric. // E Press down the strip of tape, connecting the side piece to the main fabric.// Repeat this step on the right side piece. The main bag is now complete.
-
Step 9
TO MAKE A STRAP, cut a 32" (81cm) strip of white heavy-duty duct tape and a 32" (81cm) strip of green duct tape. Stick them together. Repeat this step to make the second strap.
-
 Step 10
Starting from the top edge of the left bag side, measure down 1½" (3.8cm) along the left and right edges and mark. Draw a horizontal line with a white grease pencil connecting the 2 marks. Measure and mark ¼" (6mm) inward from each end of the drawn line. // F Cut a 2" (5cm) line inward (toward the center), starting from the ¼" (6mm) mark made.//
-
 Step 11
// G Insert approximately 4" (10cm) of the end of the first strap into the slit.// Attach the strap to the bag by placing 2 strips of 7" (18cm) white heavy-duty duct tape vertically over the strap end on the inside of the bag.
-
Step 12
Repeat step 9 on the right bag side to attach the second strap. Loop a metal slider through the unattached end of the second strap, leaving a 1" (2.5cm) tail. Fold the tail over the middle bar of the slider and secure it with a 1" (2.5cm)strip of white heavy-duty duct tape. Weave the open end of the first strap through the slider.
-
 Step 13
TO MAKE THE SUBWAY GRID PATTERN, cut one 17½" (44.5cm) strip each from orange, purple, yellow, dark blue, and dark green duct tape. Cut 3 strips lengthwise from each color; each strip is approximately ¼" (6mm) wide. // H Place these strips across the front side of the bag flap in a grid or a pattern that is similar to a subway map, where a single color represents a transportation line.// Be sure to crisscross some strips. Trim or fold over any extra duct tape that extends beyond the edges of the flap.
-
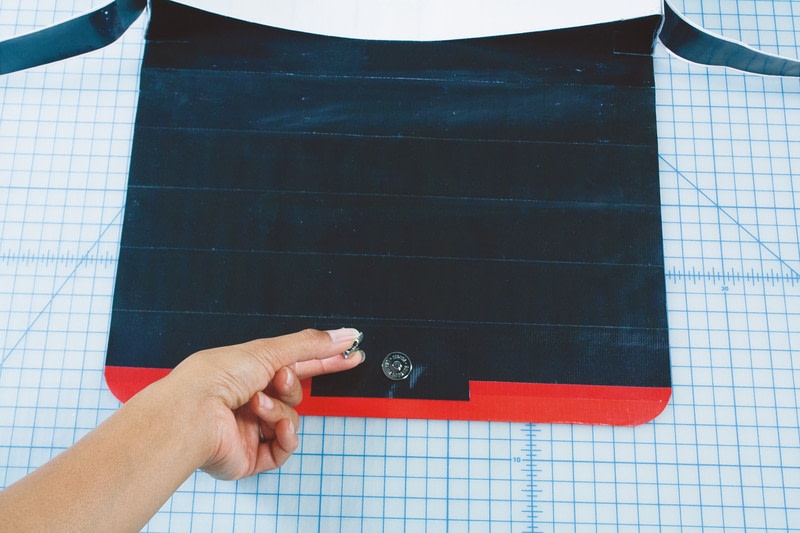
 Step 14
Use 2 strips of 4" (10cm) white heavy-duty duct tape to center and attach the magnetic snap closure ½" (13mm) from the edge of the flap.
-
 Step 15
MAGNETIC SNAP CLOSURE
TOOLS
• self-healing cutting mat
• craft knife
• flat-nose pliers
• magnetic snap closureAll the magnetic snaps used in this book are ¾" (2cm) in diameter. Each one has a male part, a female part, and two washers. You will need a pair of flat-nose pliers to fold down the prongs of the male and female parts. To maintain a smooth front surface of the bag, it is best not to attach the male part directly to the bag fabric. Instead, we’ll first attach it to a strip of duct tape and then place it on the inside of the bag.
-
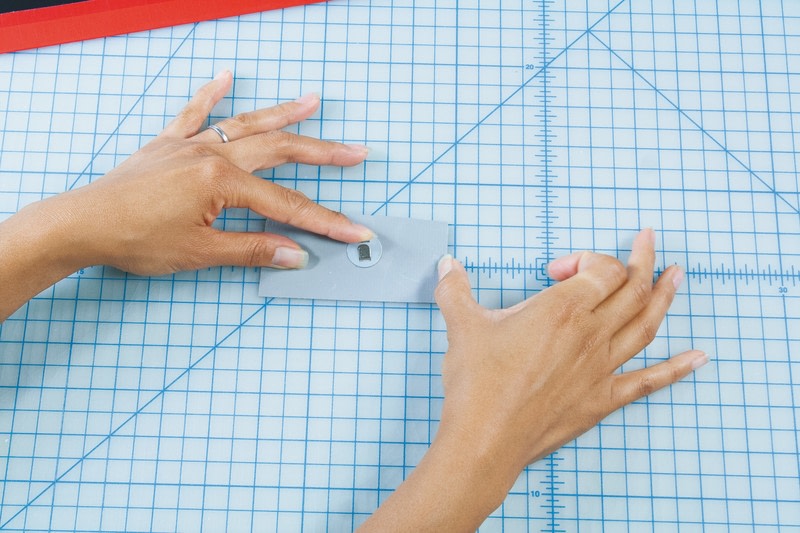
 Step 16
Take the male part and push the 2 prongs against the center of your strip of tape.// (Each project will indicate the length of the tape strip you’ll need.)
-
 Step 17
Remove the male part to reveal 2 indentations made on the tape.
-
 Step 18
Using a craft knife make 2 small slits where the indentations are. Push the prongs of the male part through the slits.// The prongs should end up on the sticky side of the tape. Slip a washer through the prongs and use flat-nose pliers to fold the prongs down.
-
Step 19
Place the strip of tape on the bottom edge and center it on the back side of the bag’s flap.
-
Step 20
Attach the female part to the male part. Close the flap and press down against the magnetic snap. The prongs of the female part should make indentations on the opposing side of the flap.
-
 Step 21
Open the flap. Use a craft knife to cut small slits where the prongs have made indentations. Push the prongs of the female part through the slits from the front side of the fabric. // C The prongs should end up on the inside of the bag.//
-
 Step 22
Slip a washer through the prongs and use a pair of pliers to fold the prongs down. Place a strip of tape over the washer to cover it.