

About
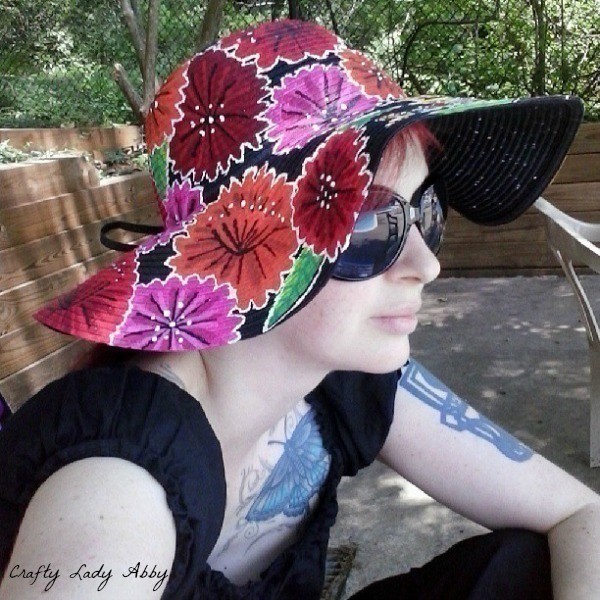
Personalize a plain sunhat by adding colorful Mexican flowers.
A few months ago, I saw two shoe painting tutorials by the Crafty Chica that are inspired Mexican oilcloth flowers. The painting style is shown on stilletos and wedges. I have a growing collection of sunhats. As someone who loves vintage styles, while having skin that burns easily and light sensitive eyes, wearing a sunhat while exposed to the sun long term, is essential in the summer. I've enjoyed painting over the last 4 years, so I combined Kathy's painting technique with my love of sunhats and painting. I followed her tutorials to paint this sunhat. I documented the painting process using Instagram.
I used acrylic craft paint with a little fabric paint medium mixed in. Alternatively, you can use acrylic fabric paint. You can change up the colors, flowers, and design size to your liking.
Tags
-
 Key West Witch favorited Mexican Floral Sunhat
28 Jun 18:44
Key West Witch favorited Mexican Floral Sunhat
28 Jun 18:44
-
 Kit McSmash favorited Mexican Floral Sunhat
13 Apr 20:57
Kit McSmash favorited Mexican Floral Sunhat
13 Apr 20:57
-
 Elin H. favorited Mexican Floral Sunhat
13 Apr 14:23
Elin H. favorited Mexican Floral Sunhat
13 Apr 14:23
-
 Sarah W. favorited Mexican Floral Sunhat
13 Apr 11:49
Sarah W. favorited Mexican Floral Sunhat
13 Apr 11:49
-
 Crafty Lady Abby published her project Mexican Floral Sunhat
06 Mar 19:35
Crafty Lady Abby published her project Mexican Floral Sunhat
06 Mar 19:35
-
 Step 1
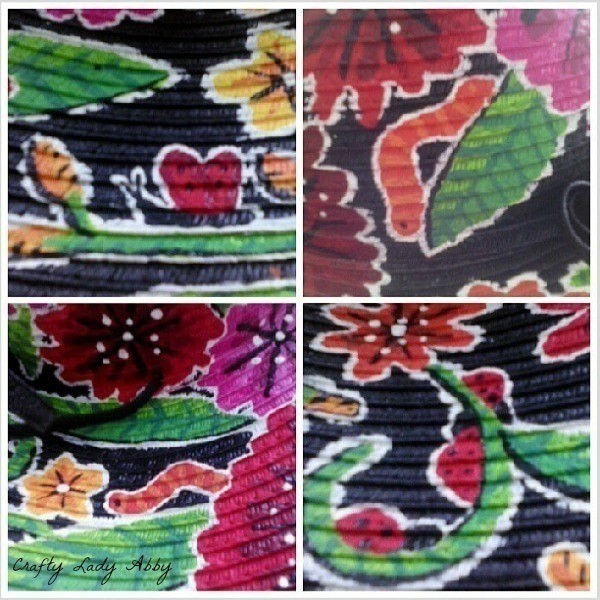
I knotted the bow out of the way, but you could remove with scissors. I used the small paint brush and the white paint to mark the base shapes for the hat. This will create the outlines for the shapes and make the colors pop well against the black. If you notice at the top of the photo, I got a bit lopsided with the amount of white. Since I used a black hat, I easily broke this up later with black paint. Before adding the petals, I painted light circles in various places on the hat. I added petals, and filled in the circles. This helped me generally place the flowers and space out a design. I painted the leaves and vines as I was creating the design around the hat. I made my design flow into itself, vs separating the elements. I think this creates a unity and nice overall design.
-
 Step 2
Using the colors, I base coated the flowers, vines, and leaves leaving a white outline around each one. You might need to make multiple coats for some colors. I used 2 different yellow shades for the small yellow flowers and buds. This was just to break up the cluster of flowers. Make sure the texture of the hat still shows. You'll see in the Step 3 photo that I did this to all the areas. If you accidentally cover the white outline, you can use the white paint to add it back in. You can use the black paint to correct any areas, as you see I did with that cluster of flowers.
-
 Step 3
Using the colors, I base coated the flowers, vines, and leaves leaving a white outline around each one. You might need to make multiple coats for some colors. I used 2 different yellow shades for the small yellow flowers and buds. This was just to break up the cluster of flowers. Make sure the texture of the hat still shows. You'll see in the Step 3 photo that I did this to all the areas. If you accidentally cover the white outline, you can use the white paint to add it back in. You can use the black paint to correct any areas, as you see I did with that cluster of flowers.
-
 Step 4
I used a slightly lighter shade of the dark colors to make more radiating lines from the center of each flower. I didn't do this for the yellow ones, since they are so small. For the pink ones, I actually used a shade lighter than the base flower color.
For the leaves, I shaded them in half with a darker green. I used blue to darken it. I darkened that green with more blue and painted veins on the leaves. For added interest, I made diagonal lines with that darkest green along the vines, following the curves.
-
 Step 5
With the black paint and the liner brush, make thin lines radiating from the centers of all the flowers. I also underlined the shading on the leaves, and followed where shading would be on the vines. This adds more depth to the leaves and vines. I made little marks through the buds too. While I had the black out, I cleaned up any white areas that I thought were too uneven, by painting over those areas. If I was going to be neurotic about that clean up, I'd be at it for hours. However, this is supposed to be more organic than that.
-
Step 6
On the centers of some large flowers, I painted open buds similar to how Kathy explained them. Slightly off to the center (but you can do it directly in the center) I painted a curved wide V and petals using the white paint and the small brush. After the white dried, I used the matching base colors of each flower to paint over the white. I used the liner brush to paint the radiating lines like I did when I 1st painted the flowers...2 layers of different darker shades and 1 of black. These radiate from the center of the curved V, towards the petals. This just adds more visual dimension to the flowers.
-
 Step 7
With the rounded end of a small brush handle, dip it into the white paint a bit. Make white dots in the centers of each flower. For the flowers with buds in the center, I placed those white dots along the petals of the buds.
-
 Step 8
If you compare the upper 2 photos, you'll notice I added some little insects...2 caterpillars (one is on the side of the hat's crown), 1 butterfly, and 3 lady bugs. To do this, I painted their basic shapes with the white paint and liner brush, in places I thought needed a little filler. They all sit along leaves or vines. After the white was dry, I added their base colors, giving them a 2nd or 3rd coat if needed. I used alternating colors and black for accents.
-
 Step 9
I tested the finished hat at the pool. I flexed the hat before putting it on, to make sure the paint was soft. I didn't actually wear it into the pool. I lounged beside the pool while my daughter played with other kids.