About
Cuddly Knitted Animals
About 15cm (6in) high
Tags
© 2024 Caprice Birker / Search Press · Reproduced with permission.
-
 Yannick P. favorited Mel Mouse
04 May 05:46
Yannick P. favorited Mel Mouse
04 May 05:46
-
 Frances Y. favorited Mel Mouse
07 Dec 12:13
Frances Y. favorited Mel Mouse
07 Dec 12:13
-
 ZombieUnicorn favorited Mel Mouse
14 Jan 22:33
ZombieUnicorn favorited Mel Mouse
14 Jan 22:33
-
irma p. favorited Mel Mouse
10 May 07:39
-
Gerrie W. favorited Mel Mouse
23 Mar 20:34
-
 Pimke added Mel Mouse to Strickmuster
27 Jan 08:21
Pimke added Mel Mouse to Strickmuster
27 Jan 08:21
-
 Emma H. favorited Mel Mouse
18 May 13:07
Emma H. favorited Mel Mouse
18 May 13:07
-
PilotMomma added Mel Mouse to Amigurumi
10 Apr 19:51
-
 Carla B. favorited Mel Mouse
15 Mar 09:08
Carla B. favorited Mel Mouse
15 Mar 09:08
-
Aurelie L. added Mel Mouse to Doudou
14 Mar 22:03
-
 Step 1
Mel Mouse Method:
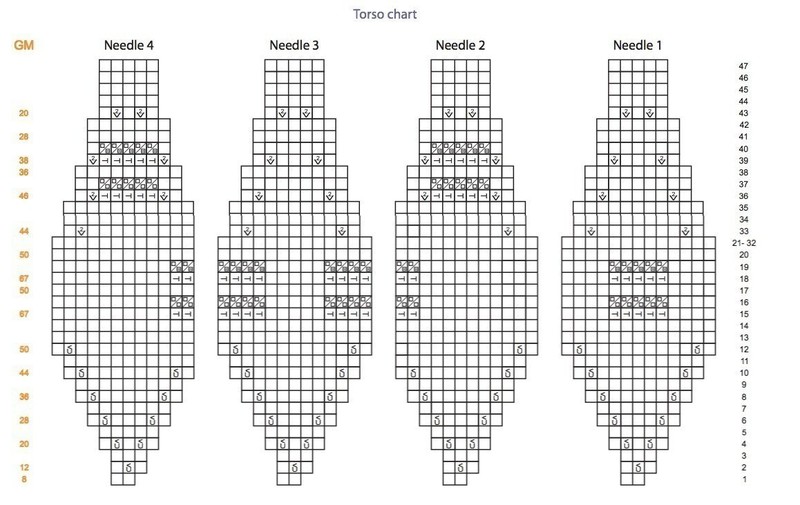
Knitting the Torso
The start of every animal is at the centre back. Work in rounds of stocking stitch.
Cast on 2 stitches four times on the set of needles. (These instructions are charted on page 12.)
Round 1: Join into a round, making sure the stitches are not twisted, and knit [8 sts].
Round 2: * K1, inc1, k1 *, repeat from * to * three more times. (Inc1 by picking up the bar before the next stitch and knitting it) [12 sts].
Round 3: Knit to the end.
Round 4: * K1, inc1, k1, inc1, k1 *, repeat from * to * three more times [20 sts].
Round 5: Knit to the end.
Round 6: * K1, inc1, k3, inc1, k1 *, repeat from * to * three more times [28 sts].
Round 7: Knit to the end.
Round 8: * K1, inc1, k5, inc1, k1 *, repeat from * to * three more times [36 sts].
Round 9: Knit to the end.
Round 10: * K1, inc1, k7, inc1, k1 *, repeat from * to * three more times [44 sts].
Round 11: Knit to the end.
Round 12:
Needle 1: K1, inc1, k9, inc1, k1.
Needle 2: K1, inc1, k10.
Needle 3: Work as for needle 1.
Needle 4: K10, inc1, k1.
Distribution of stitches: 13/12/13/12 [50 sts]. Rounds 13–14: Knit.
On rounds 15 and 18, the stitches for the tail are created on the first needle and the stitches for the legs are created on the other three needles.
Round 15:
Needle 1: K4, kfb five times, k4 [18 sts].
Needle 2: K10, kfb twice [14 sts].
Needle 3: Kfb four times, k5, kfb four times [21 sts].
Needle 4: Kfb twice, k10 [14 sts].
Distribution of stitches: 18/14/21/14 [67 sts].
Round 16: Knit the round as tightly as possible.
Now transfer the stitches you created in the last round for the legs on to two stitch holders and the stitches for the tail on to another stitch holder as follows:
Needle 1: Lift 4 stitches on to a new knitting needle, * place 1 stitch on a stitch holder, lift 1 stitch over on to the knitting needle *, repeat from * to * four more times. Close the stitch holder and then lift the remaining 4 stitches from needle 1 over on to the new knitting needle with the other 4 stitches.
Needle 2: Lift 10 stitches over on to a new knitting needle, place
1 stitch on a second stitch holder, lift 1 stitch on to the knitting needle, place 1 stitch on stitch holder, lift 1 stitch over on to the knitting needle.
Needle 3: * Place 1 stitch on the same stitch holder (which has
2 stitches on it so far), lift 1 stitch over on to a knitting needle *, repeat from * to * three more times, close the second stitch holder, then lift 5 stitches over on to the knitting needle, ** place 1 stitch on a third stitch holder, lift 1 stitch over on to the knitting needle **, repeat from ** to ** three more times.
Needle 4: Place 1 stitch on the same stitch holder (which has 4 stitches on it so far), lift 1 stitch over on to a new knitting needle, place 1 stitch on the stitch holder, lift 1 stitch over on to the knitting needle, close the third stitch holder, lift 10 stitches over on to the knitting needle.
Distribution of stitches: 13/12/13/12 [50 sts]. On the stitch holder for the tail you should have 5 stitches and on each stitch holder for the legs you should have 6 stitches.
Round 17: Knit as tightly as possible.
Round 18: Work as for round 15.
Round 19: In this round, the first of each of the doubled stitches that will later be left on stitch holders should be purled. This is so that these stitches fit into the form of the stocking-stitched body. Work as follows:
Needle 1: K4, * p1, k1 *, repeat from * to * four more times, k4. Needle 2: K10, p1, k1, p1, k1.
Needle 3: * P1, k1 *, repeat from * to * another three times, k5, ** p1, k1 **, repeat from ** to ** another three times.
Needle 4: P1, k1, p1, k1 then k10.
Transfer the purled stitches on to three stitch holders in the same way as for round 16.
Distribution of stitches: 13/12/13/12 [50 sts]. In this round you should have placed 5 stitches on a tail-stitch holder and 6 stitches on each of two leg-stitch holders.
Round 20: Knit as tightly as possible.
Rounds 21–32: Knit.
Round 33:
Needle 1: K1, k2tog, k7, k2tog, k1.
Needle 2: K1, k2tog, k9.
Needle 3: Work as for the needle 1.
Needle 4: K9, k2tog, k1.
Distribution of stitches: 11/11/11/11 [44 sts]. Rounds 34–35: Knit.
On rounds 36 and 39, the stitches for the arms are created on needles 2 and 4.
Round 36:
Needles 1 + 3: K1, k2tog, k5, k2tog, k1.
Needles 2 + 4: K1, k2tog, kfb 5 times, k2tog, k1.
Distribution of stitches: 9/14/9/14 [46 sts].
Round 37: Knit as tightly as possible.
Transfer the stitches for the arms on to two stitch holders, in the same way as the legs as follows:
Needles 2 + 4: Lift 2 stitches over on to a new knitting needle,
* place 1 stitch on the stitch holder, lift 1 stitch over on to the knitting needle *, repeat from * to * four more times, close the stitch holder, lift 2 stitches over on to the knitting needle. Distribution of stitches: 9/9/9/9 [36 sts]. In this round you should have placed 5 stitches for each arm on to a stitch holder (one holder for each arm).
Round 38: Knit.
Round 39:
Needles 1 + 3: K1, k2tog, k3, k2tog, k1.
Needles 2 + 4: K2tog, kfb 5 times, k2tog.
Distribution of stitches: 7/12/7/12 [38 sts].
Round 40:
Needles 1 + 3: Knit tightly.
Needles 2 + 4: K1, * p1, k1 *, repeat from * to * four more times, k1. Transfer the purled stitches on to two stitch holders, proceeding in the same way as for round 37.
Distribution of stitches: 7/7/7/7 [28 sts]. In this round you should have placed 5 more stitches for each arm on to stitch holders.
Round 41: Knit as tightly as possible.
Round 42: Knit.
Round 43: * K1, k2tog, k1, k2tog, k1 *, repeat from * to * on the other three needles [5/5/5/5 = 20 sts].
Rounds 44–47: Knit.
You have now knitted the torso and neck.This chart shows the pattern for the torso. The stitches on each needle are knitted differently. Refer to the written instructions for information on transferring the stitches for the limbs and tail on to stitch holders.
-
 Step 2
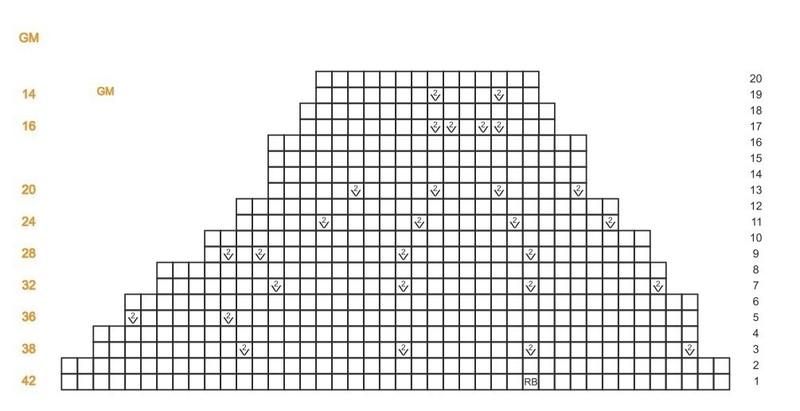
Knitting the Back of the Head
Knit the back of the head directly after round 47 of the body. You should have 5 stitches on each of the four needles to start. You will need two more stitch holders.
Round 1: * k1, inc1 *, repeat from * to * three more times, k1. Repeat round 1 on each needle [9/9/9/9; 36 sts].
Round 2: Knit all stitches.
Round 3: K31, leaving the final 5 stitches unworked. Now redistribute the stitches as follows:
Move the 5 unworked stitches from needle 4 on to needle 1 and then move the first 5 stitches of needle 2 on to needle 1 as well. Needle 1 now has 19 stitches.
Put all the remaining stitches (4 from needle 2, 9 from needle 3 and 4 from needle 4) on to a stitch holder, maintaining that order [17 sts].
The back of the head is made like a heel turn on a sock.
Starting with the stitch that was the 5th stitch of needle 4, work the 19 stitches on the needle in rows of stocking stitch.
Row 4: Knit all stitches [19 sts].
Row 5: Purl.
Rows 6–19: Work in stocking stitch (repeat rows 4 and 5).
From here, the actual heel turn starts.
Row 20: K4, k2tog, k7, k2tog. Turn work.
Row 21: Slip 1, p7, p2tog. Turn work.
Row 22: Slip 1, k7, k2tog. Turn work.
Rows 23–28: Continue working in the same way until only the original 9 stitches on the first needle are left. Cut off the yarn and fasten off. The start of the round for the face (next) is the 1st stitch of this needle when knitting from right to left. Leave these stitches on a stitch holder until needed.This chart shows the pattern for the back of the head, starting at row 4, after the stitches have been redistributed.
-
 Step 3
Knitting the Legs
Lift the two sets of 6 stitches left for each leg from the stitch holders and distribute equally on to a set of four needles.
Round 1–4: Join into a round and knit four rounds [12 sts]. These four rounds form the joint and should not be stuffed with wadding. Round 5: * K1, inc1, k4, inc1, k1 *, repeat from * to * once more [16 sts]. Round 6 onwards: Knit in rounds until the desired length is reached. Pull the starting yarn slightly before finishing off, so that the stitches of the joining rows pull together a bit, making the stitches look nicer.This chart shows half the stitches for the leg. Repeat the stitches once on each round.
-
 Step 4
Knitting the Feet
For each foot, just continue knitting on after each leg.
Round 1: K4, inc1, k8, inc1, k4 [4/5/4/5; 18 sts].
Round 2: Knit.
Round 3: K15, transfer the last 3 stitches to a stitch holder. Redistribute the remaining stitches over three needles as follows: Put the last 3 stitches on to needle 1 with the first 2 stitches of needle 1. Arrange the next 5 stitches on needle 2. Put the next
5 stitches on needle 3.
Distribution of stitches: 5/5/5/(+ 3 on stitch holder) [18 sts]. Work in stocking stitch.
Row 4: * K1, inc1 *, repeat from * to * three more times, k1. Repeat on needles 2 and 3 [27 sts + 3 left on needle]. Turn work.
Row 5: Slip 1, p26. Turn work.
Row 6: K9. To shape the feet, k9, turn and p9, turn and k9, looping the yarn around the next stitch each time before you turn to prevent a hole forming. K6 then loop the yarn around the next stitch to avoid a hole. Turn work.
Row 7: P21 then loop the yarn around the next stitch. Turn work. Row 8: K6 then k9, turn and p9, turn and k9, looping the yarn around as before. K9 plus the 3 stitches that you put on the stitch holder in round 3 [30sts]. Close up the work in a round again. Round 9: K3tog, k21, k3tog, k3 stitches [26 sts].
Rounds 10–16: Knit all stitches.
Stuff the leg with wadding, avoiding the joint area.
Stuff the foot with wadding.
Round 17: K2tog thirteen times [13 sts].
Round 18: Knit.
Before pulling together, stuff with some extra wadding, if necessary. Cut off the yarn, pull through the remaining stitches and fasten off. The right and left foot are knitted in the same way.This chart shows the pattern for the standard foot. Stitches shaded purple are not knitted.
-
 Step 5
Knitting the Arms
Knit each arm for 15 rounds following these instructions:
Knit in stocking stitch in rounds.
Lift the two sets of 5 stitches reserved for each arm from the stitch holders on to a set of needles.
Distribution of stitches: 3/2/3/2 [10 sts].
Rounds 1–4: Join into round and knit four rounds [10 sts]. These four rounds form the joint and should not be stuffed with wadding.
Round 5: K2, inc1, k6, inc1, k2 [12 sts].
Round 6 onwards: Knit in rounds until the desired length is reached. Pull the starting yarn slightly before finishing off, so that the stitches of the joining rows pull together a bit, making the stitches look nicer.
Rounds 2–6: Knit.
Stuff the arm with wadding, avoiding stuffing in the area of the joint. Stuff the hand with wadding.
Round 7: K2tog, k7, k2tog twice, k7, k2tog [18 sts].
Round 8: K2tog, k5, k2tog twice, k5, k2tog [14 sts].
Round 9: K2tog, k3tog, k2tog twice, k3tog, k2tog [6 sts].
Before pulling together, stuff with some extra wadding, if necessary. Cut off the yarn, pull through the remaining stitches and finish off.This chart shows half the stitches for the arm. Continue each round on the second pair of needles, working the chart in mirror image.
-
 Step 6
Knitting the Hands
Hand with thumb
Begin the hand as follows:
Round 1: * K1, inc1 *, repeat from * to * four more times, k1. Repeat once more from the beginning [22 sts].
Rounds 2–4: Knit.
Stuff the arm with wadding, avoiding stuffing in the area of the joint.This chart shows half the stitches for the hand with a thumb. Continue each round on the second pair of needles, working the chart in mirror image.
-
Step 7
The tail:
The tail is not stuffed with wadding.
Transfer the two sets of 5 stitches left on stitch holders on to a set of needles.
Knit in rounds for about 6cm (21⁄2in) [10 sts].
Next round: K2tog, k8 [9 sts].
Knit for 2cm (3⁄4in).
Next round: K2tog, k7 [8 sts].
Knit for 2cm (3⁄4in).
Next round: K2tog twice, k4 [6 sts].
Next round: Knit.
Cut off the yarn, pull through the remaining stitches and finish off. -
 Step 8
The face:
This face is knitted directly after the back of the head – do not knit the forehead first. The modular approach means that any animal could be given this face. A dog could therefore have this face, rather than a dog’s face. If he is given the dog’s ears and tail, he will still be a dog.
Lift the stitches left on the stitch holders on to a set of needles – you have 9 stitches from the top back of the head plus 17 stitches set aside in round 3 when you knitted the back of the head. These 17 stitches were originally arranged as 4/9/4. Arrange your stitches as 9/4/9/4 [26 sts].
Pick-up round: K9, pick up 8 stitches at the side, knit the remaining 17 stitches, pick up 8 stitches at the side [9/12/9/12;
42 sts].
Start of round: 1st stitch of needle 1. In some rounds, this stitch is knitted together with the last stitch of needle 4 in the previous round. Round 1: Join into a round and knit each stitch [42 sts].
Round 2: Knit to the last stitch (see round 3).
Round 3: Knit together the last stitch of needle 4 with the 1st stitch of needle 1, k7, k2tog, k9, k2tog, k9, k2tog, k9 [9/10/9/10; 38 sts]. Round 4: Knit.
Round 5: K19, k2tog, k5, k2tog, k10 [9/10/7/10; 36 sts].
Round 6: Knit to the last stitch (see round 7).
Round 7: Knit together the last stitch of needle 4 with the 1st stitch of needle 1, k7, k2tog, k7, k2tog, k7, k2tog, k7 [9/8/7/8; 32 sts]. Round 8: Knit to the last stitch (see round 9).
Round 9: Knit together the last stitch of needle 4 with the 1st stitch of needle 1, k7, k2tog, k8, k2tog, k1, k2tog, k8 [9/7/5/7; 28 sts]. Round 10: Knit.
Stuff the body and the head with wadding.
Round 11: K2tog, k5, k2tog, k5, k2tog, k5, k2tog, k5 [7/6/5/6;
24 sts].
Round 12: Knit.
Round 13: K2tog, k3, k2tog, k4, k2tog, k5, k2tog, k4 [5/5/5/5; 20 sts]. Rounds 14–16: Knit.
Round 17: K2tog, k1, k2tog twice, k11, k2tog [3/4/5/4; 16 sts]. Round 18: Knit.
Stuff the nose with wadding.
Round 19: K3, k2tog, k9, k2tog [3/3/5/3; 14 sts].
Round 20: Knit.
Before pulling together, stuff with some extra wadding, if necessary. Cut off the yarn and pull through the remaining stitches.This chart for knitting the mouse face shows all the stitches in the sequence 4th, 1st, 2nd and 3rd needle, read from the right. Start knitting at the round beginning (RB).
-
 Step 9
The left ear:
Knitting ears in the round:
1. Start where you want the top end of the left ear to be and then work outwards as explained here. With the back of the head towards you, use the crochet hook to reach through under a stitch in the stuffed head and pull through a loop of yarn. The first stitch created in this way should be pulled tight again in the same way. For the next stitch, pull a loop through under the next purl stitch in the knitting. Continue until you have picked up the desired number of stitches for half of the ear.
2. Distributethestitchesacrosstwodouble-pointedknittingneedles. 3. To pick up the second half of the stitches (front or inner ear),
turn the animal round so it is facing you. Pick up the next stitches as close to the stitches for the outer ear as possible. Distribute these stitches over two knitting needles as before.
4. Join the round and knit following the instructions for your chosen animal.
5. When picking up stitches for the right ear, start at the side of the head and continue upwards, then pick up the stitches on the head.
6. Pick up the second half of the stitches (front or inner ear), first at the top of the head, then downwards at the side of the head.Pick-up round: With the mouse facing you, pick up 4 stitches on
the top of the head and then 7 stitches at the side. Turn the mouse around and work your way back on the other side, picking up 7 stitches at the side and 4 stitches on the top of the head [22 sts]. Round 1: Join into a round and knit.
Round 2: K1, inc1, k20, inc1, k1 [24 sts].
Round 3: * K1, inc1, k10, inc1, k1 *, repeat from * to * once
more [28 sts].
Round 4: Knit.
Round 5: * K1, inc1, k12, inc1, k1 *, repeat from * to * once
more [32 sts].
Rounds 6–9: Knit.
Round 10: * K2tog, k12, k2tog *, repeat from * to * once more [28 sts].
Round 11: * K2tog, k10, k2tog *, repeat from * to * once more [24 sts]. Round 12: * K2tog, k8, k2tog *, repeat from * to * once more [20 sts]. Round 13: * K2tog, k6, k2tog *, repeat from * to * once more [16 sts]. Round 14: * K2tog, k4, k2tog *, repeat from * to * once more [12 sts]. Then cast off the remaining stitches together.
The right ear:
Pick-up round: With the mouse facing you, pick up 7 stitches at the side of the head and 4 stitches on the top. Turn the mouse around and work your way back on the other side, picking up
4 stitches on the top of the head and 7 stitches at the side.
Knit the right ear in the same way as the left one.
This chart shows half the stitches for Mel’s ear. Continue each round on the second pair of needles, working the chart in mirror image. -
Step 10
Embroider the eyes in black and the nose in pink.
Embroidering the eyes
For most of the knitted animals, the eyes are about 4–5mm (a scant 1⁄4in) wide and 3–5mm (1⁄8–1⁄4in) high. The width of the eyes corresponds roughly to the width of 1.5–2 knitting stitches, but you can, of course, make the eyes whatever size you like.
Usually the eyes are embroidered with black or brown embroidery thread although the cat, for example (page 84), has green eyes. Work the eyes as follows:
1. Knot the embroidery thread and insert the needle from the
back of the head through to the desired position on the face at the bottom edge of one eye. Make a horizontal stitch the desired width of the eye and bring the needle out just above the start of the first stitch.Embroidering the nose
Embroider the nose with satin stitch as you did for the eyes. Start at the widest point of the nose and work two stitches. Work a pair of narrower stitches, and then work another pair of even narrower stitches until the nose is the desired depth. As with the eyes, you can change the length and number of stitches to suit the animal and your personal preference.