


About
Learn how-to make a mattress stitch on ribbing with The Sheep Shop, Cambridge
This tutorial shows two ways to sew together single ribbing (K1, P1) using mattress stitch: using the running threads between stitches or sewing two halves of two knit columns together. Mattress stitch is an invisible (from the right side) join between the sides of two pieces of knitting. Exactly the same principles can be used to sew double ribbing, you just choose where you want to put the seam line for a seamless-looking join.
If your pattern has added no selvedge stitches, your ribbing will usually either start and end with a knit stitch or one edge will be a knit, the other a purl. Here we will use the running threads to join a knit edge to a purl edge and the knit columns to join a knit edge to a knit edge. You can use either method as you see fit. I find the second method a little easier but the seam is bigger (unless you start and end with a purl). Having two knit stitches on each edge and using the running threads between them is also good.
The yarn used here is Hjertgarn Woolcott, a machine-washable 55% lambswool, 45% cotton DK. It was knitted very loosely in order to make it easier to take pictures.
Tips for mattress stitch
To sew up, use the same yarn as you used for the project unless it is very thick yarn.
Unless it’s just a little seam, do not use a dangling tail in case you need to reknit a bit, you’ll have to unpick the whole seam first. Instead, cut a piece of yarn about twice as long as the length of the seam.
For long pieces, use safety pins or butterfly hairclips to align the garment corners and some key points in the middle.
When your needle gets to one of these markers on one side you should reach it at the other side on the next stitch – if
not, you’ll be ending up with a piece of knitting looking like a shirt with its buttons done up into the wrong button holes. If you do end up a bit skeewiff, do a couple of bars on one side and just one on the other a few times, but spread this out, don’t bunch it all into the next few stitches.
-
 Alex B. favorited Mattress Stitch On Ribbing
18 Apr 08:12
Alex B. favorited Mattress Stitch On Ribbing
18 Apr 08:12
-
 Karen P. favorited Mattress Stitch On Ribbing
09 Feb 06:09
Karen P. favorited Mattress Stitch On Ribbing
09 Feb 06:09
-
 Elentine added Mattress Stitch On Ribbing to Yarncrafts
16 Feb 18:39
Elentine added Mattress Stitch On Ribbing to Yarncrafts
16 Feb 18:39
-
 Shop Showcase published her project Mattress Stitch On Ribbing
23 Jan 17:35
Shop Showcase published her project Mattress Stitch On Ribbing
23 Jan 17:35
You Will Need
-
 Step 1
Running thread join
Running threads are the pieces of yarn which connect a stitch to its neighbour. You can think of a stitch as a horseshoe with the open bit at the bottom. For a knit stitch, the top of the horseshoe (the stitch head) is slanted to the back and you can clearly see its legs facing you. For a purl stitch you can see the stitch head but the legs are on the other side of the work. For the running thread join you simply sew under a running thread on one piece of knitting then sew under a running thread on the other piece, working your way steadily upwards.Please insert pictures rt1 – rt8
-
 Step 2
First you need to secure your yarn with a figure of eight join. With right sides up, bring the needle up from back to front by the bottom corner stitch on the left side piece of knitting, then reach around the back and come up through the same hole. The yarn is now secured to one piece of knitting. Leave a long enough tail that you can weave it in later.
-
 Step 3
Now bring the needle up from back to front by the bottom corner stitch on the right piece of knitting. Now up again through the same hole on the left piece. See the figure of eight?
-
 Step 4
With RS up, pass the needle under the first two running threads on the right hand piece (you put the needle in where it came out before). Your needle stays at the front of the work, you never need to pass it all the way through the knitting.
-
 Step 5
Then pass the needle under the first two running threads on the left hand piece. Put the needle back where it came out on the right side and pass under another two bars. Put the needle back where it came out on the left side and pass under another two bars. Keep repeating this.
-
 Step 6
After a couple of inches, pull the thread taut and the sides will zip up together seamlessly (pull it back if it gets too tight).
-
 Step 7
When you've sewn under the last running bars on the right side and the left side, and pulled taut your yarn, you'll probably find it looks a bit scruffy. Now you do put your needle all the way through your knitting. If you'e done the last running bar on the left, put your needle back where it came out on the right and sew all the way through.
-
 Step 8
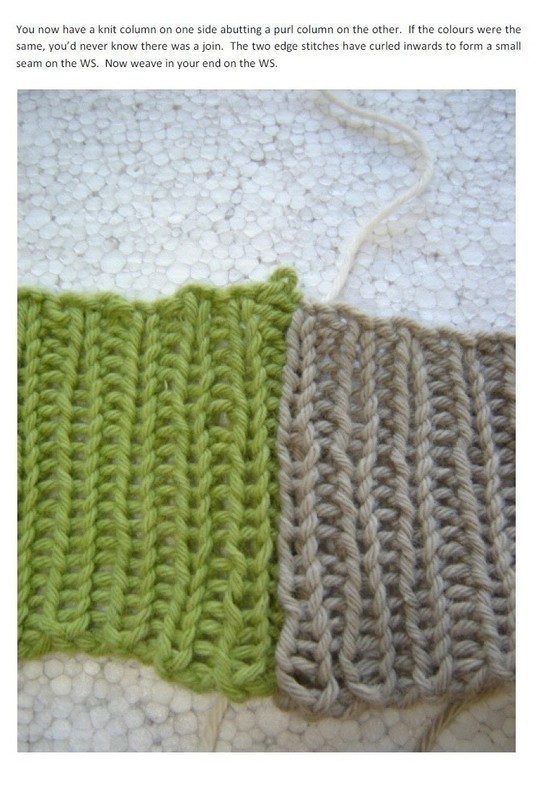
You now have a knit column on one side abutting a purl column on the other. If the colours were the same, you'd never know there was a join. The two edge stitches have curled inward to form a small seam on the WS. Now weave in your ends on the WS.
-
Step 9
Joining knit columns
Here a knit stitch edge is being joined to a knit stitch edge. You could use the running thread join above, this will give a small seam on the inside as there will be one stitch from each side. If you join knit columns instead, you can either work up the very edge stitches to give a very small seam on the inside but it can be tricky to do and look sloppy. Easier is to work up the knit columns one further in, though you will get a big seam on the inside. -
 Step 10
Start by securing your yarn to the left hand piece and making a figure of eight join. You don't want to work one stitch in - this time your needle comes out in the centre of the bottommost stitches of the knit columns you will be sewing together.
-
 Step 11
With RS up, pass the needle under the first two stitch heads on the right hand piece. Your needle stays at the front of the work, again you never needs to pass it all the way through the knitting.
-
 Step 12
Put your needle back where it came from on the left piece and pick up two stitch heads on that side. Then back to where your yarn comes out on the right... exactly as before just you are working within the column of knit stitches instead of the running threads which join them.
-
 Step 13
When you get to the top, sew through all the way same as before and weave in your end on the WS.
-
 Step 14
You now have a neat seam on the RS and a bigger seam on the WS.


 1
Watercolor Art »
Watercolor Paints Made From Make Up
1
Watercolor Art »
Watercolor Paints Made From Make Up


