


About
A super cute and fun convertible dress.
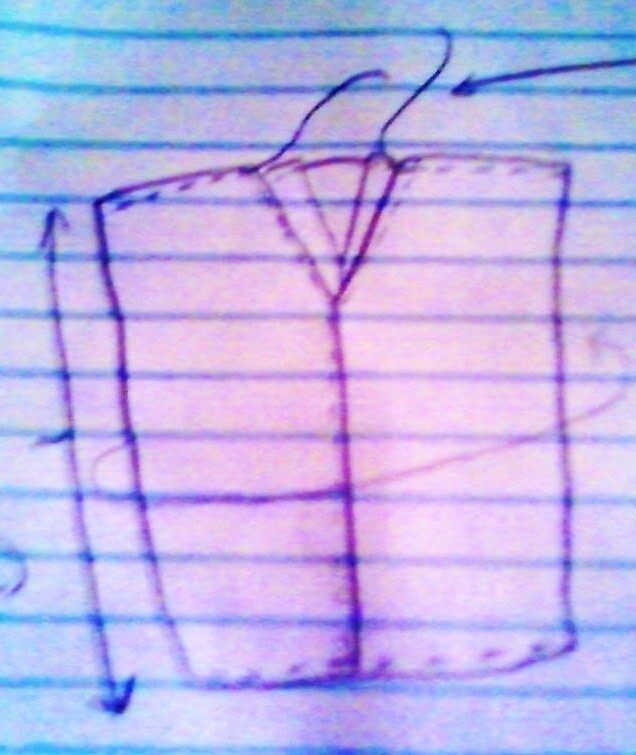
It's been "how-to"-ed before, but I couldn't get a clear picture of what other how-tos were saying. So I studied them, and the original dress, and made up my own pattern. I hope the picture of my pattern helps, and if you have any questions, please ask me! Good luck, and have fun with the ribbon and fabric you choose!
-
 mmrydawn favorited Le Sac Dress!
06 Sep 02:51
mmrydawn favorited Le Sac Dress!
06 Sep 02:51
-
 Eva.Sugai favorited Le Sac Dress!
24 Mar 03:16
Eva.Sugai favorited Le Sac Dress!
24 Mar 03:16
You Will Need
-
 Step 1
Measure your fabric to fit your hips, with about 2 inches for seam allowance. Since the strings let you cinch the top of the dress, it is only important that the dress be large enough to go around your hips. (Mine are quite wide...)
-
 Step 2
Cut the fabric to the length you wish your dress to be, with about 1.5" allowance on each end for hems. I chose knee length, so that I could wear it in the hot Florida summertime.
-
 Step 3
Lay your fabric inside out, and fold it in half, creating the actual dress shape. Measure approximately 7" down on each side, and mark it. On the folded side, you will need to cut down the fold until this mark. This creates the "V"s of the dress.
-
 Step 4
Hem the top and bottom of your dress to prevent fraying. Fold the dress in half again and sew it together, leaving the 7" gap open.
-
 Step 5
Sew hems on both sides of this gap, and then stitch across the bottom of the gap to keep it from fraying/tearing.
-
 Step 6
Almost there! At the top of your dress (where the "V"s open), fold the hems indie and sew them so as to create the space for your ribbon to thread through.
-
 Step 7
Using a safety pin, thread your ribbon through this seam at the top of the dress. As in the picture, one "V" will have a loop of ribbon, and the other will have the loose ends. I tied knots in the ends of my ribbon to keep them from slipping through, but the length of your ribbon will probably prevent that anyway.
-
 Step 8
Yay! Your very own Le Sac dress is finished! Have fun experimenting with ways to tie it, and please let me know if you figure out a cool way to wear it!


 1
Watercolor Art »
Watercolor Paints Made From Make Up
1
Watercolor Art »
Watercolor Paints Made From Make Up
