Intaglio Printing
Extract from The Encyclopedia of Printmaking Techniques • By Judy Martin • Published by Search Press


About
The Encyclopedia of Printmaking Techniques
■ PREPARING PAPER
■ INKING AND WIPING
■ TAKING THE PRINT
■ COLOUR PRINTING
The method of printing from an intaglio plate is essentially the same for all processes – drypoint, mezzotint and etching. Unlike block printing or lithography, when it is strictly surface contact that forms the impression, the pressure of printing must force the paper into the intaglio to pick up an even impression from marks as varied as fine creviced lines, delicate aquatinting and deep, open bite. The way the paper is pushed into the lines and sunken areas in the plate produces an embossed effect that adds an extra dimension
to the print.
A flat-bed press is used, consisting of a heavy metal bed that passes between two large rollers. Studio presses are usually very heavy and work on a gearing system that makes it easier to move the weight of the bed, operated by turning a large wheel at one side. The space between the rollers can be varied to alter the pressure. Soft felt blankets, which cushion the rollers and spread the pressure evenly, are used to cover the plate and bed before they are pressed through the rollers.
-
 Crafterella featured Intaglio Printing
20 Dec 23:00
Crafterella featured Intaglio Printing
20 Dec 23:00
-
 DarkLady1993 published her project Intaglio Printing
12 Dec 09:00
DarkLady1993 published her project Intaglio Printing
12 Dec 09:00
You Will Need
-
 Step 1
Preparing paper
Intaglio plates are printed on damp paper, which gives more flexibility for pressing into the intaglio without the paper splitting or failing to pick up all the ink. The paper is prepared beforehand by soaking in clean water. It is then drained and blotted, interleaved with blotting paper, pressed between boards, and left until needed.
High-quality watercolour papers are often chosen for intaglio printing, particularly hand-made or mould-made papers with deckle edges which look good when framed without a mount. It is important that the weight and texture of the paper suits the style and complexity of the image, so that fine marks are picked up accurately where appropriate and the qualities of the print do not compete with that of the printing surface.Preparing paper
Put the paper to soak in a bath of clean water. The amount of time it needs to soak depends on the weight and texture of the paper – it must become fully damp right through the fibres.
-
 Step 2
Lift the paper from the water bath and let it drain. Lay it on a sheet of blotting paper and cover it with a second sheet. You can build up a stack of paper layers in this way. Lay a board on top to press it so the paper sheets remain flat and moist.
-
 Step 3
Inking and wiping
Before you start to take a print, make sure the plate is completely clean and free of any traces of ground or varnish. Check that the edges are cleanly bevelled; if they have been damaged during the etching process, file them smooth again.
The inking process requires a heavy first application of ink, which must be rubbed well into the plate so that it is pushed into all the intaglio marks. The plate is then wiped carefully and thoroughly to take off all surplus colour. This is easiest to do if the plate is warmed slightly on a hotplate, but heating is not always essential. It is important that there is no ‘loose’ ink left on the surface after wiping, as this will prevent the true tones of the intaglio being seen, and make it impossible to produce identical prints.
Although ready mixed inks are available, many printmakers like to mix up inks from powder pigments and copperplate oil. Selecting particular types of pigments, even different kinds of black, gives them control over the tones and colours of the print as well as the consistency of the ink, which can vary from a rich liquid to a thick paste.
The ink can be applied with a ready-made dabber or simply with a pad of coarse muslin, called scrim or tarlatan. The same muslin is used for wiping, with a slightly finer fabric sometimes chosen for later stages. The final wipe, which polishes the white areas and cleans the pale tones, is done with the heel of the hand, dusted with French chalk, or with pieces of tissue rubbed flatly over the metal surface. Drypoint plates are not hand-wiped, because the burred texture is abrasive.Mixing ink
Use a broad palette knife to lay a heap of powder pigment on the mixing slab. Make a depression in the centre and pour in a small pool of copperplate oil.
-
 Step 4
Push the pigment into the oil from all sides and start to work it into a paste, alternately pressing and lifting the mixture with the knife. Continue until the ink has a smooth consistency. The amount of oil you add determines whether it is stiff or fluid.
-
 Step 5
Inking the plate
Let the clean etching plate warm through on the hotplate. Twist a small piece of wiping canvas (scrim) to make a dabber – a little firm pad with a ‘stalk’ that you can hold it by. Pick up ink on the pad and dab it onto the plate.
-
 Step 6
Work the ink into the intaglio all over the plate surface. Use a generous amount of colour, and push it firmly into any deep lines and heavily bitten areas.
-
 Step 7
Fold a large piece of wiping canvas into a pad and briskly wipe the surface to remove excess ink. Keep the pad travelling flatly across the plate to clean the smoother textures and lighter tones – do not dig the ink out of the deep intaglio.
-
 Step 8
When you can see the design clearly, continue wiping with a clean piece of canvas, working lightly and consistently so no obvious smears of ink are left on the surface. To polish the light tones and obtain a clean tonal range from the aquatint areas, go over the plate with a piece of tissue. Spread your fingers flatly on the tissue and rub with a circular motion.
-
 Step 9
Taking the print
This process is very simple. The plate is positioned on the flat bed of the press and the damp paper laid over the top. The felt blankets are spread over them, between two and five layers, with a lightweight felt next to the plate and a heavy, napped blanket next to the press roller. The handle of the press is turned to run the bed between the rollers.
To make sure that the impression is taken square on the paper, with even borders, you can lay a base sheet of paper on the bed of the press with the outline of the plate marked on it. When the printing paper is placed on the plate, the edges can be aligned to the base sheet, working from one corner. Alternatively, you can stick masking-tape guides for both plate and paper onto the bed of the press.Taking a print
Make sure the blankets are in place on the press, fed in under the roller but turned back so the bed of the press is clear. Lay the inked plate on a clean sheet of paper on the bed.
-
 Step 10
Turn back the board on the paper stack and lift out one sheet of damp paper. To keep the edges clean, hold it between small paper folds.
-
 Step 11
Position one corner of the paper on the press in relation to the inked plate. Gently lower the paper and smooth it down on the plate.
-
 Step 12
Pull the blankets down onto the bed of the press one by one, smoothing them carefully in place over the plate and paper.
-
 Step 13
Turn the handle of the press to pass the bed between the rollers. It should turn easily, though a slightly greater effort is required as the thickness of the plate moves through, as the pressure of the rollers does need to be quite heavy.
-
 Step 14
Take the bed through far enough to release both the plate and printing paper from beneath the rollers. Turn back the blankets and peel the print up gently from one corner.
-
 Step 15
The finished print is the example shown.
-
 Step 16
Colour printing
There are several ways of introducing colour into an intaglio printing, even when you are working on only one plate. One method is to ink up the intaglio in one colour, usually black or a dark colour such as blue or sepia, then use a roller to lay down a flat coating of a second colour over the plate surface. Any areas required to print white can be masked off with paper before the colour roll-up.
You can also ink the intaglio in more than one colour, using separate dabbers for different parts of the plate. This is not absolutely precise, as colour areas will merge or overlap slightly in the process of inking and wiping, but it can produce very expressive and atmospheric results.
A more laborious method, which keeps colour areas quite separate, involves cutting up the plate and inking each piece individually. When you come to print, the pieces are then reassembled like a jigsaw on the bed of the press. The disadvantage is that you are likely to see white lines between the cut pieces on the final impression.
Alternatively, you can overprint separate plates, each representing a different part of the design and inked in different colours. This approach needs careful planning, and you have to register the images accurately, both when preparing the plates and when printing.Inking in two colours
Warm the clean plate on the hotplate. Make a clean dabber out of wiping canvas and apply your first colour to the appropriate areas. Wipe off the excess.
-
 Step 17
Apply the second colour to the required areas of the plate and wipe off the excess. Wipe again with clean canvas, then finish with tissue as you did before.
-
Step 18
You cannot get hard edges to the colour areas working in this way, but both colours appear distinctly, with a gentle transition of mixed tone between them.
-
 Step 19
Anja Percival
Dusk Light IV (ETCHING)
Drawing with a wax crayon on aquatint results in subtle tonal differences within the artist’s imagery. During the printing process ink is applied to the plate in a painterly fashion that allows the artist to vary density and colour in such a way as to exaggerate the effect of the etched image. -
 Step 20
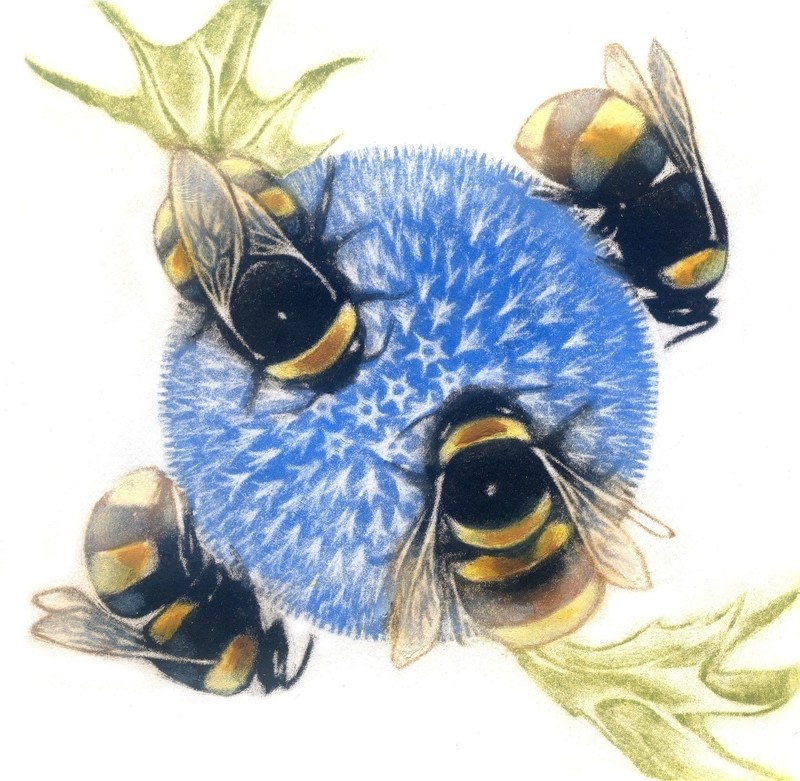
LOUISE BIRD
Bumblebees on Echinops (mezzotint)
Inspired by observing foraging bumblebees, this mezzotint uses the technique of selectively burnishing areas of the plate to create a range of tones to form the image. The plate is then carefully inked, applying colours individually to different areas of the plate. The final result comes from a single print, with only a small amount of colour application to highlight the bees, post printing.