Industrial Dog Bed
Extract from DIY Industrial Pipe Furniture and Decor • By James Angus • Published by Ulysses Press

About
DIY Industrial Pipe Furniture and Decor
The picture of her made me smile. Her personality just beamed through my monitor. She was standing on someone’s bed (one of my biggest pet peeves about dogs), with a big foam ball in her mouth. Her head was cocked, her good ear straight up in the air and the other flopping down, and she was looking right at the camera. I knew it was because the photographer had just called her name: Harley Davidson. Such a perfect name.
She was only a 20-minute drive from our house, and we made arrangements to “just meet” her that afternoon. We knew in that instant she was the one.
We brought Harley Davidson home with us, and we made her this industrial dog bed. So she would have a forever home, and a bed of her own.
Tags
© 2024 James Angus / Ulysses Press · Reproduced with permission.
-
 Sandi G. favorited Industrial Dog Bed
23 Jan 19:12
Sandi G. favorited Industrial Dog Bed
23 Jan 19:12
-
 kzack408 favorited Industrial Dog Bed
22 Jan 23:34
kzack408 favorited Industrial Dog Bed
22 Jan 23:34
-
 Natalie A. favorited Industrial Dog Bed
22 Jan 20:56
Natalie A. favorited Industrial Dog Bed
22 Jan 20:56
-
 Shawnshawn D. favorited Industrial Dog Bed
22 Jan 20:03
Shawnshawn D. favorited Industrial Dog Bed
22 Jan 20:03
-
 Spanky H. favorited Industrial Dog Bed
22 Jan 11:05
Spanky H. favorited Industrial Dog Bed
22 Jan 11:05
-
 Crafterella featured Industrial Dog Bed
18 Jan 23:00
Crafterella featured Industrial Dog Bed
18 Jan 23:00
-
 DeadGirl favorited Industrial Dog Bed
18 Jan 00:40
DeadGirl favorited Industrial Dog Bed
18 Jan 00:40
-
 Elena B. favorited Industrial Dog Bed
12 Jan 21:12
Elena B. favorited Industrial Dog Bed
12 Jan 21:12
-
 Ulysses Press published her project Industrial Dog Bed
11 Jan 09:00
Ulysses Press published her project Industrial Dog Bed
11 Jan 09:00
You Will Need
-
 Step 1
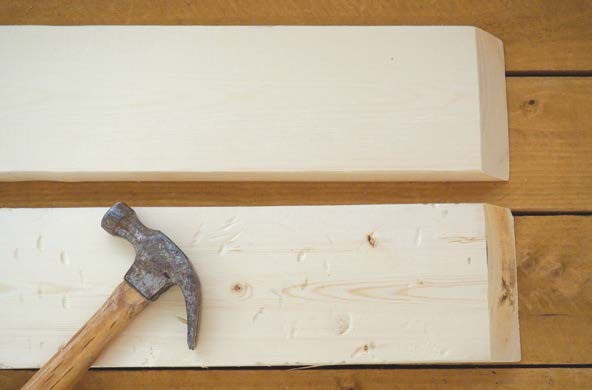
For a reclaimed wood look, beat the four 2 x 6 sides with a chain, hammer, small crowbar, anything that will mar the surface. I find the chain works best. There isn’t possibly a wrong way to do this, so really take some frustrations out on the wood. Be as random as you can with the marks and careful not to crush the mitered edges.
-
 Step 2
See the difference that “damaging” the wood a little can make?
-
 Step 3
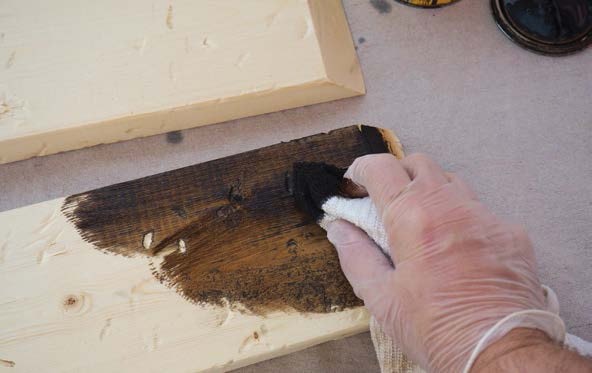
Stain the wood pieces with your choice of stain. I used a dark, rich Minwax Jacobean. Simply wipe it on with a clean cotton cloth. Be sure to protect your hands with rubber gloves. The dark stain will settle into the grooves and rough spots, making them even more visible. This is exactly what you want it to do.
-
 Step 4
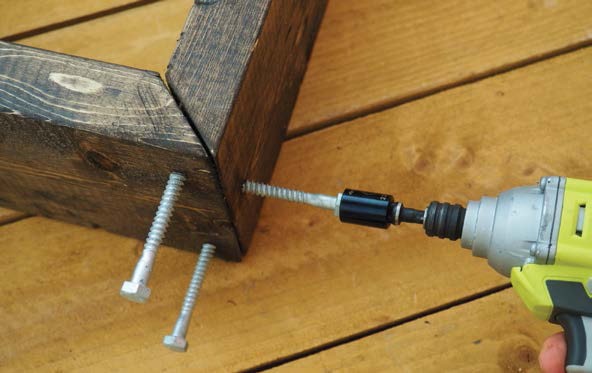
After the stain has completely dried, drill pilot holes into the sides of the 2 x 6s for the lag screws with a 1⁄4-inch drill bit.
-
 Step 5
The front and back boards get two holes on each end, close to the top and bottom. The side boards get one hole at each end, directly in the middle.
-
 Step 6
TIP: To miter or not to miter? Cutting the boards at a 45-degree angle is called “mitering” and requires a little more time and patience. It’s not necessary, but your finished dog bed will look much more professional if you do.
-
 Step 7
So give it a try. If you decide to do flat edges, change the length of the smaller boards from 27 inches long to 24 inches.
-
 Step 8
With a hex socket bit attached to the cordless drill, screw in the lag screws to connect all four sides of the box. When you connect the four sides, the lag screws will overlap each other. Your wood seams at the corners don’t need to be perfect. In fact, slightly imperfect will only enhance the rustic character of the bed.
-
 Step 9
Attach the corner braces to the inside of the box with the 1-inch screws included in the pack.
-
 Step 10
These should be as close to the bottom as they will go. Of course they hold the bottom of the bed in place, but they’ll also help strengthen the box.
-
 Step 11
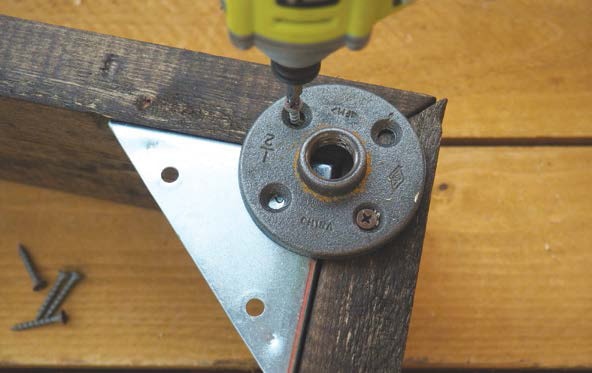
Add a flange in each corner of the under- side of the box for the feet. Adjust the flange so that three of the holes line up with wood, and attach with drywall screws.
-
 Step 12
Twist a 3-inch-long pipe into each flange.
-
 Step 13
Top each 3-inch-long pipe with another flange.
-
 Step 14
Cover each of these flanges with a 3-inch-round self-adhesive felt pad to keep the bed from scratching your floors. If you don’t have hardwood floors, you can proba- bly skip the pads.
-
 Step 15
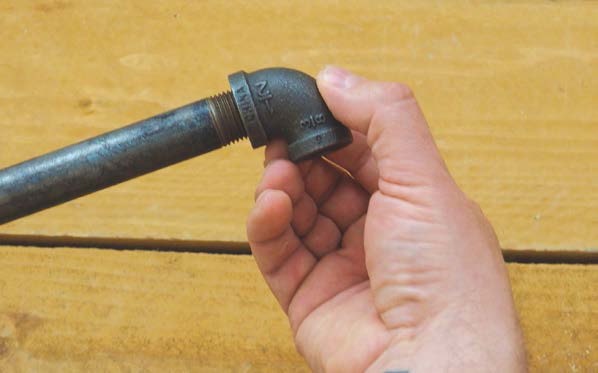
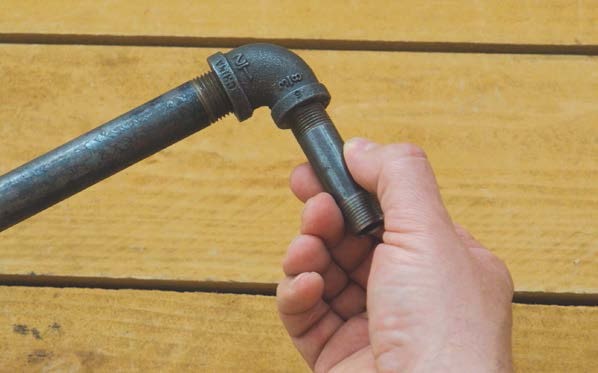
To make the side rails, add a reducing elbow to each end of the 18-inch-long pipes.
-
 Step 16
To the open end of the elbows, twist on the 21⁄2-inch-long pipes.
-
 Step 17
...
-
 Step 18
Place the rails where you think they need to be in the center of the sides of the box, and give each end a good whack with a rubber mallet.
-
 Step 19
Don’t be gentle. It will leave a little round mark from the pipe.
-
 Step 20
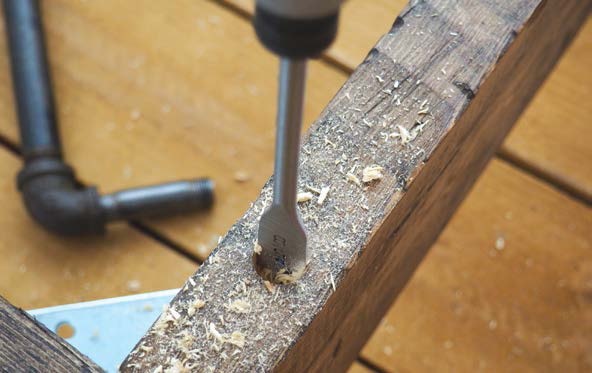
With a cordless drill fitted with a 5⁄8-inch paddle bit, drill out a hole about an inch deep.
-
Step 21
Place the railing back over the freshly drilled holes and give it a couple good pounds with a rubber mallet to drive the pipes into the holes. These aren’t really handles, they are more of just a decorative railing.
-
 Step 22
Place the plywood bottom into the finished box resting on the corner brackets. There’s really no need to stain it, unless you’re a perfectionist, because it won’t be seen.
-
 Step 23
Any blanket will work, but I prefer the look of Mexican serape blankets. Wrap the blanket around the foam piece, folding the edges just like you would wrap a pres- ent.
-
 Step 24
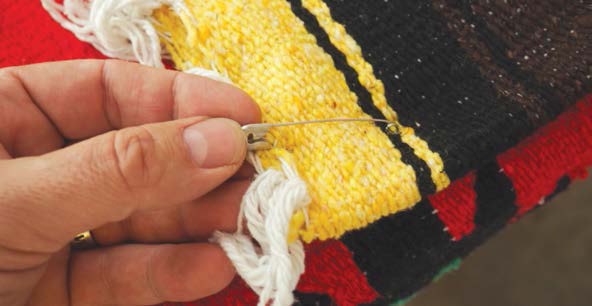
Hopefully you will want to wash this occasionally so just secure the ends with a few big safety pins so it can be removed easily.
-
 Step 25
Slip the blanket-covered foam into the finished dog bed and prepare yourself for a happy best friend.
I realize that this is a pretty big dog bed,
and not everyone has a moose of a dog like Harley Davidson. (She’s about 80 pounds.) You can easily adjust the dimensions of the bed to fit your size of dog. Or simply adopt a bigger dog like we did.