


About
Give a thrift-store table some new life with decoupage and some paint
This is pretty easy, so I didn't break it out into steps visually...but any questions, ask away!
Now, I happen to be a graphic designer so I have tons of images in digital format on my computer that I have collected—most of the art used on this table were printouts of those images, along with postcards. I also have a coffee table I did a Picasso theme, clipping Picasso paintings from a book of his art. I'll share that with you soon.
If you have an inkjet printer and want to use this method‚ PLEASE be sure to spray the clipped out images with an acrylic coat or workable fixative will work also. Otherwise, the ink will run when you get to the topcoat stage...(I learned this the hard way!)
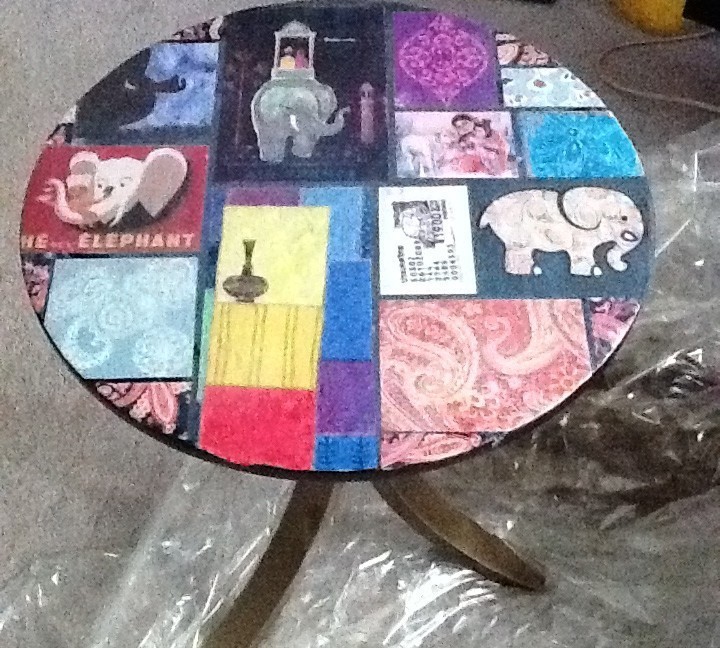
So, the first image is my layout (one of many tries, and actually the fun part!) I try to vary the horizontal/vertical images and not group up similar colors, but sometimes that actually works, it's all up to you.
It's helpful if you can snap a pic once you've got a masterpiece layout! Otherwise, one wag of a doggy tail and your idea could be blown a scatter :)
Tags
-
 Sarah Sylvia S. favorited India Inspired Decoupage Side Table
23 Jul 09:24
Sarah Sylvia S. favorited India Inspired Decoupage Side Table
23 Jul 09:24
You Will Need
-
Step 1
Once you're set on your layout, take your first clipping and apply Mod Podge to the back with sponge brush. Place it in it's spot, press firmly, smoothing down corners with your fingers. Give it a minute to set, then smooth with cloth. You will repeat this step until you've pasted down all your pieces.
-
Step 2
Keep an eye out for bubbles under the paper. A few are okay and add character, but you'll want to smooth out edges and bigger bubbles. Once you're happy with the smoothness, let your project sit untouched for about an hour.
-
Step 3
Next you'll want to put a generous coat of Mod Podge over the entire surface, to seal your images. I used a sponge brush, but you can also use a paint brush. I've done both Matte and Gloss and both have awesome results.
-
Step 4
Once the Mod Podge has dried to Clear (it goes on white-ish clear) Take an X-acto or utility knife, and trim the images around your table.
-
Step 5
Now you can apply a 2nd coat of Mod Podge at this point OR a coat of the Triple Thick Acrylic Sealant and let dry for several hours.
I also spray painted the legs on this table to an antique bronze (they were a cheapy wood color)
NOTE: Please make sure you and your guests use coasters on your masterpiece!
Comments


