I'm Stuffed! Fabric Cans
Extract from Simply Sublime Gifts: High-Style, Low-Sew Projects to Make in a Snap • By Jodi Kahn • Published by Potter Craft

About
Sew some fabric food cans.
Finished measurements: soup—2 1/2" x 3 7⁄8" (6.5cm x 10cm); tomatoes—4" x 4 1/2" (10cm x 11.5cm)
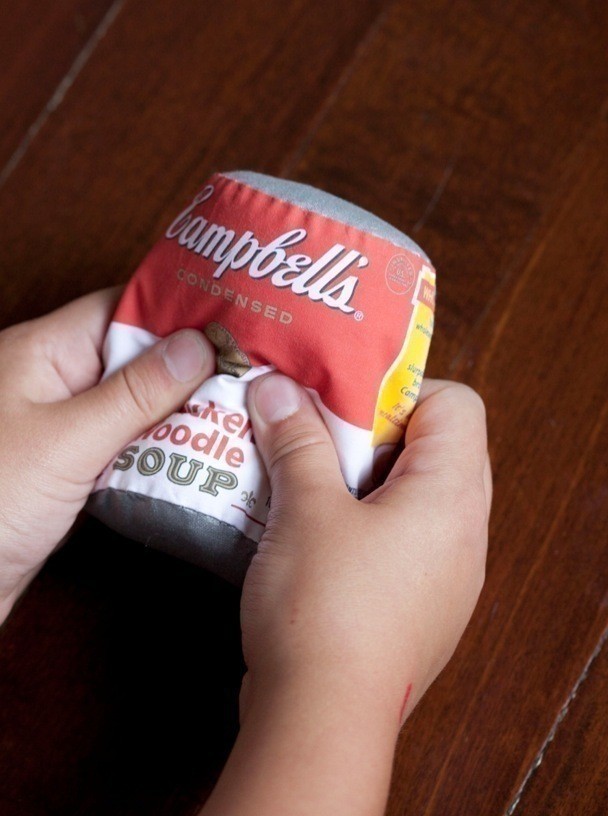
These “stuffed” food cans are a twist on ordinary children’s building blocks, and they’re a big hit with the two-to-five-year-old set! Kids love to play with “real” foods they recognize from Mom’s kitchen, so why not make a soft, safe set of canned goods that are just the right size for little hands to hold? The can fabric is made by scanning real labels and printing them onto printable fabric sheets. Silvery heat-resistant ironing board fabric, available at most fabric stores, mimics the look of the tin tops. The cans are hand-sewn and surprisingly sturdy—perfect for cooking up lots of fun in busy little kitchens.
-
 Ms Dorito added I'm Stuffed! Fabric Cans to Plushie
12 Jun 17:23
Ms Dorito added I'm Stuffed! Fabric Cans to Plushie
12 Jun 17:23
-
 Key West Witch favorited I'm Stuffed! Fabric Cans
08 Oct 08:53
Key West Witch favorited I'm Stuffed! Fabric Cans
08 Oct 08:53
-
 Sabrina Dee Berry favorited I'm Stuffed! Fabric Cans
09 Apr 16:24
Sabrina Dee Berry favorited I'm Stuffed! Fabric Cans
09 Apr 16:24
-
 Roughwaters44 favorited I'm Stuffed! Fabric Cans
08 Jul 03:53
Roughwaters44 favorited I'm Stuffed! Fabric Cans
08 Jul 03:53
-
 kneellock favorited I'm Stuffed! Fabric Cans
08 Mar 07:39
kneellock favorited I'm Stuffed! Fabric Cans
08 Mar 07:39
-
 Sophie L. favorited I'm Stuffed! Fabric Cans
16 Nov 06:23
Sophie L. favorited I'm Stuffed! Fabric Cans
16 Nov 06:23
-
 bemeself favorited I'm Stuffed! Fabric Cans
24 Aug 21:08
bemeself favorited I'm Stuffed! Fabric Cans
24 Aug 21:08
-
 daisy f. favorited I'm Stuffed! Fabric Cans
07 Apr 13:13
daisy f. favorited I'm Stuffed! Fabric Cans
07 Apr 13:13
-
 Vanessa B. added I'm Stuffed! Fabric Cans to Home DIY
23 Mar 16:27
Vanessa B. added I'm Stuffed! Fabric Cans to Home DIY
23 Mar 16:27
-
Shelby W. added I'm Stuffed! Fabric Cans to Craft
30 Jan 03:00
-
Step 1
Carefully remove the label from the can by cutting along the seam with a craft knife. Scan the label and print it out on a scrap of paper first, adjusting it so it is slightly larger than actual size. (You want the label image to be as tall as the whole can, including the rim.) Cut out the sample label and check the size around the real can. The ends should overlap a little when you fold it around; just make sure the height of the label image is as tall as the whole can.
-
 Step 2
Once you’ve got the size you want, lay out the image on your computer with at least 1/2" (13mm) of extra room around the label. (For large cans, you may need to cut the image in half for it to fit on an 8 1/2" x 11" (21.5cm x 28cm) piece of fabric transfer paper.) Print out the image, then cut out the label, adding an extra 1⁄8" (3mm) on the top and the bottom of the image, and 1/4" (6mm) extra on each end.
-
 Step 3
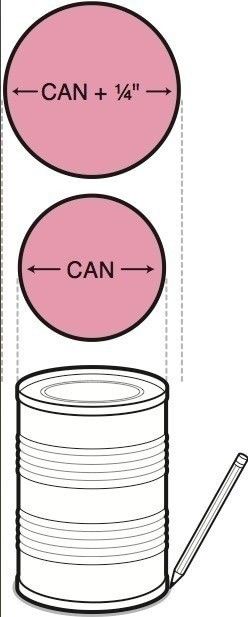
Cut out the top and bottom of the can: Make a pattern for the top and bottom by tracing around the can. Measure across the circle you’ve just traced, then draw a new circle that is 1/4" (6mm) bigger in diameter. Cut out 2 circles from the silver fabric using the new, enlarged circle as your pattern.
-
 Step 4
Assemble the pieces: Before sewing the pieces together, fold over the extra 1/4" (6mm) on the ends of the label fabric, finger pressing the material toward the wrong side of the label. Then, with right sides together, begin sewing the top of the can to the label, carefully lining up the edges and hand-sewing the pieces together using a 1/8" (3mm)
seam allowance. -
 Step 5
Repeat, sewing the bottom of the can to the bottom of the fabric label.
-
Step 6
Turn the can right side out.
-
 Step 7
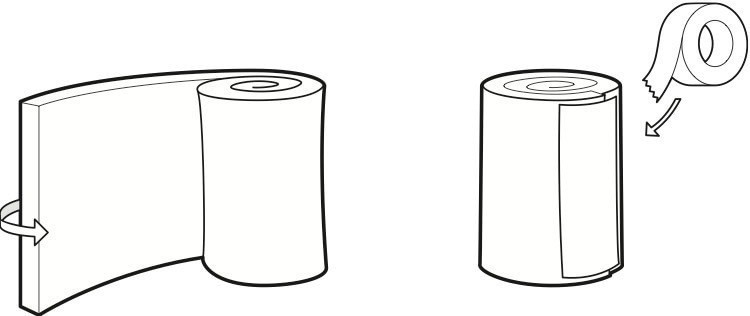
Make the stuffing: Measure the height of your can. Cut a long strip of batting or foam that is as wide as the can is tall. Roll the strip of material so that it is slightly smaller in diameter than the can. Tape the roll closed with a few strips of duct tape.
-
 Step 8
Place the stuffing inside the can and check the fit. Remove the roll, and add more batting if necessary for it to fit snugly inside the fabric can. Cut 2 circles out of batting, the same size as the finished top and bottom of the can, and place them inside the can at each end. Then add the roll of stuffing.
-
 Step 9
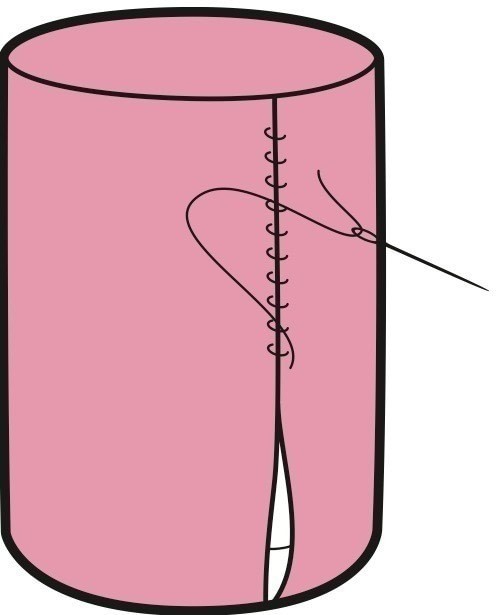
Blind stitch the sides closed using a needle and thread. Tie a knot and trim any loose threads.