


About
This is for all the dragon training vikings out there...
As you may come to notice in future projects, mythical creatures have always been a sort of obsession for me, with dragons being my favorite. So I'm a big fan of the entire How To Train Your Dragon / Dreamworks: Dragons saga. And so when I got a little figurine of Toothless and realized the Berk Dragon Training Academy symbol on a sheild on each side of the package, this idea popped into my head. I got a free pendant out of it along with little Toothless!
So I figured I'd share a tutorial for all the other Dragons fanatics out there
The time is just a general guesstimate. Yes I use the word "guesstimate" since I have a bad sense of how much time is passing without timing it by checking the clock every few minutes.
Tags
-
 Key West Witch added Httyd / Dreamworks: Dragons Dragon Training Academy Pendant to Jewelry
30 Jun 02:03
Key West Witch added Httyd / Dreamworks: Dragons Dragon Training Academy Pendant to Jewelry
30 Jun 02:03
-
 Nix S. favorited Httyd / Dreamworks: Dragons Dragon Training Academy Pendant
16 Apr 02:26
Nix S. favorited Httyd / Dreamworks: Dragons Dragon Training Academy Pendant
16 Apr 02:26
-
 Rainbow Wyvern commented on Httyd / Dreamworks: Dragons Dragon Training Academy Pendant
26 Jan 20:46
Rainbow Wyvern commented on Httyd / Dreamworks: Dragons Dragon Training Academy Pendant
26 Jan 20:46
-
 sqzl commented on Httyd / Dreamworks: Dragons Dragon Training Academy Pendant
19 Jan 02:59
sqzl commented on Httyd / Dreamworks: Dragons Dragon Training Academy Pendant
19 Jan 02:59
-
sqzl favorited Httyd / Dreamworks: Dragons Dragon Training Academy Pendant
19 Jan 02:56
-
 choco s. favorited Httyd / Dreamworks: Dragons Dragon Training Academy Pendant
17 Jan 09:37
choco s. favorited Httyd / Dreamworks: Dragons Dragon Training Academy Pendant
17 Jan 09:37
-
Jenna C. added Httyd / Dreamworks: Dragons Dragon Training Academy Pendant to Jewlery
31 Jul 21:16
-
 Spookachtige replied to a comment on her project Httyd / Dreamworks: Dragons Dragon Training Academy Pendant
28 Jul 14:10
Spookachtige replied to a comment on her project Httyd / Dreamworks: Dragons Dragon Training Academy Pendant
28 Jul 14:10
-
Belle W. favorited Httyd / Dreamworks: Dragons Dragon Training Academy Pendant
05 Jul 12:21
-
 e p. commented on Httyd / Dreamworks: Dragons Dragon Training Academy Pendant
02 Jul 21:33
e p. commented on Httyd / Dreamworks: Dragons Dragon Training Academy Pendant
02 Jul 21:33
-
 Step 1
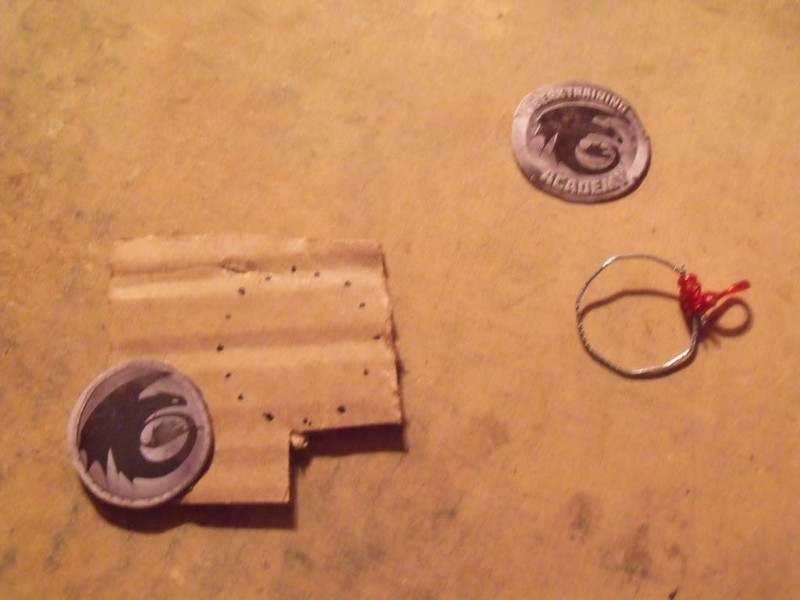
I made mine from the sheild logos on the sides of the case that my little Toothless figurine came in. but this logo could be on any Dragons merchandise, though this tutorial only covers those that had two logos, one on each side. you might have to adapt or make your own back for it if you only have one. or you could make your own logo, use a different dragon class symbol, or other circular design. Whichever you want, this stage is very flexible.
Prepare the logo. Cut both sides out of the thin cardboard and then use them as a sort of guide to cutting the the second layer of thin cardboard. hold one of them to the thin cardboard and carefully mark along the edges of the logo and then cut the thin cardboard along those marks. you'll want to put it on the back of the logo to make it stronger and more durable on the outside. Glue the thin cardboard to the back of the logo and set those aside to dry while you get the rest ready.
-
 Step 2
Then, take the paperclip and bend it into a hoop that would fit inside of the logo's size. Next, you'll have to take your other more easily bent wire and cut off about... uhm.. Two inches or so. I didn't measure it... but whatever you think will be enough to wrap around the joining ends of the paperclip (this will hold the hoop together) and still leave maybe around an inch, more or less, to twist into a hoop for the chain.
-
 Step 3
HELPFUL TIP::: Your flexible wire, once all bent around the ends of the hoop, may end up making your pendant buldge from the top if said wire is too wide or wrapped many times around. This was an annoying accident. To help with this, put the fattest side of the wrapped up clip facing the backside of the pendant and cut out a small bit of the back of the logo so that it will fit perfectly over the buldging spot. Having a spot sticking out could make it harder for the glue to stick.
-
 Step 4
Do the same thing you did with the thin cardboard with the thick cardboard. I suggest using either a small tipped marker or a pen for cleaner marking, and I also suggest using the back side of the logo, that way if your marking gets on it it won't be as obvious.
(Also in this picture, is the completed paperclip hoop.)
Glue the back of the front logo picture onto the thicker cardboard circle and let that dry.
-
 Step 5
Now you'll have to take that paperclip hoop and hold it so that it's positioned in the middle of the thick cardboard circle, mark that so you'll know where to put the TWO inside peices that you will now cut out of the thin cardboard, also using the paperclip hoop to mark a guide.
Each time you mark for these two peices, you mark on the inside of the hoop to make sure it will fit around the new peices. Make sure to cut a straight top to them so that the wrapped wire at the top of the hoop will fit in.
-
Step 6
( My apologies for the lack of a photo for the rest of this project. it was very late and I was getting tired so I guess I forgot to take some. =P )
Now cut the thin cardboard and glue those two together. You can either glue them together first, or as you put them onto the thick cardboard.
put the small peices of thin cardboard in the middle of the thicker cardboard circle, positioned inside of the guide marks you made with the hoop. Let this dry.
-
Step 7
Then rub a thick layer of glue onto the middle peices and position the paperclip hoop around the middle peices, then put glue on the back of the logo cutout and place that on the bare side. now, hold the whole thing together in the very middle gently so you don't crush the cardboard but firmly enough that you won't let anything move around, hold that for a few minutes or so.
-
Step 8
then, with a very small brush, paint the very edges with a very thick coating of black paint. (Or whatever color fits your design best.) this will cover the cardboard so it doesn't look like cardboard and possibly give a little extra hold.
Now you have to let it dry for a couple of hours just to be sure that it's fully dried, the longer it dries untouched the better, the more sure it won't fall apart. you will want to put the side that is connected directly to the little inside peices downward, this may also help to make sure that end dries on firmly.
-
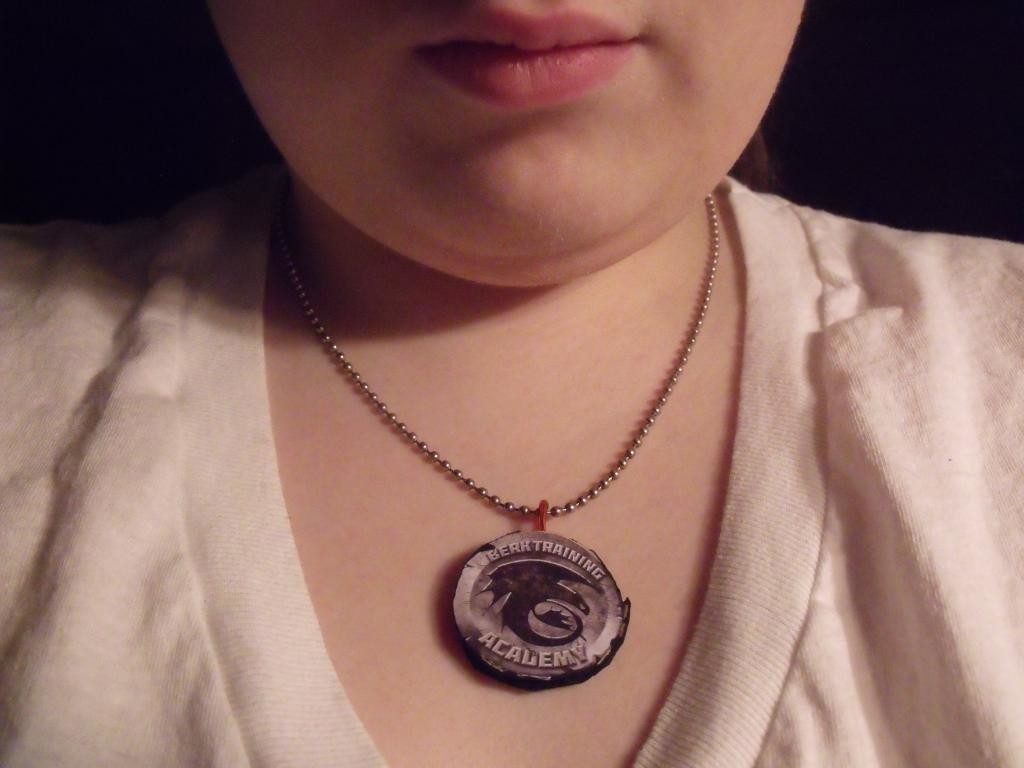
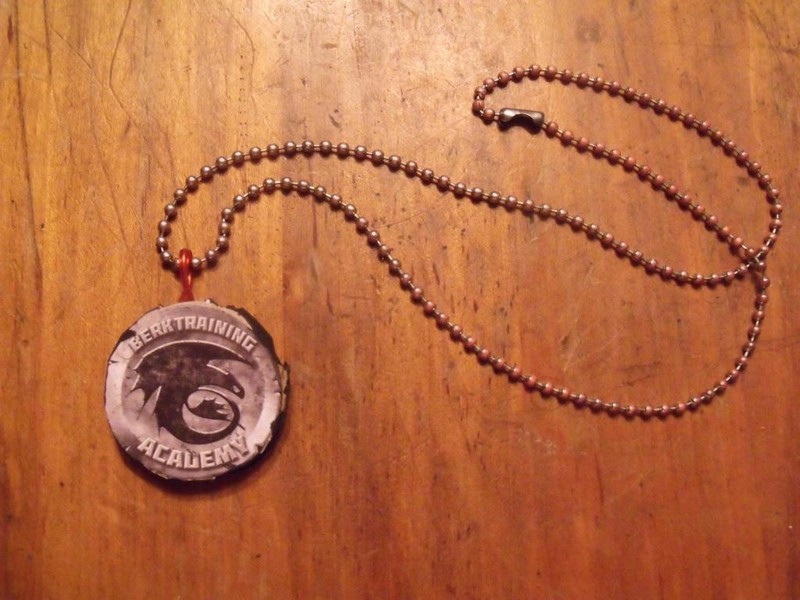
 Step 9
And after it dries, gently make sure it doesn't move, and then, find any chain or string or whatever you want and loop it through the chain loop an there ya have it! You have your very own Berk dragon trainer pendant!


Comments


