


About
Cooked and Smushed just how I like them
One the major design elements in the hair bows I create are the emblems. The metal in each is actually from a bottle cap and there are a few steps that have to be done in order to get them ready for use. The bottle caps bought in bulk from a brewery supply store and have a liner inside which is what creates the seal with the bottle. You can buy bottle caps from craft outlets that already have the liner removed but they are much more expensive. I did a cost analysis and including the shipping to get the bottle caps each cap costs me about $0.05. Also I flatten mine before use. These are the steps that I go through to get them ready for having an image added to them.
Tags
-
 Caden Kaslik favorited How To Prepare And Flatten Bottle Caps For Crafting Projects
25 May 20:29
Caden Kaslik favorited How To Prepare And Flatten Bottle Caps For Crafting Projects
25 May 20:29
-
 Roxyandboys favorited How To Prepare And Flatten Bottle Caps For Crafting Projects
01 Aug 13:12
Roxyandboys favorited How To Prepare And Flatten Bottle Caps For Crafting Projects
01 Aug 13:12
-
 Sarah Sylvia S. favorited How To Prepare And Flatten Bottle Caps For Crafting Projects
23 Jul 03:49
Sarah Sylvia S. favorited How To Prepare And Flatten Bottle Caps For Crafting Projects
23 Jul 03:49
-
 Moira A. favorited How To Prepare And Flatten Bottle Caps For Crafting Projects
22 Feb 10:08
Moira A. favorited How To Prepare And Flatten Bottle Caps For Crafting Projects
22 Feb 10:08
-
 ShortHairedGirl favorited How To Prepare And Flatten Bottle Caps For Crafting Projects
01 Jan 00:27
ShortHairedGirl favorited How To Prepare And Flatten Bottle Caps For Crafting Projects
01 Jan 00:27
-
 Shawnacy added How To Prepare And Flatten Bottle Caps For Crafting Projects to 2016 Projects
30 Dec 20:57
Shawnacy added How To Prepare And Flatten Bottle Caps For Crafting Projects to 2016 Projects
30 Dec 20:57
-
Shawnacy favorited How To Prepare And Flatten Bottle Caps For Crafting Projects
30 Dec 20:56
-
 craftybecker48 favorited How To Prepare And Flatten Bottle Caps For Crafting Projects
28 Oct 02:45
craftybecker48 favorited How To Prepare And Flatten Bottle Caps For Crafting Projects
28 Oct 02:45
-
Arah D. favorited How To Prepare And Flatten Bottle Caps For Crafting Projects
18 Aug 00:22
-
 Mary L. favorited How To Prepare And Flatten Bottle Caps For Crafting Projects
09 Jul 03:37
Mary L. favorited How To Prepare And Flatten Bottle Caps For Crafting Projects
09 Jul 03:37
You Will Need
-
 Step 1
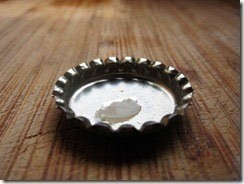
Bottle Cap with the liner. This is how I receive them.
-
 Step 2
Get a pot of water to a good boil and add the bottle caps.
-
 Step 3
The liners have begun to deform as they melt slightly. You can see the edges curling up on this one. You can spot them in the pot doing this and just fish out the ones that are ready. Only take out one or two at a time.
-
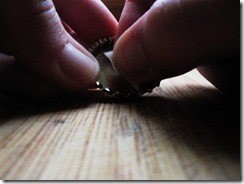
 Step 4
he aluminum will cool very fast after they are pulled them out of the water. I drop them quickly on a towel to remove most of the hot water water and then I just use my fingers to gently pull the liner out.
-
 Step 5
Be quick about it or it'll begin to cool again and you may be left with a small bit in the center that stays stuck.
-
 Step 6
n this case I pull out my Xacto knife and carefully remove this last little piece. If it is being very stubborn I will throw it back into the pot of boiling water.
-
 Step 7
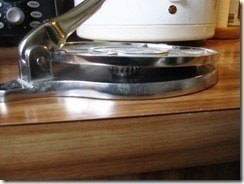
The tool I use to flatten my bottlecaps is a tortilla press. Yep, nothing fancy. I've read of people using all sorts of equipment but this works great for me. I got it off of Amazon for ~$12. I couldn't find any in nearby stores.
-
 Step 8
Put the bottle cap in the press towards the middle and close.
-
 Step 9
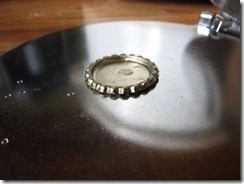
Voila! A cleaned and flattened bottle cap ready for use.


I don't have a tortilla press but I would find
something that'l work.