About
I cannot express the importance of a sloper.
A sloper, or block, is a basic bodice, sleeve, skirt, pant, or dress pattern that is made to fit a particular individual, size, or mannequin exactly and perfectly. It has minimal darts and is usually sewn with muslin or some other light-weight cotton fabric. From this pattern, other patterns can be drafted by slashing and opening, slashing and spreading, slashing and overlapping, or other pattern manipulation techniques (unless the design requires draping, in which case the pattern is made by draping and then trueing). A sloper is also a good tool to use throughout the design process because when patterns are manipulated, shapes can become distorted and it’s a good habit to compare the shapes of the manipulated pattern to the shapes of the sloper pattern so that the original pattern shapes are maintained as much as possible. Throughout the design process, I’m constantly going back to see that the armhole depth/length/shape is as close to my sloper as I can get it. A sloper is also a good tool to use when dealing with commercial patterns – you can compare specs and pattern shapes and adjust the commercial pattern as needed so that it is as close to your sloper as possible.
Below I show you my method, which I have used personally, to draft a sloper. My method differs from a textbook in the amount of ease that is built into the pattern. If a sloper is supposed to be the closest approximation of your body in fabric form, why add 2” of ease at the bust? This is what every textbook I have read suggests. A sloper should be form fitting but also moveable. The amount of ease I build into the sloper pattern gives just enough wiggle room to allow easy movement while still being fitted.
Before I move on to measuring and drafting, I have a foreword. I believe that everyone is capable of drafting a perfect sloper, no matter their size. It’s all about getting the correct measurements from the get-go and meticulous fitting (this method will give you a very good fitting bodice but fine tuning the fit may be necessary to get it to fit perfectly). This stuff is simple for me because I worked with blocks, drafting, and measurements for 2 and 1/2 years when I worked in technical design for this company (I now blog for the brand) but I was in your shoes not too long ago. You can do it. I promise!
-
 Marzia A. added How To Draft A Front Bodice Sloper to sewing
08 Jun 14:25
Marzia A. added How To Draft A Front Bodice Sloper to sewing
08 Jun 14:25
-
 Pimke added How To Draft A Front Bodice Sloper to Nähmuster
01 Feb 09:24
Pimke added How To Draft A Front Bodice Sloper to Nähmuster
01 Feb 09:24
-
 amber t. favorited How To Draft A Front Bodice Sloper
25 Aug 23:59
amber t. favorited How To Draft A Front Bodice Sloper
25 Aug 23:59
-
 Fairywells favorited How To Draft A Front Bodice Sloper
05 Jun 13:25
Fairywells favorited How To Draft A Front Bodice Sloper
05 Jun 13:25
-
arina m. added How To Draft A Front Bodice Sloper to Sewing
27 May 03:34
-
 Amanda S. favorited How To Draft A Front Bodice Sloper
11 May 20:09
Amanda S. favorited How To Draft A Front Bodice Sloper
11 May 20:09
-
 MissCindy favorited How To Draft A Front Bodice Sloper
14 Feb 14:52
MissCindy favorited How To Draft A Front Bodice Sloper
14 Feb 14:52
-
arina m. favorited How To Draft A Front Bodice Sloper
07 Jan 23:17
-
 Sew Petite Gal favorited How To Draft A Front Bodice Sloper
09 Dec 07:56
Sew Petite Gal favorited How To Draft A Front Bodice Sloper
09 Dec 07:56
-
 Miss Monstro favorited How To Draft A Front Bodice Sloper
23 Sep 12:15
Miss Monstro favorited How To Draft A Front Bodice Sloper
23 Sep 12:15
You Will Need
-
 Step 1
First, we need to measure. Just like I cannot express the importance of a sloper, I cannot express the importance of accurate measuring. Ninety-nine percent of the time, reader’s questions are answered by correcting their measurements. It’s not the drafting method that is incorrect – it is their measurements.
The first steps to measuring are determining who will take the measurements and time. I highly recommend that someone measures you but measuring solo is not impossible. If measuring solo, be sure to stand in front of a full length mirror while measuring (so that you ensure the measuring tape is level while measuring). I also highly recommend setting an hour aside to take all of your measurements. Spend one hour to get accurate measurements or spend six hours remeasuring yourself and redrafting your sloper because accurate measuring was not done on the first go.
The second step to measuring is wearing the correct clothing. Wearing only undergarments will yield the most accurate measurements but if someone will be taking your measurements, it is okay to wear workout/exercise clothes such as leggings and a tight tank top. Also, make sure that you wear the same bra while measuring and throughout the sloper fitting process.
Whether you wear undergarments or exercise clothes while measuring, I also highly recommend that you mark your shoulder line, shoulder tip, neckline, bust point, armhole depth, side seam, and waist line with a marker, pen, chalk, or pins. You can eyeball all of these measurements except for shoulder tip, bust point, armhole depth, and waist line, which I will show you how to find below. This will keep measuring points consistent throughout the measuring process.
Stance and breath is also important while measuring. Be sure to stand upright, on a flat surface, with feet slightly apart, and with weight distributed evenly. Also, breath normally while measuring as any large inhales or exhales can distort measurements.
Before taking any measurements, a waistline must be defined. To find the waist line, tie a string, shoelace, tie, or whatever string around your waist – don’t tie it too tight or too loose; tie it just right – and wiggle around to let the string fall to your natural waist.
{FULL LENGTH} shoulder at neck to waist line
{CF (CENTER FRONT) LENGTH} hollow at center front neck to waist line
{SHOULDER TIP} ¼” from the end of shoulder (if you start to raise your arm, a hollow will form at the shoulder joint. This is shoulder tip – approximately)
{SHOULDER LENGTH} shoulder at neck to shoulder tip
{ACROSS SHOULDER} shoulder tip to shoulder tip –
MEASURED on back – and DIVIDED by 2 (across shoulders for both front and back bodice sloper is taken on back){ARMHOLE DEPTH} shoulder tip to armpit (usually ½” to 1” below actual armpit). Using two l-square rulers, arrange rulers as shown in diagram and measure. This measurement is the most often incorrectly measured measurement. Three quarters of the questions I receive are solved by correcting this measurement. Because of this, I suggest to cross check this measurement two ways. One way is to measure the armhole from shoulder tip to bottom of armhole on a very good fitting sleeveless blouse (measure straight and not measure along the curve). Another way to cross check this measurement is to compare it to ‘standard’ measurements. If the ‘standard’ armhole depth for a size 6 is 7 ¼” and armhole grades ¼” per size, use math to find the ‘standard’ armhole depth for your size. Are both of these measurements close to the armhole depth measurement taken on body?)
{BUST DEPTH} shoulder tip to bust point (bust point is the nipple. To find, poke a needle from INSIDE of bra/tank top to OUTSIDE and mark
{BUST SPAN} bust point to bust point, divided by 2
{BUST ARC} CF to bust point to armhole depth/side seam. I do not advise to measure from CF to bust point and then pivot measuring tape up to armhole/side seam because the hollow in between breasts cause the measurement to be larger/bigger, especially if your breasts are very large. In theory, this measurement should be taken from the ‘bridge’ between bust points at CF but this is very hard. So I suggest to measure from bust point to armhole/side seam and then add this measurement to bust span measurement (make sure that bust span measurement is ½ of bust point to bust point)
{SHOULDER SLOPE} CF waist line to shoulder tip. Be sure that to keep measuring tape taut and extend it straight from waist, over bust point, and to shoulder tip
{SIDE SEAM LENGTH} armhole depth to waist line
{WAIST ARC} CF to SS along waist line
{DART PLACEMENT}: bust span less ¾”
Now, let’s start drafting… -
 Step 2
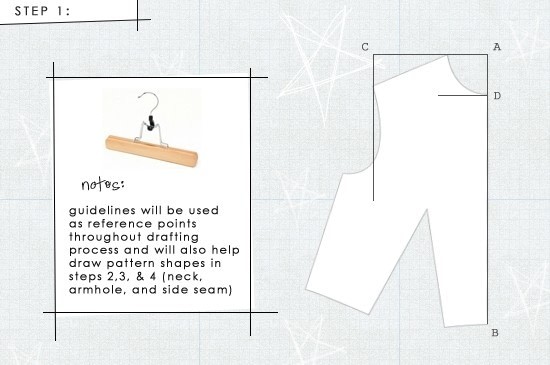
STEP 1:
A-B: Full length
A-C: Square a line out from point A equal to across shoulder
Square a line down from C equal to 10” (this will be a guideline for drawing armhole and side seam)
B-D: CF length minus 3/8”
Square a line out from D equal to 4” (this will be guideline for drawing neck)
-
 Step 3
STEP 2:
B-E: Shoulder slope with E falling somewhere on C guidelineF-E: Shoulder length with F falling somewhere on A-C line
Square a line down from F with line falling somewhere on D guideline and label G (make sure that F-G line is perpendicular to F-E line)
G-H: ½” diagonal line that is at a 45 degree angle between F-G and G-D lines
Using a curved ruler, draw neckline with line passing through points F, H, and D. It is okay if line does not follow
F-G exactly near the intersection of the shoulder seam at neck. Front neckline will connect with back neckline and
it’s more important that the neckline is a smooth curve from CB to CF or vice versa. But it is important that necklines intersects CF at a 90 degree angle.
E-I: Armhole depth
I-J: 2”
Square a line out 5” from I and J (this will be another guideline for drawing armhole and side seam)
E-K: ½ of E-I
Square a line out from K to A-B line and label L
K-M: ½”
E-N: Bust depth (on E-B line)
O-P: Bust span, squared from CF and passing through point N
-
 Step 4
STEP 3:
O-Q: Bust arc. Draw a line from point O to point P, then pivot line upwards to J guideline and mark Q(this is where most people run into problems. O-Q line should pivot upwards and if it doesn’t, two reasons are the cause. The first is the armhole depth. If the armhole depth was measured incorrectly – most overestimate measurement – this will cause line to pivot downwards. If this is the case, carefully remeasure armhole depth and be sure to cross check measurement as described in measuring section. The second has to do with petite vs. normal height. If your torso is petite, then the guidelines need to be reduced to accommodate for a shorter bodice. This drafting method was designed for a person of ‘normal’ height.’ If this is the case, shorten I-J line to be 1”)
P-R: P-Q plus ½” with R falling somewhere on I guideline
R-S: Side seam length with line passing through point Q
-
 Step 5
STEP 4:
B-U: Dart placement squared from BU-V: 3/16” squared down from U
Draw a temporarily line (you may change line later) from S to V
To find point W, subtract B-U from waist arc measurement.
With this measurement, measure from point S on S-V line and mark W
Draw a line from point P to point V
P-X: P-V (it is okay if line extends past point W because left and right dart legs must equal. This is where you may have to change S-V line)
T-Y: 1/8” squared out from T (the diagram does not show this step because drawing 1/8” is very hard to see/draw).
This is the ease added to bust. It may not seem like a lot but 1/8” ease on front and back will give ½” in the roundUsing a curved ruler, draw armhole. First, draw the top of the armhole with curved ruler touching points E and M and then draw the bottom of the armhole with curved ruler touching points M and Y. After, eyeball and true the shape. The armhole should curve slightly inward from shoulder seam to mid-armhole and then scoop to meet the side seam. The armhole should intersect side seam at a 90 degree angle. This will ensure that front armhole transitions well to back armhole and that the base of the armhole is flat. But it is okay if armhole does not intersect shoulder seam at a 90 degree angle. Just like neckline, front armhole will connect with back armhole at the shoulder seam and it is important that it transitions well.
Lastly, true the waistline by folding the dart closed (making sure dart intake is pressed towards CF) and redrawing waistline so that it is a smooth line from side seam to CF. The waistline should intersect side seam and CF at a 90 degree angle.