


About
Sassy Cross Stitch At Your Fingertips!
This is a pattern I designed is available at my shop and super cheap! Ever wanted to learn how to cross stitch, love those sassy and funny little cross-stitchings? Well I am going to show you step by step how to do just that with one of my own patterns for an example!
-
 shari.martin2 added How To Cross Stitch to Cross Stitch patterns
23 Jan 22:28
shari.martin2 added How To Cross Stitch to Cross Stitch patterns
23 Jan 22:28
-
 Alma favorited How To Cross Stitch
07 Jun 10:14
Alma favorited How To Cross Stitch
07 Jun 10:14
-
 Pam added How To Cross Stitch to Curious Kitchen
08 Nov 21:20
Pam added How To Cross Stitch to Curious Kitchen
08 Nov 21:20
-
 KGuzzy10 added How To Cross Stitch to Subversive
12 Dec 01:01
KGuzzy10 added How To Cross Stitch to Subversive
12 Dec 01:01
-
 Alexandria H. favorited How To Cross Stitch
06 Feb 18:08
Alexandria H. favorited How To Cross Stitch
06 Feb 18:08
-
 Bonnie K. favorited How To Cross Stitch
03 Sep 21:16
Bonnie K. favorited How To Cross Stitch
03 Sep 21:16
-
 Diabolic Cupcake favorited How To Cross Stitch
17 May 07:06
Diabolic Cupcake favorited How To Cross Stitch
17 May 07:06
-
 mushroomcrumbs favorited How To Cross Stitch
25 Apr 17:33
mushroomcrumbs favorited How To Cross Stitch
25 Apr 17:33
-
 Coreen R. favorited How To Cross Stitch
15 Mar 18:58
Coreen R. favorited How To Cross Stitch
15 Mar 18:58
-
 Danielle D. favorited How To Cross Stitch
03 Feb 19:58
Danielle D. favorited How To Cross Stitch
03 Feb 19:58
-
 Step 1
First you are going to want to gather your materials. I use 14 ct White Aida, black dmc (#310), a simple black 4x6 frame, pattern available in my shop, and of course don't forget your scissors! Beginners may want to invest in a hoop to hold the fabric in place, I personally don't use them for small pieces like this but I also have some hoops available in my shop for purchase!
-
 Step 2
A little stitchers secret to keep your pieces looking nice and neat is split your six count of thread. I use two strands at a time!
-
 Step 3
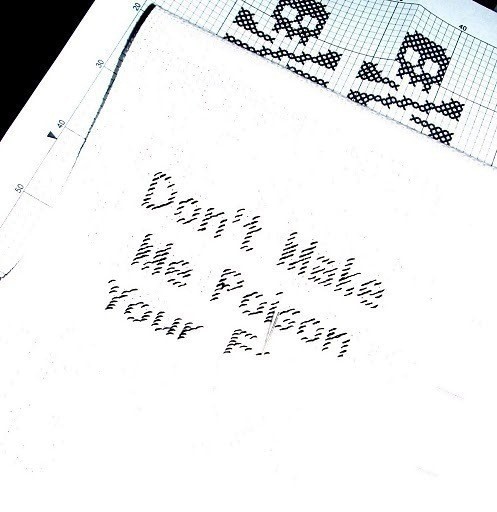
As you can tell in the first picture I start my pieces in the center. It is easy to do because most patterns show arrows on the top and center length of that paper, as you can see in the center of the pattern in the previous picture. Simply fold your fabric in half both ways and you will know your center point of fabric. I stitch half stitches first so if I make a mistake it is easy to remove the stitches
-
 Step 4
As you follow the simple to read pattern, and if you stitch the half stitches like I do, your piece will start to look something like this.
-
 Step 5
Once you have finished the half stitches you will have an idea of what your piece will look like. Great point to make sure it fits the frame you have set aside for the piece, just in case you make a mistake you can always remove the stitches!
-
 Step 6
The next step is easy, you just go back through the pattern x-ing or crossing the half stitches.
-
 Step 7
Your piece should start to come together though out step six.
-
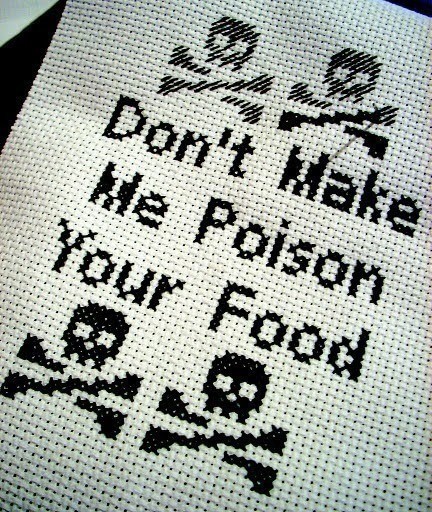
 Step 8
This is what your piece should look like once it is completely stitched!
-
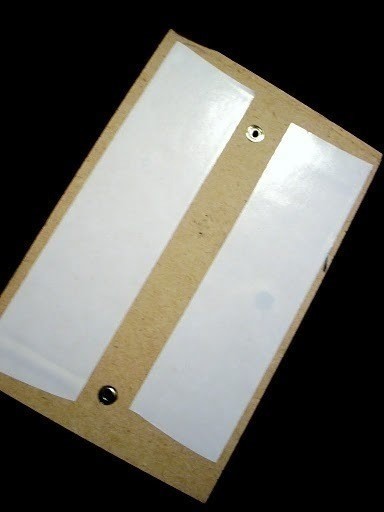
 Step 9
This step isn't mandatory but it helps keep the piece in place. This is double sided tape placed on the inside of the back of the frame.
-
 Step 10
Center piece on the back of the frame and cut and remove any excess aida fabric.
-
 Step 11
The frame should snap right into place and ta-da! You not only have taught yourself how to cross stitch but you have a super cute/awesome cross stitch to hang in your kitchen or apartment :)


Comments


