About
Customized nail wraps made from dried polish!
Nail wraps are all the rage!
With the super-cool designs and easy application, why not make your own with the nailpolish you have laying around?
I will show you the basic technique on how to make these wraps, but you can customize the design to fit your needs and style.
It's a lot easier to make a detailed pattern on a flat surface instead of a curved nail!
-
 Aaliyah D. favorited Homemade Nail Wraps
26 Mar 06:42
Aaliyah D. favorited Homemade Nail Wraps
26 Mar 06:42
-
 craftylilred favorited Homemade Nail Wraps
26 Feb 00:52
craftylilred favorited Homemade Nail Wraps
26 Feb 00:52
-
maham k. favorited Homemade Nail Wraps
15 Jun 05:29
-
 Quiet Lion published her project Homemade Nail Wraps
26 Apr 04:40
Quiet Lion published her project Homemade Nail Wraps
26 Apr 04:40
You Will Need
-
 Step 1
Step 1: Gather materials. Needed are nail polishes, a ziplock bag or laminate report cover, a sharpie, a toothpick, and an xacto knife. You need somewhat of a thick plastic base to paint your decal on, so don't use a flimsy sandwich bag or something....
-
 Step 2
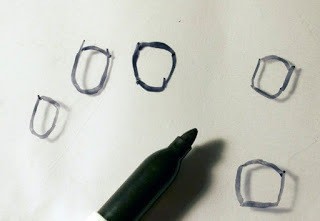
Step 2: Cut a square of the plastic from the bag so you are only working with one plastic piece. Trace an outline of all our nails on one side of the zip-lock bag. Turn the piece over so you will not be painting on top of this Sharpie (it will leech off into your decal and look bad if you paint on the same side).
-
 Step 3
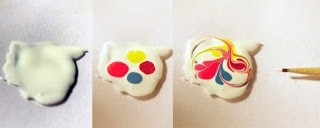
Step 3: Paint a thick layer of paint on one of your outlines. I added four drops of other colors and marbled them with a toothpick. Repeat this for all your nail outlines. Make sure your plastic is lying flat
-
 Step 4
You should have something that looks like this. Let all your paint decals dry for one day.
-
 Step 5
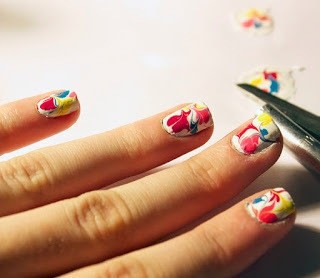
Step 4: Take your xacto knife and trim off any ragged edges so that the plastic is more of a nail shape; slice very gently with the blade so you only cut the nailpolish decal, not the bag underneath. Once you have a decal shape, gently lift off the whole decal, being careful not to rip it; it helps to pry the ends up with your blade. Paint a layer of nailpolish on your nail and when still wet, place the decal on top. Gently burnish the decal to adhere and remove air bubbles.
-
 Step 6
Step 5: Repeat for each nail. If the decals are longer on the edges, you can gently trim with scissors and/or file them to shape the nail. Once they are all totally adhered and the paint beneath has had time to dry, finish with a top coat to totally seal.