Greedy Cat Punch Needle
Extract from The Art of Punch Needle Embroidery • By Suarez, Marie • Published by Search Press


About
The Art of Punch Needle Embroidery
Dimensions
17cm (6¾in) in diameter (embroidered area)
Embroidery preparation
The flat side of the work is the front of the finished project.
Centre and transfer the pattern on Template Sheet B onto the front of the linen fabric, then secure firmly in the hoop.
Prepare the punch needle, adjusting the needle so it extends 1.8cm (¾in) from the handle.
Embroider following the instructions, opposite, working through the diagram in numbered order.
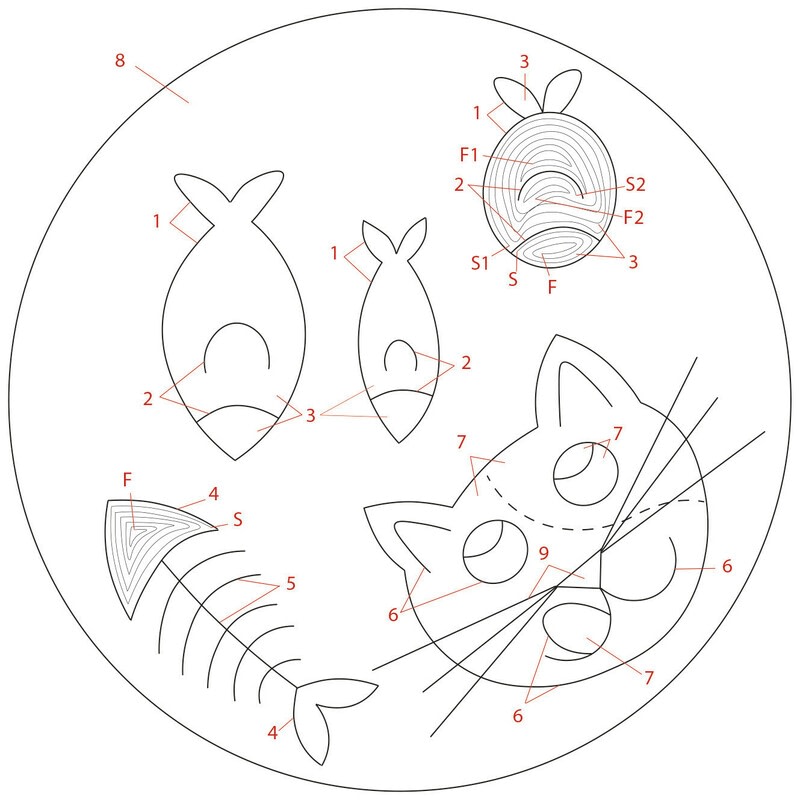
On the annotated embroidery diagram, opposite above, filling stitches are indicated by lighter lines. The direction the filling stitches are worked is marked as follows:
S = point from where you start filling
F = point where you finish filling
If a section of the embroidery requires several rounds of punching to fill in the area, the starting and finishing points on the diagram are marked S1 and F1 for the first round of colour, S2 and F2 for the second round, and so on.
Assembly
Secure the fabric within the hoop. Stitch the ends of the linen twine to the top of the work with the natural-colour linen thread and chenille needle (see also the diagram opposite, below).
Knot the fishes’ tails in accordance with the ‘Tying the Fish’ instructions and diagram, opposite.
Trim any excess fabric around the embroidery, leaving a seam allowance of 3cm (1¼in) all around. Spray the back of the embroidery generously with textile glue. Place the wrong side of the circle of natural cotton fabric on top.
Using a gathering stitch, the strong natural-colour sewing thread and the crewel needle, sew all round the edge of the fabric with a 1cm (½in) seam allowance. Pull on the yarn to gather and tie off firmly.
Pattern on
Template Sheet B
-
 Susu favorited Greedy Cat Punch Needle
14 Jul 18:40
Susu favorited Greedy Cat Punch Needle
14 Jul 18:40
-
 Meghan E. favorited Greedy Cat Punch Needle
16 May 00:42
Meghan E. favorited Greedy Cat Punch Needle
16 May 00:42
-
 Barbara M. favorited Greedy Cat Punch Needle
25 Apr 00:49
Barbara M. favorited Greedy Cat Punch Needle
25 Apr 00:49
-
 Crafterella featured Greedy Cat Punch Needle
20 Apr 23:00
Crafterella featured Greedy Cat Punch Needle
20 Apr 23:00
-
C.J. M. added Greedy Cat Punch Needle to Embroidery
19 Apr 13:08
-
C.J. M. favorited Greedy Cat Punch Needle
19 Apr 13:08
-
 Search Press published her project Greedy Cat Punch Needle
19 Apr 11:24
Search Press published her project Greedy Cat Punch Needle
19 Apr 11:24
You Will Need
-
 Step 1
EMBROIDERY STITCHES
1. For the outline of the fish, embroider a single row of stitches using blue-grey wool/silk yarn for the left and right fish and light maroon alpaca yarn for the centre fish.
2. Embroider two adjacent rows of staggered stitches for the fins and the curved line of the head, again using the blue-grey wool/silk yarn or light-maroon alpaca yarn.
3. Fill the heads, bodies and fins of the fish with adjacent rows of stitches, using pale turquoise or dark sage green wool/silk yarn, or warm orange alpaca yarn.
4. Embroider the outlines of the head and fins for the skeleton then fill them in, using the speckled dark brown yarn.
5. Using the same colour, embroider the spine with two adjacent rows of stitches. For the ribs, embroider two layered rows of stitches.
6. Around the head, the tongue, the eyes and eyelids of the cat, embroider two layered rows of stitches with the speckled dark brown yarn.
7. Fill the cat’s tongue, eyes and head with the following yarns, using adjacent rows of stitches and carefully working around the embroidered elements: ecru alpaca yarn (whites of the eyes), dark brown speckled yarn (pupils), light beige wool/silk and light beige alpaca yarns (face), pink thread/floss (tongue). NB: For the head, first fill the part to the left of the dotted line with the lighter yarn, then the part to the right with the darker yarn.
8. Embroider the background, embroidering the outline partially with speckled dark brown yarn, a smaller ring below this with ecru yarn, then carefully working around the embroidered elements before filling in the whole background with adjacent rows of stitches with the ecru yarn.
9. With the crewel needle and dark brown speckled yarn, embroider a nose by working three straight stitches in a triangle shape. Then, with the same needle and yarn, work six long straight stitches for the whiskers. -
Step 2
TYING THE FISH
Thread a long length of speckled dark brown yarn onto the chenille needle and insert the needle at 1, bringing it back out at 2. Remove the needle and knot the length together, positioning the knot at 3, then tie the ends of the yarn around the cord, at 4. Trim off any excess yarn.
Tie two more lengths around the tails of the two other fish in the same way.
Linen twine
Linen thread