


About
Lets be bestfriends for ever and ever
I hope the instuructions are clear as I am really bad at expaining. If not use the link below which should help.
Its really short but you just have to keep repeating this over and over again untill it gets to the length you want.
Sorry about the dodgy photos-I kind of stood on my camera and now the lens has gone all wonky haha
-
 Ida G. favorited Friendship Bracelet
21 May 00:01
Ida G. favorited Friendship Bracelet
21 May 00:01
-
 Elentine added Friendship Bracelet to Jewellery & Beading
15 Jun 23:44
Elentine added Friendship Bracelet to Jewellery & Beading
15 Jun 23:44
-
 Miss_Fit favorited Friendship Bracelet
08 Jun 21:36
Miss_Fit favorited Friendship Bracelet
08 Jun 21:36
-
 Pam E. favorited Friendship Bracelet
07 Dec 04:13
Pam E. favorited Friendship Bracelet
07 Dec 04:13
-
 ktull329 favorited Friendship Bracelet
12 Sep 03:29
ktull329 favorited Friendship Bracelet
12 Sep 03:29
-
 allison.sartin.9 favorited Friendship Bracelet
16 May 12:36
allison.sartin.9 favorited Friendship Bracelet
16 May 12:36
-
 jaidababy favorited Friendship Bracelet
02 May 22:09
jaidababy favorited Friendship Bracelet
02 May 22:09
- Geni Greenhill favorited Friendship Bracelet 05 Apr 11:04
-
 kandykissey favorited Friendship Bracelet
16 Dec 19:40
kandykissey favorited Friendship Bracelet
16 Dec 19:40
-
 victoria.joneskeeling favorited Friendship Bracelet
24 Nov 17:26
victoria.joneskeeling favorited Friendship Bracelet
24 Nov 17:26
-
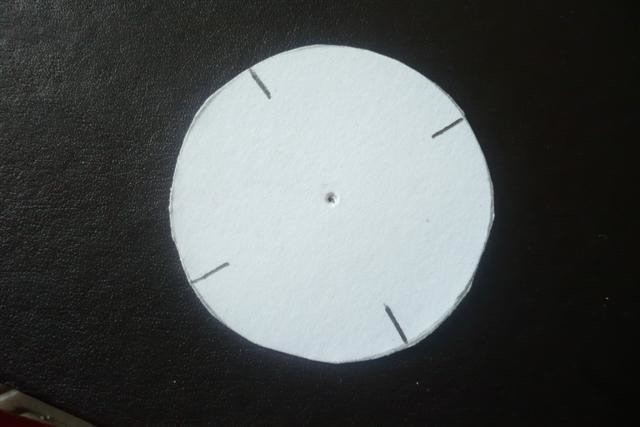
 Step 1
Get a compass and draw a smallish circle on some thick card. Cut this out.
-
 Step 2
Get a ruler and roughly mark four lines on the card about 1/2 cm long, like a clock. Hopefully you get what I mean...
-
 Step 3
Now draw four lines in bewteen the ones you just drew.
-
 Step 4
Now where the lines are you want to cut very thin slits with some scissors.
-
 Step 5
Now get a hole punch and make a small hole in the centre. or you can get a pencil and shove that through the middle. But make sure that the whole is not too big though.
-
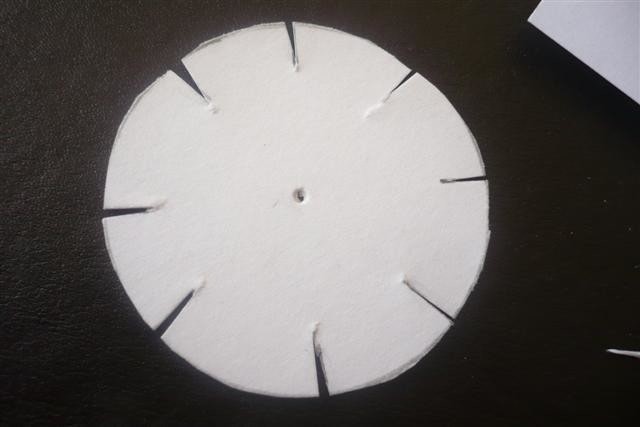
Step 6
Now you should have a thick piece of card with a hole in the middle. It should have eight slits on the outside.
NOW ONTO MAKING THE BRACELET!
-
 Step 7
Cut seven lengths of embroidery thread or wool, you can use different colours or the same depending on what you like. Im really not too sure on the length that you need. I normally just cut the length around my wrist and then add quite a few centimetres to tie the knot.
-
 Step 8
Now tie a single knot around all of the embroidery thread/wool at the end.
-
 Step 9
Put the knot through the whole in the disc.
-
 Step 10
Now get your thread and put each piece of embroidery thread/wool in a different slit of the card disc. There should be one free slit on the card disc.
-
Step 11
<a href='http://gickr.com' title='free graphic for myspace' ><img src='http://gickr.com/results4/anim_5121f907-220f-f924-5d2f-2bab5a131182.gif' alt='myspace graphic' /></a><br/><a href='http://gickr.com'>myspace graphic</a>
This is where it gets hard to explain.
HERE GOES-
where the free slit is count three to the right-the third piece of embroidery thread/wool you want to move over to the free slit and put it there. Do this again, so where the free slit is count three to the right, the third embroidery thread/wool move it over to the free slit.
HOPEFULLY you get this if not check the youtube link above, or the animation I made. That should help!
-
 Step 12
Keep doing this process untill you get a long ropey thing. Make sure that you pull it tightly when you are threading it around the disc
-
 Step 13
When you have the desierd length you need to take it off the disc and tie a knot at the end-find a wrist and tie it on and be bestfriends together forever and ever


btw veryy cool