


About
Embroider with you "normal" sewing machine - no need for an expensive, special embroidery machine ^-^
Embroidery is supercute, but many of us can't afford an embroidery machine or want different designs from the one you can purchase.
Embroidery (or free motion appliqué) can add a personal twist to your purchased wardrobe and it can easily theme your next sewing project.
All you need is a bit of inspiration and excercise... the more you try the better your outcome will look!
The following tutorial will mix pictures of two of my projects, but most of the steps are the same.
Option 1 is free motion embroidery, option 2 is free motion appliqué.
-
 VillainousNinja added Free Motion Machine Embroidery / Appliqué to Inspiration
23 Aug 23:21
VillainousNinja added Free Motion Machine Embroidery / Appliqué to Inspiration
23 Aug 23:21
-
 Alissa B. favorited Free Motion Machine Embroidery / Appliqué
05 Feb 02:24
Alissa B. favorited Free Motion Machine Embroidery / Appliqué
05 Feb 02:24
-
 mmotse03 favorited Free Motion Machine Embroidery / Appliqué
29 May 15:04
mmotse03 favorited Free Motion Machine Embroidery / Appliqué
29 May 15:04
-
Calah L. added Free Motion Machine Embroidery / Appliqué to MUST DO
31 Jan 17:38
-
 Karen D. favorited Free Motion Machine Embroidery / Appliqué
06 Oct 01:56
Karen D. favorited Free Motion Machine Embroidery / Appliqué
06 Oct 01:56
-
 Rose K. favorited Free Motion Machine Embroidery / Appliqué
19 Aug 01:53
Rose K. favorited Free Motion Machine Embroidery / Appliqué
19 Aug 01:53
-
 silentband favorited Free Motion Machine Embroidery / Appliqué
03 Aug 22:29
silentband favorited Free Motion Machine Embroidery / Appliqué
03 Aug 22:29
-
 Misato M. favorited Free Motion Machine Embroidery / Appliqué
19 Jun 11:37
Misato M. favorited Free Motion Machine Embroidery / Appliqué
19 Jun 11:37
-
 Mac Joy favorited Free Motion Machine Embroidery / Appliqué
18 Jun 03:30
Mac Joy favorited Free Motion Machine Embroidery / Appliqué
18 Jun 03:30
-
 simone.garcia.102 favorited Free Motion Machine Embroidery / Appliqué
07 May 04:10
simone.garcia.102 favorited Free Motion Machine Embroidery / Appliqué
07 May 04:10
You Will Need
-
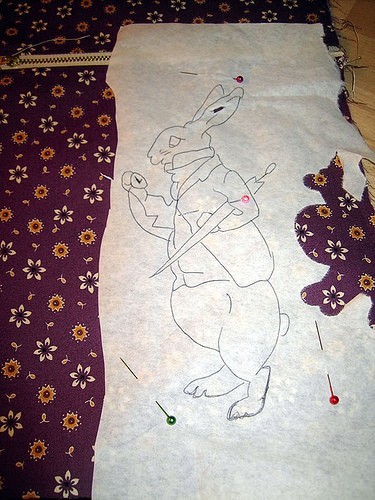
 Step 1
Choose and draw a design.
If needed, enlarge it.
I used a <a href="http://en.wikipedia.org/wiki/Pantograph">pantograph</a> for this, but you may use your computer or go to a copy shop and let them resize your design as needed.
-
 Step 2
Try which colors you will use for your applique or embroidery.
Doing this in advance is important, as it is very annoying to rip out free motion sewing, and it's most likely that you will hurt the basic object.
-
 Step 3
Option 1:
Use tear-away stabilizer and trace the basic lines of your design onto it.Option 2:
Transfer design lines to a scrap of fabric large enough to cover the color you are working. Cut out, leaving about 1/4" seam allowance around.BOTH options:
Pin in place OR use temporary spray glue (you will get this in embroidery or quilting stores). -
Step 4
Put your project into an embroidery hoop, if you own one.
Layer like follows:- Water soluble stabilizer
- Your actual Project/Fabric, with right side facing youTake care not to pull the fabric too much or your design will look crooked.
The hoop should be at least 1/2" larger on each side, otherwise you will have to replace your project during the process.If you don't have an embroidery hoop I suggest to use temporary spray glue and a heavyweight water soluble embroidery stabilizer underneath your project.
-
 Step 5
Sink the transport of your machine.
Set up a straight stitch, stitch length "0".
Stitch length and direction is determined by you.
Hold your project with both hands and slowly move it forwards, backwards, to the right or to the left. Never turn the project, just slide!To achieve a good look will take some excercise and time. You will want to try it on a test piece before you start your actual project. To avoid bad surprises make sure to use the same thread, interfacing, fabric or stabilizer.
Play around with the thread tension if needed.Sew around outlines in a color that will either blend into your background fabric or into your project.
Outline only the basic lines, you will work out the details later.
-
 Step 6
Remove your project from the hoop.
Option 1:
Carefully tear away the stabilizer on your fabric (only the one on top!).Option 2:
Cut back excess fabric around your outlines.
Be careful not to cut the outline.
A pair of special appliqué scissors will work great, but a pair of small, sharp embroidery scissors will also work.BOTH options:
Put your work back into the hoop. -
 Step 7
BE SURE TO CAREFULLY TEST STITCH WIDTH/LENGTH BEFORE YOU START USING A DIFFERENT STITCH.
A BROKEN NEEDLE THAT HITS YOUR EYE IS NO FUN!!!!Work the details!
Go back and forth, using a straigt stitch. Add shaddow by adding zigzag or a fancy stitch.Option 2:
Repeat the steps 3 to 7 with your other appliqué pieces. -
 Step 8
The backside of your finished embroidery will look something like this.
Black: bobbin thread
White: water soluble stabilizerThis will magically disappear when you rinse or wash your project.
As my project was black the bobbin work now is almost invisible on the inside.
-
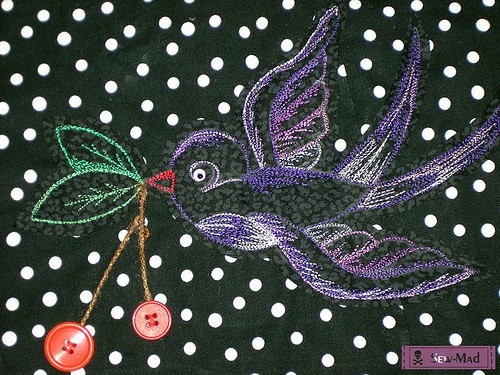
 Step 9
This is an example for option 1 - embroidery only.
Outlines were accentuated, zigzag was used for the shaddows and the details.
Background shines through, so the look of option 1 is pretty subtle.
-
 Step 10
Example for option 2.
Appliqué fabric was chosen to be black only, coloring was done completely with embroidery thread.
Only straight stitch was used.The fabric will hide the background, so you can add additional color or provide a solid background for your embroidery.
-
 Step 11
Congrats!
Your project is finished and absolutely individually! ^-^


Comments


