


About
This is a beginners project with needle tatting.
Tatting is generally made up of one stitch, the double stitch(ds) separated by picots. This stitch is used to make the rings and chains that are the main structure of all tatting.
Tags
-
 Laura L. commented on Flower Pendant
24 Jun 06:03
Laura L. commented on Flower Pendant
24 Jun 06:03
-
 Lesley P. added Flower Pendant to Tatting
23 Nov 03:11
Lesley P. added Flower Pendant to Tatting
23 Nov 03:11
-
 MICHELLE M. favorited Flower Pendant
22 Apr 00:11
MICHELLE M. favorited Flower Pendant
22 Apr 00:11
-
 Angie added Flower Pendant to Jewelry
20 Apr 10:22
Angie added Flower Pendant to Jewelry
20 Apr 10:22
-
Kriszta I. favorited Flower Pendant
06 Feb 13:32
-
Jessie D. added Flower Pendant to To Do Yarn Crafts
19 Nov 03:51
-
 jennfer c. favorited Flower Pendant
12 Nov 02:47
jennfer c. favorited Flower Pendant
12 Nov 02:47
-
Laura H. favorited Flower Pendant
15 Sep 10:38
-
 caffeineaddict4life favorited Flower Pendant
09 Sep 03:50
caffeineaddict4life favorited Flower Pendant
09 Sep 03:50
-
Karen N. favorited Flower Pendant
05 Jul 02:12
You Will Need
-
 Step 1
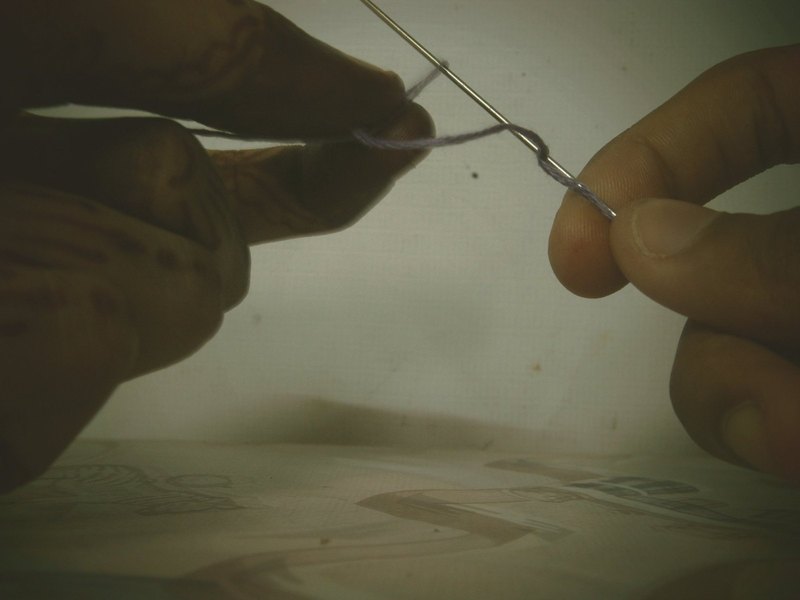
:: THE DOUBLE STITCH ::
1. Thread the needle from the ball leaving a tail about 16 inches long.
2. Hold the working thread (thread from the ball, not the tail) near the end of the needle with your right index finger. You can release the thread as soon as soon as the first ds is made.
-
 Step 2
:: THE FIRST HALF OF THE DOUBLE STITCH ::
1. While hanging on to the thread with your other three fingers, wrap the thread clockwise around the back of your index finger
2. Slide the needle under the thread up toward the tip of your finger. Remove finger and tighten the loop onto the needle. This is the first half of the ds
-
 Step 3
:: THE SECOND HALF OF THE DOUBLE STITCH ::
For the second half of the ds, we do the opposite. Wrap the thread around your index finger counter-clockwise, slide the needle under the thread toward the tip of your finger. Slide the loop next to the first loop and tighten.
-
 Step 4
You might notice that this is in fact just a half hitch knot.
-
 Step 5
:: CREATING A PICOT ::
1. After completing a ds, make the first half of the next ds, but instead of sliding the the stitch next to the first ds, hold the loop about a 1/2 inch away while making the second half of the ds.
-
 Step 6
2. Slide the completed ds next to the first ds. The small loop created between them is a Picot
-
 Step 7
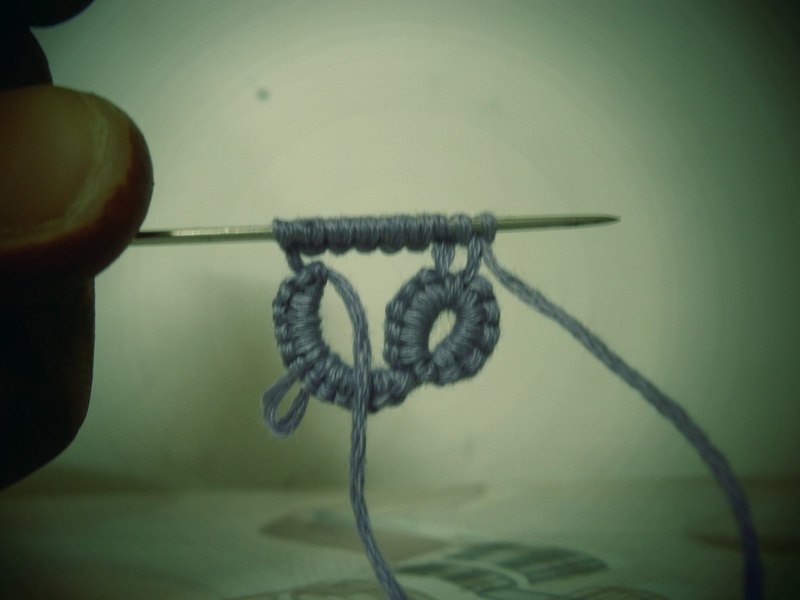
:: CREATING A RING ::
1. Create any number of ds with any number of picots. For our flower pendant, make a ring consisting of six ds with a long picot(1 inch) followed by six more ds.
2. Slide the ds off the needle onto the thread that is in the eye of the needle, keeping the loop forming at the end from closing by placing your pinky in the loop.
3. Bring the needle tip through the loop and pull the loop closed. This is referred to as 'close the ring' in written patterns
-
 Step 8
4. The last step is to turn the ring over and tie a knot at the top. This is referred to as reverse work or rw.
-
 Step 9
:: CREATING A CHAIN ::
1. Place the needle at the last knot made on your ring. A chain is generally only created after a ring.
2. Create any number of ds and picots. For our flower pendant, chain 6ds, 1 picot(p) 6 ds.
3. Slide the ds off the needle onto the thread in the eye of the needle. Pull the thread all the way through so that the chain lies right next to the ring.
4. As with the ring, turn the chain over and tie a knot (rw). Occasionally a ring or chain isn't reversed after closing, but a knot is still tied. The right and left thread do not change place when the knot is tied this way.
-
 Step 10
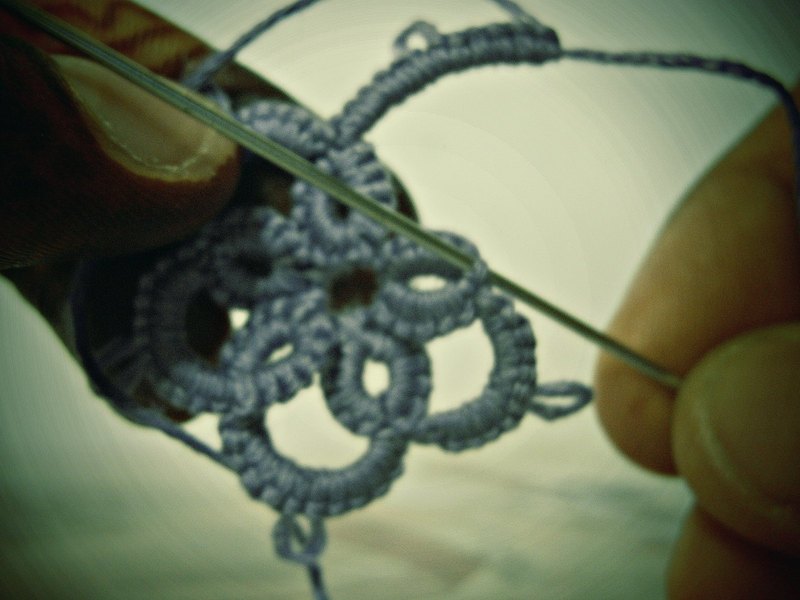
:: MAKING THE FLOWER ::
Continuing to make the flower, you should have one ring and one chain.
-
 Step 11
1. Make a ring 6 ds and join to the long picot of your first ring by using the tip of the needle to pull the working thread through the picot. Finish the ring with 6ds, close and rw.
2. Next make another chain the same as the first, 6ds, 1p, 6d close and rw
3. Continue in this manner until you 5 rings and 4 chains.
-
 Step 12
:: FINISHING THE FLOWER ::
1. Make the final chain in the same way, but after you close join to the first ring you made by bringing the needle through the knot in the ring.
-
 Step 13
2. To Finish tie a double knot and cut the thread from the ball leaving enough tail to hide. Hide each end by putting the needle through a few stitches in either the closest ring or chain and pulling the thread through. Cut off the remainder.
-
 Step 14
3. To make the flower a pendant, simply add a jump ring to one of the outer picots.
-
Step 15
You can make this simple design in any color or size you like, you can also join flowers together at the outer picots to form chains or add seed beads to the picots for a little bling...!!!


Comments


