


About
Making jewelry
FIRST AID IN MAKING JEWELRY
Are you just beginning to make jewelry or would you like to refresh your memory? Then read on quickly because here you will find a clear explanation about various basic components that you can use when making bracelets, earrings, necklaces and key rings. Making jewelry yourself is of course super fun and is suitable for everyone. Do you still need a little help or inspiration? Take a look at our lookbooks for the best ideas. https://dreambeads-online.com/blog/explanation-jewelry-making
Which pieces of jewelery are there, and most importantly, what can you do with them? We have highlighted the following items in this blog: Jump rings, head- and eyepins, end caps, cord and ribbon ends, crimp beads, crimp bead covers, knot covers, wire protectors, pliers and jewelery glue.
-
 Wilco P. published her project First Aid In Making Jewelry
14 Jan 16:40
Wilco P. published her project First Aid In Making Jewelry
14 Jan 16:40
You Will Need
-
 Step 1
With jump rings you can attach all kinds of parts to your jewelry such as clasps, charms, end caps and more. So they're really indispensable when making jewelry. With the help of two pliers you can easily bend the ring open, and close again after you have applied your action. It is important that you open them along each other (towards the front and back) instead of apart (left and right). In this way it keeps a nice round shape. Also nice: String on a number of jump rings between your beads for a surprising effect.
-
 Step 2
What is the difference between head- and eyepins? Headpins have a flat head on one side, where your beads linger behind as soon as you thread them on the pin. Cut off the remainder with the help of a wire cutter and keep about 1 cm. Using a round nose pliers, tighten an eyelet and attach it to, for example, an earring or bracelet. Eyepins are already on one side with an eye, so you only have to make one eyeat the other end. In this way you can use them to chain what is nice with for example bracelets.
-
 Step 3
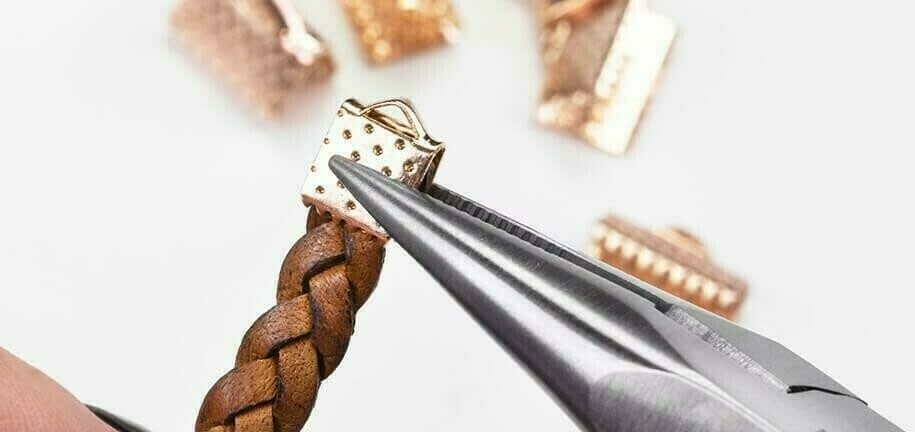
Endcaps are available in different shapes and sizes and have the purpose of finishing your wire. To attach your endcaps, fill them with a little jewelery glue and place the endcap on the end of for example your leather or multiple strands of cord. All end caps are equipped with a small eye, which you can attach something like a clasp using a jump ring. Endcaps with an inside size of 1 mm fits on 1 mm wire, endcaps with an inside size of 4 mm fits on 4 mm wire, etc. Tip: It is always handy to have several sizes of end caps in your possession so you always have the right size when you work with different strands of wire for example.
-
 Step 4
When finishing your (faux) suede or other thin cord such as (round) leather you can choose for ribbon ends. Place the ends of your cord in the ribbon end and squeeze it with a flat pliers. Ribbon ends are suitable for flat cords, like flat leather, and are also squeezed by means of pliers. The cord and ribbon ends are both equipped with an eyelet, making them easy to attach to another piece of jewelry such as a lobster clasp or jump rings.
-
 Step 5
These are fine beads that you carefully squeeze on your wire with a flat nose pliers so that they no longer move. By applying this action you can, for example, let your beads "float" and simply make a tiger tail wire necklace. But above all they're very useful when making loops in, for example, your metal wire to which you can attach a lobster clasp or jump ring on. For this, thread the crimp bead onto your wire, make a loop and pull the thread through the crimp bead again and then squeeze it shut.
-
 Step 6
As with crimp bead covers, knot covers are there for covering the squeeze bead. The difference is that a knot cover has an eye so that you can easily attach a clasp or jump ring to it. First place a crimp bead on your wire and then squeeze it shut. Then thread the cover on the wire and with a flatnose pliers carefully squeeze the cover over the crimp bead. This finish is not very suitable for heavy chains.
-
 Step 7
To protect your metal wire, you can choose to work with wire protectors. In addition, they're also a beautiful finish of your jewelry. Take your metal wire through the wire protector and attach, if you want to, a jump ring or clasp to it. Then you string a crimp bead on it and squeeze it carefully so that the thread stays firmly in the protector.
-
 Step 8
Various types of pliers are indispensable when making jewelery. Every plier has its own function and possibilities. The flat nose pliers have 2 sides that are flat with which you can open and close, for example, jump rings, or pinch ribbon ends and pinch crimp beads. With the round nose pliers you can especially make beautiful eyes on your head- and eyepins. The cutting pliers are suitable for cutting wire, memory wire or head- and eye pins. In our assortment you can find them all, packaged per set or just loose.
-
 Step 9
We have different types of adhesives in our range that you can work with. The Hasulith jewelery glue is widely used and of good quality, suitable for all kinds of hard materials such as leather and wood, but also elastic. This glue is transparent in color so you will not have discoloration. Drying time is a few hours. Especially for gluing rhinestones and glass cabochons is our rhinestone 244 jewelry glue a godsend. Drying time is 24 hours. We also have various types of (super) glue from Bison in the assortment. Always make sure that you do not use too much glue in for example your magnetic lock or end cap and prevent the glue from running out as soon as you put the wire in

