


About
All the way from Sparkle Forest.
These are completely inspired by the work availiable for sale at Cursive Design.
Bringing fairies into it was my own idea. Fairy Glamour is the term used when fairies take the form of other things, the beads on the peices represent droplets of water but just maybe there is a fairy lurking! Sparkle Forest is a special forest made all out of crafting espeically for crafters were squirrals knit tail warmers and there are no ikky bugs!
Tags
-
 Reginula favorited Fairy Glamour Earrings And Necklace
26 Jul 05:02
Reginula favorited Fairy Glamour Earrings And Necklace
26 Jul 05:02
-
 queenfairypants entered their project Fairy Glamour Earrings And Necklace to Jewelry Contest with Fifi's Secret
17 May 22:45
queenfairypants entered their project Fairy Glamour Earrings And Necklace to Jewelry Contest with Fifi's Secret
17 May 22:45
-
 Step 1
Cut two peices of the thickest wire at any length you wish.
-
 Step 2
Wrap the thinner peices of wire around the thick wire. I can never seem to do this right so if you're like me the thinner wire may be a bit loose and slip off but once you wrap the thread around it will be kept in place.
-
 Step 3
Tie a knot with the thread onto the wire and start wrapping the thread tightly around the wire.
-
Step 4
When you get to an end that you want to be the top slip a ring onto the end of the thread and hold it in place while you continue to wrap the thread around the wire. The thread should keep it where you want it to be. Do the same for when you wish to add a bead.
-
Step 5
When you have covered the wire completely use the needle to thread the thread underneath the thread on the back and tie a knot.
-
 Step 6
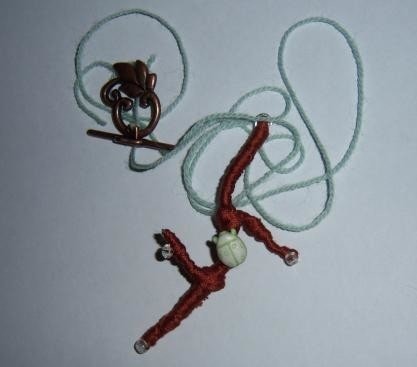
Add the things neccessery to turn them into jewellery. I have used string because I couldn't find a spare chain and a t-bar clasp (with a leaf detail on both parts of clasp) for the necklace.
-
Step 7
Spray hairspray over the each end of the 'twig' and over the knots just incase it doesnt hold on it's own, spray from a few inches away.


Comments

 1
Watercolor Art »
Watercolor Paints Made From Make Up
1
Watercolor Art »
Watercolor Paints Made From Make Up

