


About
Two cute and easy hair pieces to add to an outfit!
Fabric headbands and scrunchies are very on trend right now, and in just a few steps you won't have to be spending crazy amounts of money to buy one in a shop!
The steps 1-4 will teach you how to make the headband, and steps 5-10 teach you how to make a scrunchie.
-
 Key West Witch favorited Fabric Hairpieces (Headbands and Scrunchies)
26 Jun 09:09
Key West Witch favorited Fabric Hairpieces (Headbands and Scrunchies)
26 Jun 09:09
-
 Alma added Fabric Hairpieces (Headbands and Scrunchies) to Hair Styling
25 May 14:14
Alma added Fabric Hairpieces (Headbands and Scrunchies) to Hair Styling
25 May 14:14
-
 Rachel B. favorited Fabric Hairpieces (Headbands and Scrunchies)
12 May 02:41
Rachel B. favorited Fabric Hairpieces (Headbands and Scrunchies)
12 May 02:41
-
 MischievousRaven added Fabric Hairpieces (Headbands and Scrunchies) to Jewellery Makes
11 Apr 14:47
MischievousRaven added Fabric Hairpieces (Headbands and Scrunchies) to Jewellery Makes
11 Apr 14:47
-
 Sharon H. added Fabric Hairpieces (Headbands and Scrunchies) to chokers
18 Feb 13:15
Sharon H. added Fabric Hairpieces (Headbands and Scrunchies) to chokers
18 Feb 13:15
-
 ChezzaLeigh favorited Fabric Hairpieces (Headbands and Scrunchies)
29 Jan 23:14
ChezzaLeigh favorited Fabric Hairpieces (Headbands and Scrunchies)
29 Jan 23:14
-
Elizabeth L. favorited Fabric Hairpieces (Headbands and Scrunchies)
08 Jan 02:09
-
 nybird added Fabric Hairpieces (Headbands and Scrunchies) to sewing SW ideas
23 Oct 14:09
nybird added Fabric Hairpieces (Headbands and Scrunchies) to sewing SW ideas
23 Oct 14:09
-
nybird added Fabric Hairpieces (Headbands and Scrunchies) to Sewing
23 Oct 14:04
-
Lindsey N. added Fabric Hairpieces (Headbands and Scrunchies) to Accessories - Head
05 Oct 22:29
You Will Need
-
 Step 1
First you will need to cut your fabric of choice into a long rectangle, mine measured 88cm x 12cm. Then fold it in half along the long edge of the fabric (make sure the right sides are facing each other).
-
 Step 2
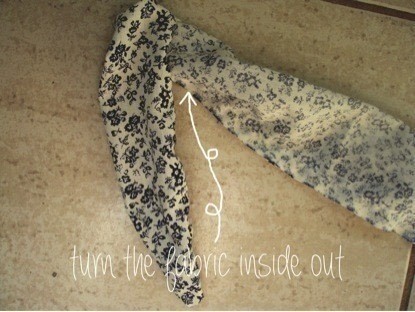
Now sew all the way up the long side of the fabric. Make sure the you leave about a 5cm gap somewhere in the middle so that you can turn it inside out when you're finished.
You may also want to sew each end into a point to give it triangular ends.Once it's sewn up, turn it inside out so that the right sides are now on the outside!
-
 Step 3
Your headband will now look like a very long sausage, so you need to iron it flat! Make sure that it's folded nicely before you iron it.
Once this is done find the 5cm hole that you left in it earlier and sew it up. -
 Step 4
You're all done! (That was easy wasn't it!?) Now if you're like me you can proceed to make many more to match up with every outfit you've ever owned!
-
 Step 5
For the scrunchie you will once again need to cut a large rectangle (like step 1)
Fold along the long edge so the right sides are together and sew it all the way along the long edge. The two short ends will stay open. -
 Step 6
Once the edge is sewn, turn it inside out so the right side is facing outwards.
-
 Step 7
Now attach a safety pin to the end of your elastic to make it easier to thread, and thread it through the tube that you just made. You will begin to see the fabric "scrunch" up.
This is also the point where if you think you have too much fabric you can cut it down a bit. Remember that the longer the fabric, the scrunchier your scrunchie!
-
 Step 8
Tie a knot in your elastic to make your scrunchie the size that you desire. Don't forget that elastic stretches, so you may need to make it smaller than you think!
Pull on the elastic really tightly a few times to make sure the knot is very tight and secure and won't untie in your scrunchie! (Alternatively, you could sew the two ends of the elastic together)
Cut of the extra ends of the elastic.
-
 Step 9
Now to sew the ends together, fold one end back into itself a little way to give it a neat edge, and then thread the opposite end into it a little way.
Sew a straight line down this seam to secure it (it is best to use a colour thread that matches your fabric), and your scrunchie is finished!
-
 Step 10
Go and scavenge any material you can find, and enjoy making many many more scrunchies!


 1
Watercolor Art »
Watercolor Paints Made From Make Up
1
Watercolor Art »
Watercolor Paints Made From Make Up
