About
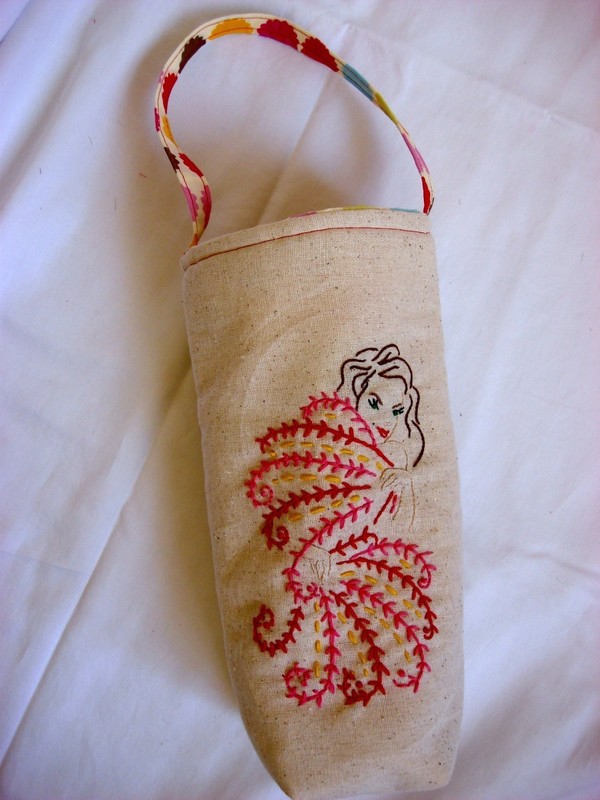
Hand Embroidered Wine Tote
A hand embroidered wine tote is the perfect gift for the party hostess or a friend who enjoys a nice bottle!
-
 marlene.gagne.3 favorited Embroidered Wine Tote
17 May 20:56
marlene.gagne.3 favorited Embroidered Wine Tote
17 May 20:56
-
 SHANNON B. added Embroidered Wine Tote to stuff i like to make
13 Sep 13:52
SHANNON B. added Embroidered Wine Tote to stuff i like to make
13 Sep 13:52
-
 Chudames favorited Embroidered Wine Tote
07 May 00:06
Chudames favorited Embroidered Wine Tote
07 May 00:06
-
Chudames added Embroidered Wine Tote to Needlework
07 May 00:06
-
 Brenda J M. favorited Embroidered Wine Tote
27 Apr 12:38
Brenda J M. favorited Embroidered Wine Tote
27 Apr 12:38
-
 Rosie R. favorited Embroidered Wine Tote
06 Apr 09:56
Rosie R. favorited Embroidered Wine Tote
06 Apr 09:56
-
Denise H. added Embroidered Wine Tote to gifts
05 Apr 16:58
-
Denise H. favorited Embroidered Wine Tote
05 Apr 16:56
-
 DocDoolittle favorited Embroidered Wine Tote
03 Apr 17:16
DocDoolittle favorited Embroidered Wine Tote
03 Apr 17:16
-
beckie jane favorited Embroidered Wine Tote
30 Mar 14:38
-
 Step 1
Transfer your embroidery pattern to one exterior piece of fabric and stitch. I used the burlesque fan dancer pattern from Jenny Hart's Embroidered Effects book. Available here: http://sublimestitching.com/collections/books/products/embroidered-effects
-
 Step 2
Cut the two exterior pieces of fabric to 8x14-inches, making sure to the embroidery is centered on one of the exterior pieces of fabric. Cut the lining and batting to 8x14-inches, as well. Cut the fabric for the strap to 4x21-inches.
-
 Step 3
Assemble the exterior portion of the bag by laying the exterior pieces of fabric right sides together and the batting on the outside of either piece. Stitch around three sides using a 1/4 seam allowance, leaving the top open.
-
 Step 4
Create a square flat bottom for the bag by taking the bottom corner seams and and pressing them flat against one another. Sew 2-inches down from the point. Clip the excess fabric and repeat on opposite corner.
-
 Step 5
Assemble the lining of the bag by placing the two lining pieces right sides together. Mark a 2-inch space to leave unsewn, this will be used to flip the bag inside out later. Sew around the three sides using a 1/4-inch seam allowance, leaving the top open. Make sure to leave your marked space open, as well.
-
 Step 6
Square off the corners of the lining as you did in Step Four for the tote exterior.
-
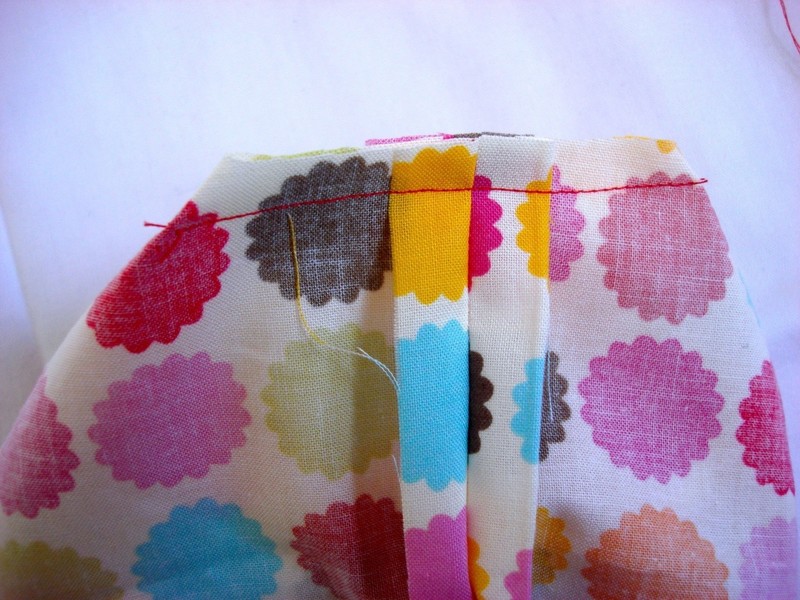
 Step 7
To assemble the strap, take the 4x21-inch piece of fabric, fold it in half, and press. Unfold, and press the outer edges in toward the center crease you just created. Fold in half again and press. Top stitch on either side of the strap.
-
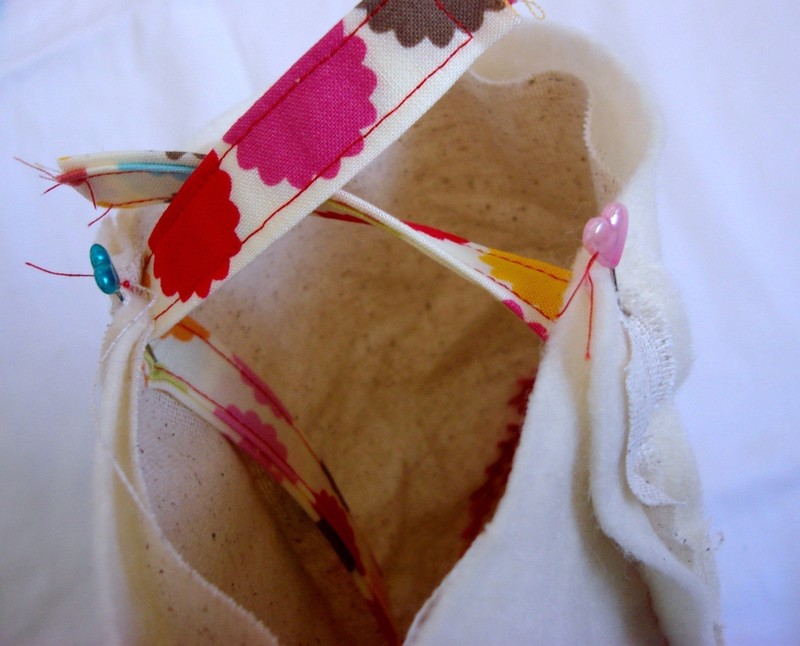
 Step 8
Take the strap, align each edge on the center of each side seam of the tote, and pin in place. Make sure the strap is not twisted inside of the tote.
-
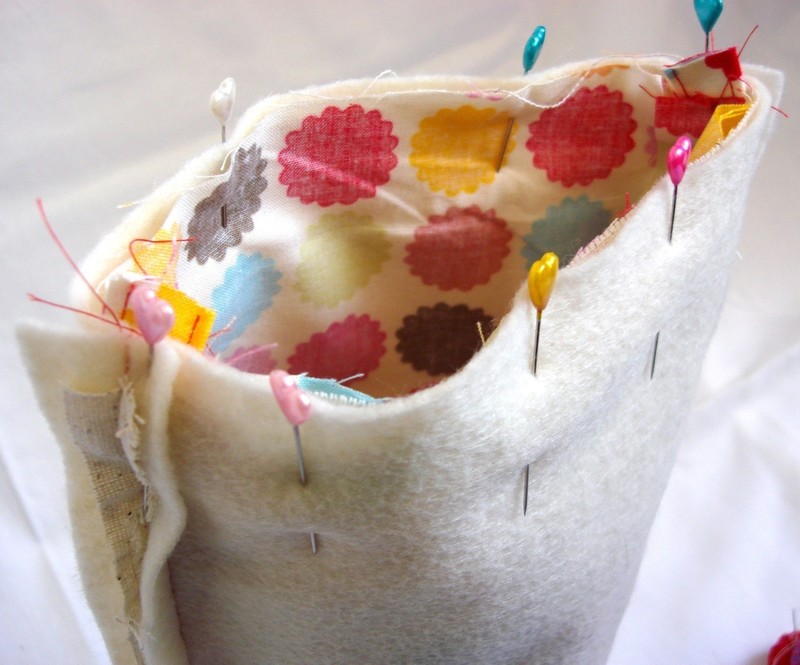
 Step 9
Take the lining of the tote and place it inside of the exterior piece, with right sides together. Pin it in place, making sure to keep the straps aligned along the side seams. Stitch along the top using a 1/2-inch seam allowance.
-
 Step 10
Flip the tote through the opening in the lining and stitch shut. I like to run this through the sewing machine, but it can be hand sewn with a slip stitch if you like.
-
 Step 11
Top stitch around the top edge.
-
 Step 12
Insert bottle and you are ready for the party!