About
Machine embroidery from clip art to finished product.
These are the steps I took to create a machine-embroidered project, beginning with purchased vector clip art. It's very specific to how I did this particular project, but it's a good overview of how to create a custom embroidery (digitized) pattern.
Step 1: Inspiration
Step 2: Research/concept
Step 3: Illustration
Step 4: Color selection
Step 5: Refine illustration
Step 6: Import and edit and edit and edit
Step 7: Stitch and finish
-
 mmotse03 favorited Embroidered Electric Eel
29 May 10:47
mmotse03 favorited Embroidered Electric Eel
29 May 10:47
-
 Chudames favorited Embroidered Electric Eel
04 May 08:24
Chudames favorited Embroidered Electric Eel
04 May 08:24
-
 Roughwaters44 favorited Embroidered Electric Eel
24 Mar 01:56
Roughwaters44 favorited Embroidered Electric Eel
24 Mar 01:56
-
 Stephanie T. favorited Embroidered Electric Eel
17 Mar 01:36
Stephanie T. favorited Embroidered Electric Eel
17 Mar 01:36
-
 SFLAG entered her project Embroidered Electric Eel to Suncatcher Craft Eyes
05 Mar 17:24
SFLAG entered her project Embroidered Electric Eel to Suncatcher Craft Eyes
05 Mar 17:24
-
 DocDoolittle favorited Embroidered Electric Eel
04 Mar 16:51
DocDoolittle favorited Embroidered Electric Eel
04 Mar 16:51
-
SFLAG published her project Embroidered Electric Eel
03 Mar 21:20
-
Step 1
Step 1: Inspiration, i.e., I am invited to a special event
In this case, it's a fundraiser for the Belle Isle Aquarium in Detroit, as they attempt to bring back an electric eel to the country's oldest public aquarium. When I make something for myself, it almost always starts as a special event to which I want to wear something I made. I feel positively naked without something I made!
-
Step 2
Step 2: Research/concept
Electric eel, that's easy. I need a good idea of what they look like, and what their distinguishing features are.
I think electric, I think lights, although electric eels don't actually light up by themselves. I have a few small battery-powered LED strings in a drawer, so I chose one of those, and decided to make a headband.
-
 Step 3
Step 3: Illustration
I abandoned the fanciful "electric eel" concept for the more accurate, and was delighted to find a specific vector clipart available on a commercial site for a couple of bucks, shown here opened in Adobe Illustrator.
-
Step 4
Step 4: Color selection
The eels are a dark brown. When it comes to thread color palettes, there are a couple of things to consider in addition to color, specifically weight and sheen. Because we're talking eel, I wanted to use only shiny threads, so I stuck with 40 weight rayon/viscose. I chose 4 browns, plus black for the outline and details.
Because the final piece would be trimmed out and added to a headband, I elected to embroider it on felt, which is both weighty enough to stand alone, and non-raveling to allow for a clean border. I had a stone-embossed medium grey craft felt in my stash, which struck me as a good background for this bottom-dwelling creature.
-
 Step 5
Step 5: Refine illustration
Opening the clip art in Adobe Illustrator, I assigned the 4 browns and black, simplifying the illustration as necessary. Fine details will get lost with a small, relatively low-res home machine.
I also removed overlaps. In some cases, stitching one color over another is acceptable — even desired. But what we have here is large areas of solid color on felt, with details on top of that. More than 2 layers of heavy stitching overlapped tempts a big ol' mess of broken needles and thready birdnests.
-
 Step 6
Step 6: Import and edit and edit and edit
With the file open in Adobe Illustrator, I selected one shape at a time to copy and then paste into the embroidery software. The software I use, Wilcom ES Designer, does a great job of auto-converting a basic shape, but they have to be handled one at a time.
Copy a shape, paste a shape, convert a shape. Next...
Then, of course, each shape is going to need ordering and tweaking.
This is the stitch view. One thing that is significant/fun about embroidery, vs typical graphic design, is the textures available simply by stitching the same color in a different direction. This software simulates/supports this, and so I wanted to take advantage of the option to give more dimensionality to the slippery critter.
-
 Step 7
Step 7: Stitch out and finish
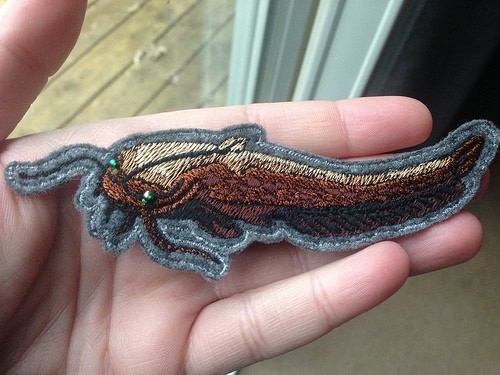
Once everything is ordered, let the machine do its thing!
The final outline is a grey border to follow for trimming. I also hand-stitched green glass beads for the eyes.
I chose a short-pile blue faux fur to cover a plastic headband, to represent the water, which I hand-stitched in place. I inserted the LEDs as I went, under the fabric, to diffuse the light. I also added a little spray of light blue tulle for an extra splash, and a few more glass beads just for interest.
-
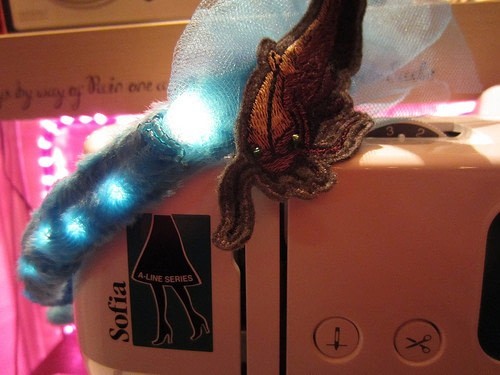
 Step 8
The final eel on lighted headband, being worn by my Babylock Sofia embroidery machine. With extra lights in the background, for no reason.