


About
Make your very own handmade earrings!
I kid you not, these make the PERFECT gift on so many levels. Not only will the recipient be blown away by the originality of these earrings but even more so when they find out they weren't bought but HANDMADE. And by you no less! If you are a parent or grandparent try to get some of the kids to help you out. My daughter had a fabulous time dipping the paper in and watching the watercolor blend with the others to create new colors. Not only is it a collaborative and bonding experience but it teaches them color theory and fine motor skills.
The possibilities are endless when you let your creativity run wild with this DIY project. I have added a few photos of the earrings I created but just imagine how many different avenues you could take.
-
 sophia.tranoris commented on Diy Watercolor Paper Earrings
09 Sep 03:17
sophia.tranoris commented on Diy Watercolor Paper Earrings
09 Sep 03:17
-
 fesummers favorited Diy Watercolor Paper Earrings
10 Feb 20:20
fesummers favorited Diy Watercolor Paper Earrings
10 Feb 20:20
-
 Melissa G. favorited Diy Watercolor Paper Earrings
20 Dec 06:13
Melissa G. favorited Diy Watercolor Paper Earrings
20 Dec 06:13
-
 HuntressFashion added Diy Watercolor Paper Earrings to Fashion how to!
16 Aug 15:45
HuntressFashion added Diy Watercolor Paper Earrings to Fashion how to!
16 Aug 15:45
-
 Sarah Sylvia S. favorited Diy Watercolor Paper Earrings
18 Jul 01:50
Sarah Sylvia S. favorited Diy Watercolor Paper Earrings
18 Jul 01:50
-
 Jen S. added Diy Watercolor Paper Earrings to stuff for me
13 Jul 17:44
Jen S. added Diy Watercolor Paper Earrings to stuff for me
13 Jul 17:44
-
 GiftedDiva24 favorited Diy Watercolor Paper Earrings
22 May 13:21
GiftedDiva24 favorited Diy Watercolor Paper Earrings
22 May 13:21
-
 Minna O. favorited Diy Watercolor Paper Earrings
10 May 05:54
Minna O. favorited Diy Watercolor Paper Earrings
10 May 05:54
-
 Dori B. favorited Diy Watercolor Paper Earrings
20 Mar 18:30
Dori B. favorited Diy Watercolor Paper Earrings
20 Mar 18:30
-
 Kimya J. favorited Diy Watercolor Paper Earrings
13 Mar 04:35
Kimya J. favorited Diy Watercolor Paper Earrings
13 Mar 04:35
-
 Step 1
Cut out a variety of shapes and sizes that you want your earrings to be. If you use specialty scissors like the ones we did you can create all sorts of fun patterns and edges to the earrings. The scissors added a ton of personality and also saved on time spent cutting shapes.
-
 Step 2
Use your screw punch to create holes at the very top of your paper shapes where you want the earring piece to go, making sure that the hole isn't to close to the edge of the paper or it may become to flimsy and easily rip. Always remember to use a hard surface like a cutting board when using a screw punch since it will leave marks and damage whatever surface you use.
-
 Step 3
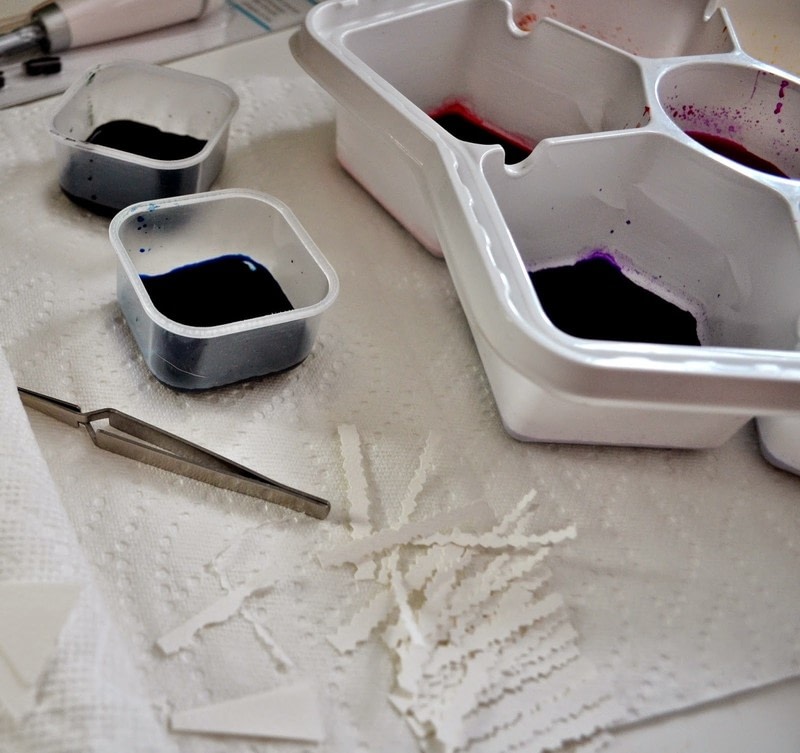
Pour the liquid watercolors into your plastic containers so they are ready for dipping. I recommend laying a rag or paper towel directly underneath the containers so you not only protect your table surface, but it will be easier to dab the excess paint on to the towel later.
-
 Step 4
This is the BEST part! Use your tweezers to carefully dip all of your shapes into the liquid watercolors and dab them on your paper towel or rag to absorb any extra paint. Get as CREATIVE as possible and try mixing up different colors and patterns or even create a variety of shades using just one color.
-
 Step 5
Then lay them out to dry either on the paper towel or any other surface you don't mind getting stained. If you are doing this project with a child then this is a great opportunity to talk about color theory!
-
Step 6
(optional)
This is an extra step I added that wasn't in the original DIY project where I decided to add a sealant to the earrings for increased longevity. I wanted to save on time so I used a varnish spray that I've used on my watercolor paintings but honestly I would probably recommend taking the time and using Mod Podge. The spray added a varnish smell that took time to disappear and the Mod Podge seemed to add more durability to the earrings.
-
 Step 7
Use the jewelry pliers to open the eye of the fish hook on the earring and thread your paper shapes onto the wire. Then use the pliers to pinch it closed. Make sure not to pinch it too tight otherwise the paper shape won't have any movement or room to dangle.


Comments

