


About
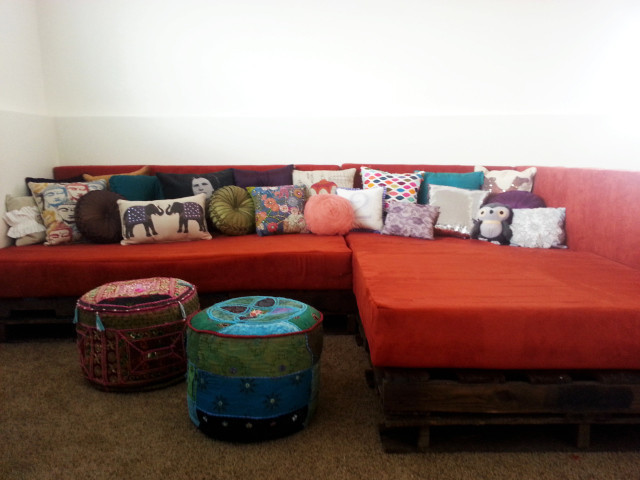
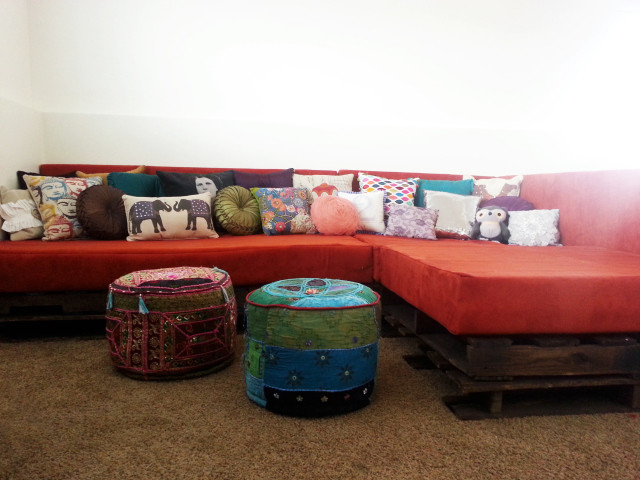
Use wood pallets to create a couch sectional!
For this couch I probably spent around $180, not bad for a huge chunk of furniture! Of course I spent more on pillows to fill her up but you may decide that step isn’t necessary for you.
I will admit up front that I wish I had more pictures of the process. I made this couch about a year ago and in that time + a move in which I couldn’t take the couch with me :( I just don’t have as many as I wish I did. But I’ll try to be concise in the steps and of course, if there’s any confusion or questions please leave a comment or shoot me an email, I’d love to offer additional help!
-
 Taylor T. favorited Diy Shipping Pallet Couch
15 Oct 09:29
Taylor T. favorited Diy Shipping Pallet Couch
15 Oct 09:29
-
kiki w. added Diy Shipping Pallet Couch to Things I need to make for myself
29 Jan 17:51
-
 Tonya B. favorited Diy Shipping Pallet Couch
06 Aug 07:49
Tonya B. favorited Diy Shipping Pallet Couch
06 Aug 07:49
-
Barbara M. favorited Diy Shipping Pallet Couch
07 Feb 02:54
-
Tammy c. favorited Diy Shipping Pallet Couch
21 Dec 11:49
-
 jdk added Diy Shipping Pallet Couch to my new work room
15 Nov 12:27
jdk added Diy Shipping Pallet Couch to my new work room
15 Nov 12:27
-
 Savannah A. favorited Diy Shipping Pallet Couch
16 Jul 13:34
Savannah A. favorited Diy Shipping Pallet Couch
16 Jul 13:34
-
 Angela I. favorited Diy Shipping Pallet Couch
20 Jun 03:32
Angela I. favorited Diy Shipping Pallet Couch
20 Jun 03:32
-
 noraknickers added Diy Shipping Pallet Couch to DIY Betsy Johnson
04 Jun 01:23
noraknickers added Diy Shipping Pallet Couch to DIY Betsy Johnson
04 Jun 01:23
-
 KBunker favorited Diy Shipping Pallet Couch
27 May 20:41
KBunker favorited Diy Shipping Pallet Couch
27 May 20:41
You Will Need
-
 Step 1
It’s hard to give exact numbers on the supplies because it will all depend on the size of couch you are looking to create. My living room at the time was a long rectangular shape so I left the base of my couch as full sized shipping pallets (42″ x 42″ x 5″) in order to fill up some of that extra, awkward space.
First thing to do is to come by some shipping pallets. I got mine from the bank I worked at, they got them often in shipments and were just going to throw them all away. There are very few businesses that don’t get shipping pallets so I would just call around and find out who’d be happy to have to take them off their hands. For my couch, I used 8 pallets.
-
 Step 2
I decided to stain my pallets rather than paint them or leave them raw. I wanted the uniqueness of each pallet to show some while also making them look somewhat uniform. I used approximately 3 quarts of English Chestnut Minwax stain. Each quart at Home Depot was about $8.
I did only one coat and I didn’t worry about covering the bottoms/underside of the tops perfectly as I knew they’d never get seen. After I stained one, I’d just put the next one on top of it and stain it without worrying about the bottom one fully drying first or drips since I wanted each pallet to remain rustic and unique looking anyway.
-
 Step 3
The long side of my couch rested against a wall so I used that for the back support but the short side didn’t. I think it would’ve looked good without a back too but because it would be used more, I decided it needed one. For that, I [had my dad help me] saw one pallet in half. We also cut another one in half for the corner of the couch. This was the layout:
-
 Step 4
So the back was two halves of a pallet, put on their sides. I attached these to the base pallets by using some L-brackets and screws.
-
 Step 5
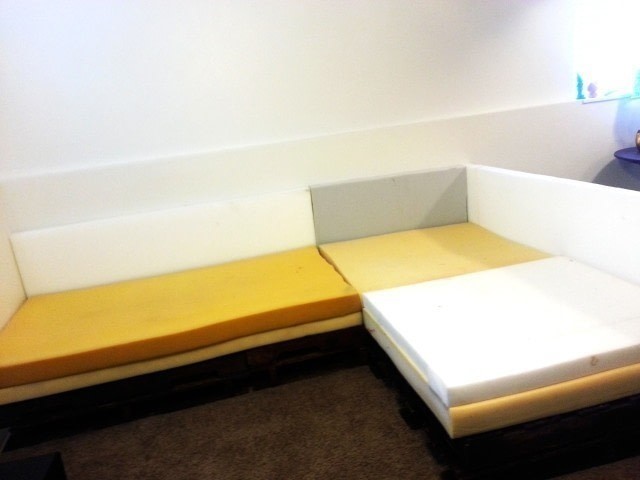
You’ll need foam for filling up your couch. This was definitely the most expensive part. The best deal I found was foam pads at Home Depot, each $20. I didn’t think these pads were too terribly comfortable however, they were very firm, so I used another layer of softer foam on top. I was lucky enough to have my parents give me two twin-size foam mattresses (39″ x 75″ x 5″) that I cut the covering fabric off of. These mattresses were too soft to use on their own (you’d sink down to the wood) so the firm ones underneath were a perfect compliment.
I needed to cut my foam to fit into the various spaces of the couch. The best tool to use for this is an electric kitchen knife. It made the process really quick and easy! Just measure where you need to cut, draw a line on with marker and go slowly down it with the knife.
-
 Step 6
I cut two foam pads down by 10″ and used one of those plus another full size foam pad underneath one mattress on the long side of my couch. The diagram below shows. Of course all the edges were matched up in real life but this is just to illustrate:
-
 Step 7
For the remaining two squares, I cut the other mattress, one pad and the remaining 10″ piece from before in half width-wise. So I had two pieces that looked like this:
-
 Step 8
The back was made up of the remaining foam pads that I had cut 10″ from and one more pad that I cut down to 39″ width-wise and cut 10″ off lengthwise.
-
 Step 9
The foam would have fabric covering it and keeping the layers together but I still went around the edges in between the mattresses with hot glue just to give it a little extra stick and make them easier to deal with while covering them. The foam along the back was higher than the shipping pallets on the back. I liked the look this way even though it wasn’t a great head-rest.
-
 Step 10
Now the more complicated part. We need to figure out how much fabric to buy! This will depend on what kind of fabric you’re using. Standard fabric widths are 36″ and 45″. Home decor or upholstery fabric (which I’d recommend using as it’ll be sturdier and handle much more use) is generally 54″ or 60″. I used an awesome microfiber home decor fabric that I found at Joann Crafts. They had it in many different colors and I went with burnt orange. This fabric came in 54″ width.
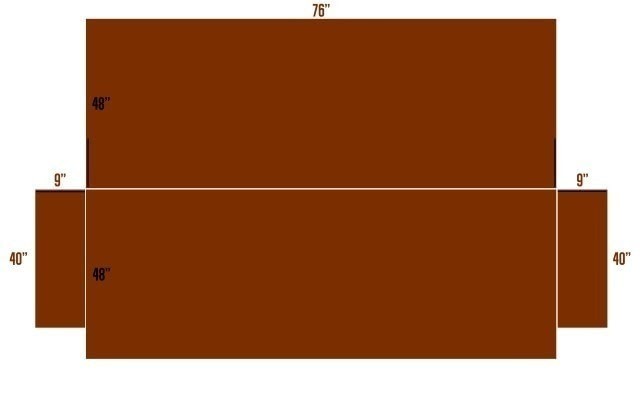
I used four cuts of fabric per pad. One cut covered the top and one side, one covered the bottom and opposite side and the other two covered the short sides. Here’s the cuts for the long base:
-
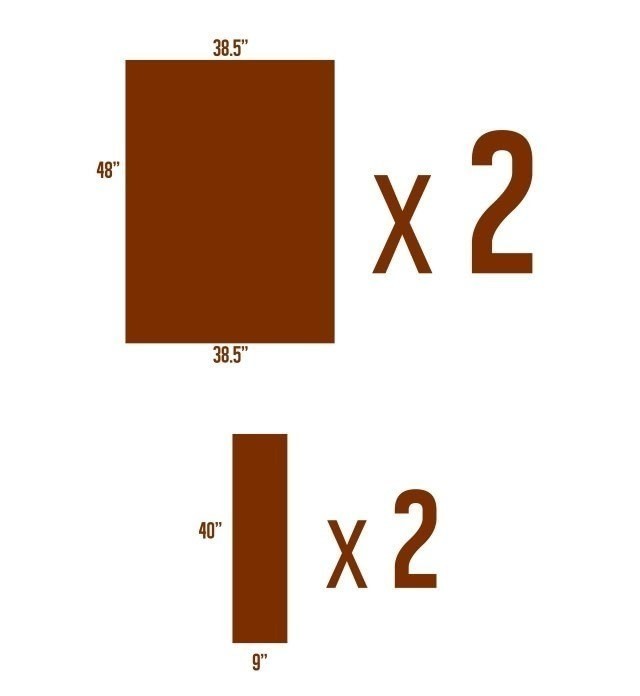
 Step 11
I added only a half inch seam allowance to each side, you may decide you want to add more or less.
Sew the 40″ side of the small pieces to the 48″ side of one of the long pieces right sides together, matching it up with the 76″ side as shown:
-
 Step 12
Then sew the other long piece to the edge of this piece right sides together:
-
 Step 13
Now sew the 9″ side to the loose 48″ side right sides together as shown by the black lines:
-
 Step 14
Finally, sew the loose 40″ sides to the remaining edges of the long piece:
-
 Step 15
Once this is all turned back right side out, you will have a slipcover shape, one long end is left open. Here are the cuts I used for the other cushions:
The two base square ones: -
 Step 16
The two long back ones:
At this point, depending on the fabric you used, you may need to iron it and press seams. Then you can insert your foam pad. To finish the cushion, tuck the loose long side around the foam, fold the two 9″ sides and the 76″ side down to hide the edge of the fabric and enough so that it meets the edge of the cushion.
Hand stitch or be lazy like me and just safety pin! I hid the pins by putting them on the bottom/back of every cushion. See, you can’t even tell!


Comments


