About
Made by Maribel Made. Inspired by Tinyhearts Designs.
On one of my recent trips to Etsy Labs I learned how to make a reversible tote bag as instructed by Kim from Tinyhearts Designs. The bag was so easy to make and after I finished it it very quickly became my main purse. It’s lightweight, versatile and perfect for summer! This tutorial is based on the pattern Kim showed us. I hope you enjoy making one of your own. :)
-
 Colleen C. favorited Diy Reversible Tote Bag
21 Oct 00:15
Colleen C. favorited Diy Reversible Tote Bag
21 Oct 00:15
-
 HylianWriter534 favorited Diy Reversible Tote Bag
09 Jun 05:14
HylianWriter534 favorited Diy Reversible Tote Bag
09 Jun 05:14
-
 Caron K. favorited Diy Reversible Tote Bag
23 Dec 08:21
Caron K. favorited Diy Reversible Tote Bag
23 Dec 08:21
-
Caron K. added Diy Reversible Tote Bag to Bags & Purses
23 Dec 08:21
-
janet b. favorited Diy Reversible Tote Bag
10 Apr 07:01
-
 Kathi N. favorited Diy Reversible Tote Bag
14 Nov 01:39
Kathi N. favorited Diy Reversible Tote Bag
14 Nov 01:39
-
 Aimee R. favorited Diy Reversible Tote Bag
16 Apr 12:58
Aimee R. favorited Diy Reversible Tote Bag
16 Apr 12:58
-
julie c. added Diy Reversible Tote Bag to to do list
17 Jul 16:41
-
Kathy S. favorited Diy Reversible Tote Bag
15 Jul 19:20
-
 Faith S. favorited Diy Reversible Tote Bag
27 Apr 05:27
Faith S. favorited Diy Reversible Tote Bag
27 Apr 05:27
-
 Step 1
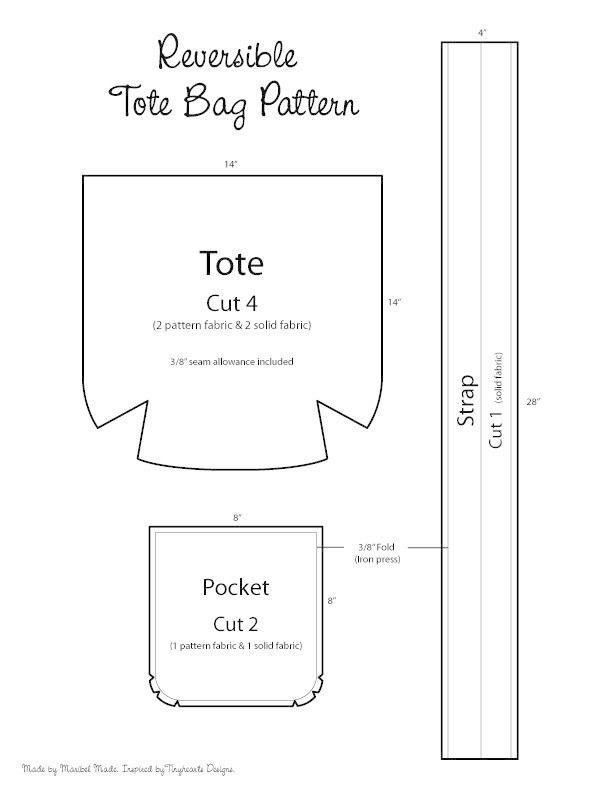
The pattern on the left is not to size, but I’d recommend printing it and using it for reference as you follow along.
-
 Step 2
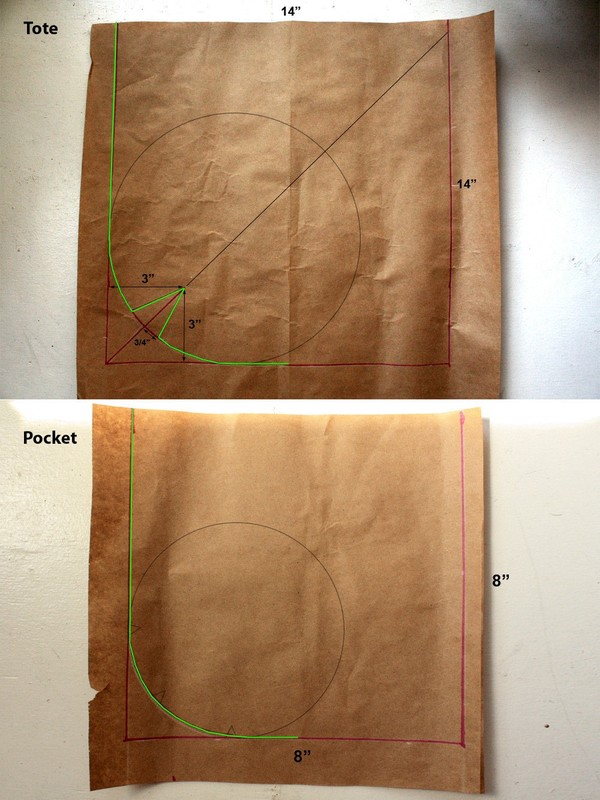
First you’ll need to recreate the pattern pieces to scale on paper. I used a brown paper similar to a brown paper grocery bag. This image will help you draft the dimensions and show you how to add the darts (the cuts on the tote piece). A compass or flower pot can also help you make the curves at the bottom of each piece. Once you’ve drawn your lines, cut your squares, fold them in half vertically and cut along the green line so that each piece is symmetrical. The strap is pretty straight forward; cut it according to the dimensions above (4″ x 28″).
-
 Step 3
Begin cutting your fabric by folding the fabric with the right sides facing each other. Folding it this way will let you mark the wrong side of the fabric and give you two finished pieces. Pin your “tote” pattern piece to the layered fabric and trace with a pen or pencil. Do this for your pattern and solid fabric. For the “pocket” and “strap” there is no need to fold the fabric over since you’ll only need one of each. Cut 1 pattern and 1 solid pocket, then cut 1 solid strap.
-
 Step 4
Once you’ve ironed all your pieces, focus on the pockets. With wrong side up, fold the right side about 3/8″ and press as you move down towards the bottom of the pocket, curving the bottom with the help of the small darts at the bottom, and around to the left side of the pocket. If you need to plead the fabric a little this is fine too as long as you get a somewhat smooth curved edge. Once you’ve pressed both sides and bottom, fold the top about 5/8″ and press.
-
 Step 5
Now focus on the strap. With wrong side up, fold about 3/8″ from the top and press. Do the same for the bottom. Then fold the piece in half horizontally (top to bottom), placing the top fold against the bottom fold. Press all along the strap with right side facing up.
-
 Step 6
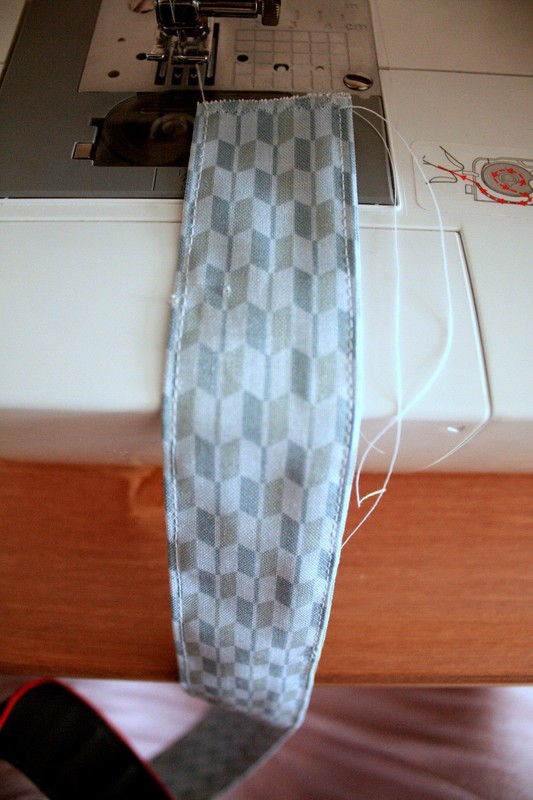
We’re now ready to sew! Let’s begin with the easiest part: the strap. Sew each side of the strap about 1/8″ from the edge.
-
 Step 7
That was easy. Now let’s work on the 4 tote pieces. Sew each dart about 1/4″ from edge with right sides facing each other. To sturdy your bag add some zigzag as well.
-
 Step 8
Now focus on the pocket. I’ve use pins to help guide me during sewing. With right side up, sew the top edge of the pocket about 1/2″ from the edge. DO NOT SEW SIDES or BOTTOM YET! Grab a contrasting tote piece and align pocket in the middle with pins (both pieces right side up). You’re now ready to sew the sides and bottom of the pocket. Sew all around pocket about 1/8" from the edge leaving the top open.
-
 Step 9
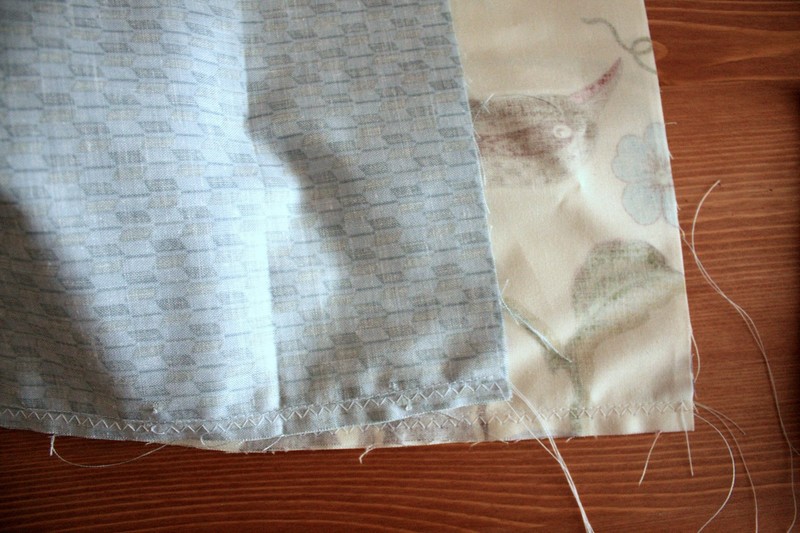
Sew your tote pieces (pattern pieces together and solid pieces together) with right sides facing each other at about 3/8″ from the edge. Add zigzag to both pieces.
-
 Step 10
Turn your patterned (floral) piece right side out and insert the wrong side out solid into your tote. Align the tops of the inside and outside of the tote with your hand by pressing and pulling them together. Once you have them close by fold them in towards each other about 5/8″ from the top. You may have to fold the inside in more than the outside to get them to align. Secure your folds using pins. When you get to each side seam insert each end of the strap at about 1″ between the two folds and pin.
-
 Step 11
This is the final step! Sew all around the tote at 1/8″ and at 1/2″ from the edge. This double seam will help secure your strap and give your tote a finished look. Voila, you now have a handmade reversible tote bag! Enjoy. :)