


About
Create a Faux Greenery Arrangement in Your Home On A Budget
I found a beautiful faux fern arrangement when I was searching for inspiration for our Master Bedroom decor. We’re in the middle of a room makeover and I’m trying to pull together the finishing touches of the design.
Unfortunately, I just couldn’t fit this fern arrangement into our room makeover budget. But, I did have room in the budget for a DIY project.
I took a trip to our local Michaels Store and was able to make my own version of this faux fern arrangement for less than $25!
-
 Summer favorited Diy Faux Fern Arrangement
09 Aug 06:41
Summer favorited Diy Faux Fern Arrangement
09 Aug 06:41
-
 jeannie.travis1 commented on Diy Faux Fern Arrangement
22 May 10:54
jeannie.travis1 commented on Diy Faux Fern Arrangement
22 May 10:54
-
 Crafterella featured Diy Faux Fern Arrangement
21 May 23:00
Crafterella featured Diy Faux Fern Arrangement
21 May 23:00
-
 Christene A Holder published her project Diy Faux Fern Arrangement
20 May 09:00
Christene A Holder published her project Diy Faux Fern Arrangement
20 May 09:00
-
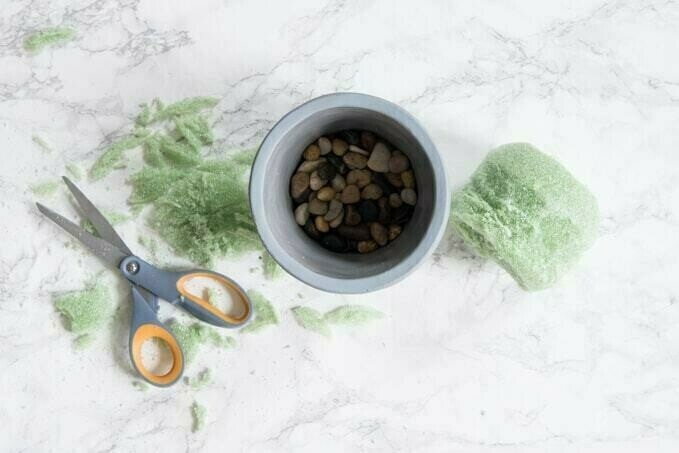
 Step 1
First, gather all of your supplies.
-
 Step 2
Because we’re working with fake plants, we won’t be using any soil. That also means that there’s nothing weighing the planter down. And since the fern greenery stem we’re using is fairly large, you’ll want to make sure your arrangement doesn’t topple over.
Take a few handfuls of river rocks and place them at the bottom of the planter. I only filled my planter with about an inch and a half of rocks.
-
 Step 3
Next, you’ll want to get a styrofoam ball that fits inside of your planter. This styrofoam ball was the exact same diameter as the top opening of my planter. Try to find one that fills the opening as best as you can.
-
 Step 4
Since my planter is tapered, the styrofoam ball didn’t sink down low enough below the edge. I didn’t want the styrofoam to be visible over the edge of the planter, so I started shaving away pieces of the ball using a pair of scissors.
I ended up with a sort of “hamburger shape” once I was done. I removed enough of the sides so that the ball could fit into the tapered part of the planter. I also slightly flattened the top so that it didn’t peek out over the edge of the planter.
-
 Step 5
Here’s what mine looked like once it had it inside the planter.
-
 Step 6
Now, it’s time to add the fern stem. Take your faux fern greenery stem and push it straight into the styrofoam. Make sure that as you’re pushing the stem into the styrofoam that you’re keeping it upright and straight.
-
 Step 7
Once you have the fern stem at a height that you like, remove it from the styrofoam and set it off to the side.
Now, this is the part of the project where I should have done the steps in a different order. At this point, I should have used hot glue to attach the styrofoam ball to the sides of the planter. But, I was so excited about my fern arrangement that I just decided to glue the stem in first.
You can do this project either way. But, it would have been much easier to attach the styrofoam base to the planter without the fern stem already attached to it. You’ll see why from the pictures. I had to keep moving he fern branches out of the way to get the glue in there.
-
 Step 8
Next, use the hot glue gun to secure the fern stem into the styrofoam base.
-
 Step 9
Now, you will need to attach the styrofoam base to the sides of the planter. Otherwise, the fern will just topple over.
-
 Step 10
Using a LOT of hot glue, I filled the space between the styrofoam ball and the planter walls to create a solid base. This took a little bit of time to get enough glue in there to fill all the gaps. Once the glue was dried, I had a super solid planter.
-
 Step 11
To finish off the faux fern arrangement, you will want to cover up the styrofoam with a more natural looking material.
I decided to use a matte black vase filler. I’m not exactly sure what material this was, but the pieces seemed like burned mulch chips. They had an ashy texture to them and the black color came off on my hands.
Working one piece at a time, I glued each vase filler piece onto the styrofoam base. I took the time to individually hot glue the pieces so that they wouldn’t fall off of the arrangement.
-
 Step 12
Keep gluing and overlapping the vase filler until you can no longer see the styrofoam base.
-
 Step 13
Finally, once everything is glued down and in place, your faux fern arrangement will be done!


Comments


