About
An embroidered and painted card with falling stars
One of my goals for this year is to send more cards and letters, and another goal is to make and share more art...so I thought, why not combine the two? Here's a DIY for a "falling stars" painted and embroidered card. The good thing about this project is that you can be a little (or a lot) messy, and it will still look good when you're finished, I promise.
-
 Kaiulani W. favorited Diy Falling Stars Card
16 Dec 21:52
Kaiulani W. favorited Diy Falling Stars Card
16 Dec 21:52
-
 lynn.wagner.501 favorited Diy Falling Stars Card
11 Aug 09:39
lynn.wagner.501 favorited Diy Falling Stars Card
11 Aug 09:39
-
 Theresa C. favorited Diy Falling Stars Card
09 Jul 06:41
Theresa C. favorited Diy Falling Stars Card
09 Jul 06:41
-
 Lee Rose added Diy Falling Stars Card to papercraft
30 Jun 03:26
Lee Rose added Diy Falling Stars Card to papercraft
30 Jun 03:26
-
 Vandana B. favorited Diy Falling Stars Card
04 Mar 00:08
Vandana B. favorited Diy Falling Stars Card
04 Mar 00:08
-
Katrina P. favorited Diy Falling Stars Card
16 Feb 05:05
-
 Pimke added Diy Falling Stars Card to Origami
22 Jan 17:37
Pimke added Diy Falling Stars Card to Origami
22 Jan 17:37
-
 emmabota73 favorited Diy Falling Stars Card
14 Dec 21:07
emmabota73 favorited Diy Falling Stars Card
14 Dec 21:07
-
 Angela I. favorited Diy Falling Stars Card
30 Nov 01:50
Angela I. favorited Diy Falling Stars Card
30 Nov 01:50
-
 Kinhime Dragon favorited Diy Falling Stars Card
28 Sep 15:40
Kinhime Dragon favorited Diy Falling Stars Card
28 Sep 15:40
-
 Step 1
What you'll need:
- blank cards (you can also use cardstock cut to the size of your envelope). I used Strathmore Canvas Cards, size 5x7. (There's a good price at Jerry's Artarama right now.) I bought these because I plan on making other cards with paint in the future, but you can really use any heavier weight paper cards.
- paint in various shades of blue. You can use acrylic or gouache or watercolor, whatever you have on hand. I used Winsor & Newton Galeria Acrylics. If you are only buying paint for craft projects, though, you might want to go with a cheaper alternative. You could use just one shade of blue and mix in a little black to get your darks and thin with water to make your lights.
- paintbrush. Really any size will do.
- silver or gold embroidery thread. I used silver metallic thread, but you should know that working with any metallic embroidery thread is a huge pain, in my experience. The individual threads like to unravel and tangle up, and it's difficult to make your stitches smooth and uniform. I wasn't too concerned with that for this project, but just keep in mind that it is more difficult to work with so you may want to go with gold or silver thread that is not metallic.
- an embroidery needle.
- something to poke holes in your card with. They make single needle perforating tools specifically for this purpose, but I've always just used thumb tacks or pins or whatever I happened to have lying about...in this case, hello kitty push pins. If your paper is thin and your needle is sharp enough, you may not need to pre-poke your holes, if that makes sense. (I'm sure there's a more technical term for that lol).
- a palette for mixing your paints
- cup of water
- tape. I used regular Scotch transparent tape.
- silver pen. I used a metallic silver DecoColor paint pen.
Optional:
- a piece of cardstock cut to the same size as your card
- glue. I used Mod Podge; any glue or glue stick (or even double-sided tape) would probably be fine also.That looks like a lot of supplies, but most of this stuff you probably have on hand, or you can find inexpensive alternatives.
-
 Step 2
Start by painting a thin wash of blue all over your card. I made long strokes, but you can paint any way you like. Build the color gradually, getting darker at the top. (You're going for an ombré effect here). It doesn't matter if it looks a bit messy.
Take a snack break and wait for your paint to dry. Actually, it's a good idea to clean your brush and palette while you're waiting. I didn't; I almost never do, and always end up washing and scraping for hours trying to get dried paint off. Don't be like me. ;)
-
 Step 3
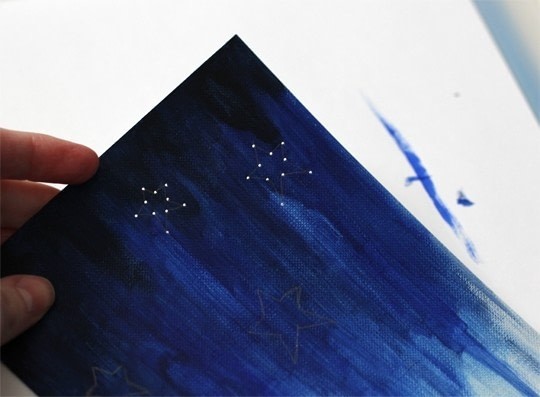
After your paint has dried--it shouldn't take very long--take a pencil and lightly sketch out where you want your stars to be. Then, poke holes at all of the stars' points. Don't worry if your stars aren't perfect. I actually think they look better when they're hand-drawn and slightly wonky.
-
 Step 4
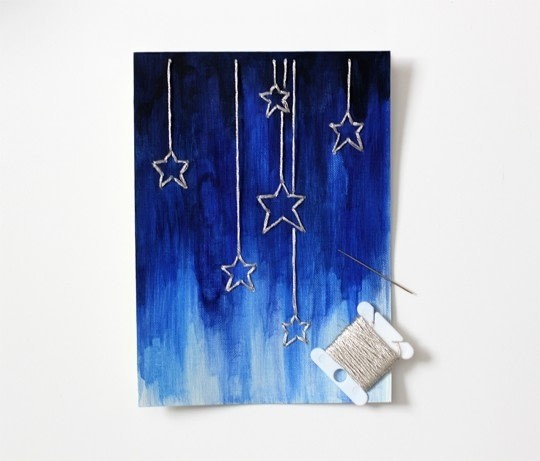
Cut a long piece of embroidery thread, go through the first hole, and tape the end to the back. (Taping is better than knotting in this case because it will lay flatter.) Continue stitching around all of your stars. Make a long stitch from each star to a point near (but not too near) the top. When you've made the last stitch, tape your end again.
I didn't get a picture of this next step, but it's pretty self-explanatory. Take a piece of cardstock cut to fit inside your card and glue inside the front to cover your stitches. This is optional because there's nothing wrong with letting the backside of your stitches show. It will look tidier on the inside, though, and give you more writing surface.
-
 Step 5
I finished my card by adding some dots with my silver paint pen.
And that's it. Write a sweet note and make someone's day a lot more awesome. :)