


About
With some duct tape and paint you can look like one classy stud or studette!
I was looking at steampunk photos, and was drooling over some awesome top hats I saw. Then I happened to glance over at my duct tape and it sparked this whole idea. And that's where the magic began.
Tags
-
 Key West Witch favorited Diy Duct Tape Steampunk Top Hat
03 Aug 01:24
Key West Witch favorited Diy Duct Tape Steampunk Top Hat
03 Aug 01:24
-
 Heidi S. favorited Diy Duct Tape Steampunk Top Hat
01 May 22:15
Heidi S. favorited Diy Duct Tape Steampunk Top Hat
01 May 22:15
-
Beth W. favorited Diy Duct Tape Steampunk Top Hat
17 Dec 01:29
-
 Stacey B. favorited Diy Duct Tape Steampunk Top Hat
26 Oct 11:48
Stacey B. favorited Diy Duct Tape Steampunk Top Hat
26 Oct 11:48
-
 Juliet P. favorited Diy Duct Tape Steampunk Top Hat
07 Oct 09:03
Juliet P. favorited Diy Duct Tape Steampunk Top Hat
07 Oct 09:03
-
 VillainousNinja added Diy Duct Tape Steampunk Top Hat to Goth/Punk
24 Aug 22:53
VillainousNinja added Diy Duct Tape Steampunk Top Hat to Goth/Punk
24 Aug 22:53
-
pyxye s. favorited Diy Duct Tape Steampunk Top Hat
03 Jul 02:27
-
Ilana M. favorited Diy Duct Tape Steampunk Top Hat
19 Jan 03:44
-
 Kirt D. favorited Diy Duct Tape Steampunk Top Hat
30 Dec 18:56
Kirt D. favorited Diy Duct Tape Steampunk Top Hat
30 Dec 18:56
-
 Virginia A. favorited Diy Duct Tape Steampunk Top Hat
30 Dec 04:58
Virginia A. favorited Diy Duct Tape Steampunk Top Hat
30 Dec 04:58
-
 Step 1
First, you should have a top hat to use as a model (you can even by cheap plastic ones at a party store to use)
-
 Step 2
Cover the outside of the hat with duct tap, be sure to have the sticky side facing out. Completely cover the sides, and top of the hat. I do the first layer this way to make it easy to slide off of the hat.
-
 Step 3
Once you have covered the sides, add a layer of tape to cover the sides, sticky side in. If you'd like, you can do 2 layers of tape to make it a little more durable. Once you have finished covering the sides, slide it off of your model hat.
-
 Step 4
Flip the hat upside down, and cover the rim with tape (if you're using a fabric hat, it should peel off easy, but if you're using a plastic hat you may want to apply it sticky side out as you did with the sides).
-
 Step 5
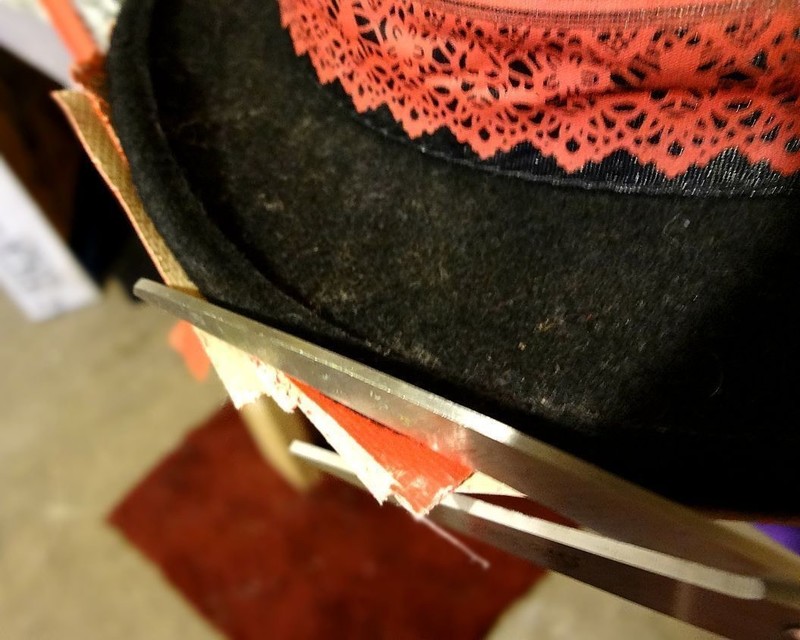
Once you have the rim completely covered, flip the hat right side up, and trim the tape around the edges to line up evenly with the rim.
-
 Step 6
After it's been trimmed, carefully peel off the tape (it should come off in a ring shape) and cover the other side with tape.
-
 Step 7
Trim the tape to match your first layer.
-
 Step 8
Once you have finished your rim, match it up to the top part of your hat, and tape together (tape it on the outside AND the inside of the hat).
-
 Step 9
Once your pieces are together, you should be able to tell it's a top hat.
-
 Step 10
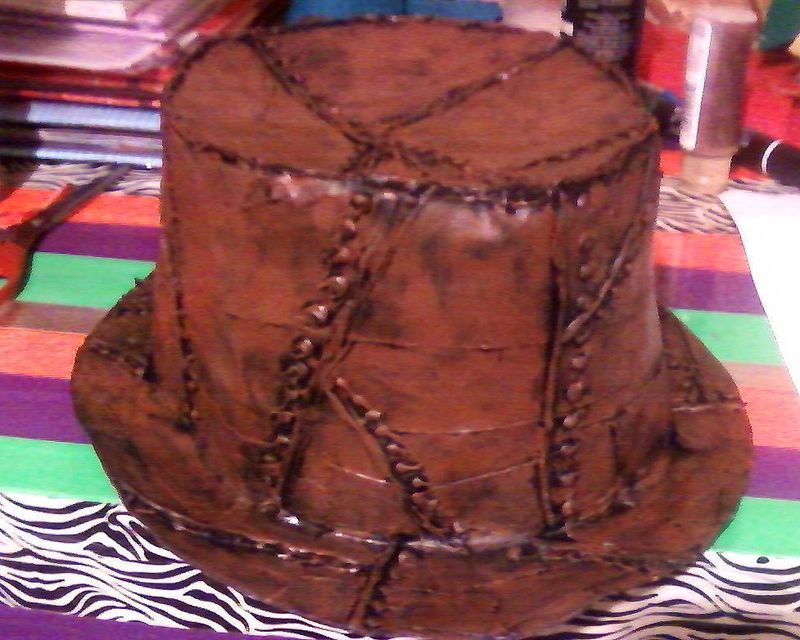
Using the hot glue gun, make different lines and studs (after the hat is painted, it should look like it's a pieced together hat).
-
Step 11
Paint the entire hat black, and apply a 2nd coat. This will give your hat the antique effect, so double check to make sure you've gotten it covered well. (Sorry, I forgot to get a photo of this stage)
-
 Step 12
I used my finger to rub on the brown paint, which is messy, however it's easier to prevent odd paintbrush strokes, and personally I feel like it's easier to control where it goes. Rub it on, and try not to get too much in the creases, that way it won't ruin the antiqued leather look.
-
Step 13
Use a sealer spray, and cover the hat, and be sure to get under the rim as well.
-
 Step 14
Using the hot glue gun, attach the lace or ribbon of your choice around the hat, I chose a copper lace for mine. If you wish, you may also add other things to decorate it (I used little bugs, a butterfly and little flowers).
-
 Step 15
Now you can sit back and admire the cheapest steampunk top hat ever!


Versions
See all 8 »


Comments


