

About
Show all sides of your favorite beads!
I love beads of all shapes and sizes, but sometimes the prettiest parts are hidden if you string them in the traditional way.
-
 Kathy C. favorited Disc Bead Earrings
09 Apr 10:41
Kathy C. favorited Disc Bead Earrings
09 Apr 10:41
-
 laura.hutchison.965 favorited Disc Bead Earrings
05 Mar 02:42
laura.hutchison.965 favorited Disc Bead Earrings
05 Mar 02:42
-
 Sarah Sylvia S. favorited Disc Bead Earrings
18 Jul 02:03
Sarah Sylvia S. favorited Disc Bead Earrings
18 Jul 02:03
-
 Nicole B. added Disc Bead Earrings to Jewelry
31 Jan 20:36
Nicole B. added Disc Bead Earrings to Jewelry
31 Jan 20:36
-
 kzack408 favorited Disc Bead Earrings
22 Jan 23:44
kzack408 favorited Disc Bead Earrings
22 Jan 23:44
-
Cheryl S. added Disc Bead Earrings to Earings
19 Dec 08:15
-
 Sandi G. favorited Disc Bead Earrings
18 Dec 22:35
Sandi G. favorited Disc Bead Earrings
18 Dec 22:35
-
 Crafterella featured Disc Bead Earrings
11 Dec 23:00
Crafterella featured Disc Bead Earrings
11 Dec 23:00
-
 Pam favorited Disc Bead Earrings
01 Dec 21:34
Pam favorited Disc Bead Earrings
01 Dec 21:34
-
 Elisabeth A. published her project Disc Bead Earrings
30 Nov 09:00
Elisabeth A. published her project Disc Bead Earrings
30 Nov 09:00
You Will Need
-
 Step 1
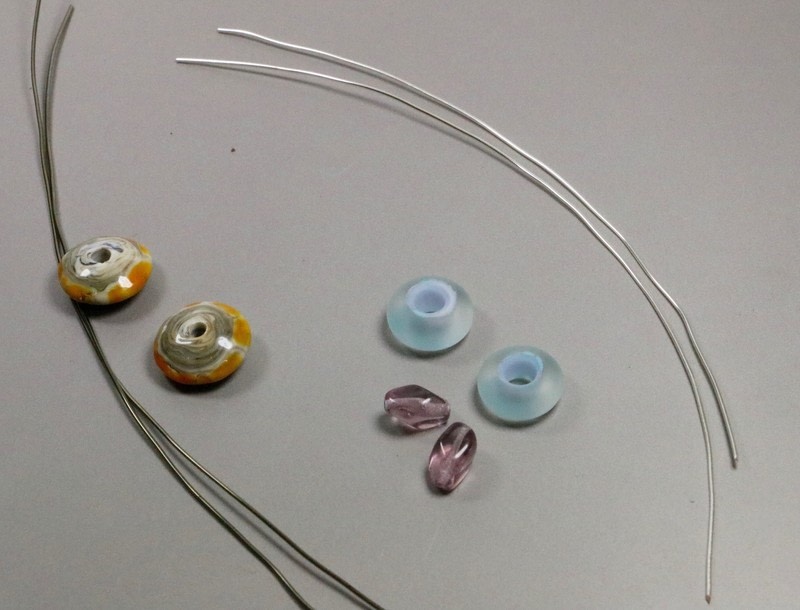
or supplies you’ll need a pair of disk shaped beads, and two lengths of wire. More is better, but I would go with at least 6 inches for the single bead style and 8 inches for the two bead style. I highly recommend copper based wire from Parawire (www.parawire.com) which is beautiful, comes in a zillion colors and is very affordable. The orange beads are my own creation, the ethereal blue/purple beads are from HMB Studios (www.etsy.com/shop/hmbstudios)
-
 Step 2
For the single bead style, using chain nose pliers, bend the wire 90 degrees in the middle.
-
 Step 3
Use wrap and tap pliers (or a sharpie) to bend one side into a large loop. It should be large enough for the bead to rotate freely.
-
 Step 4
String the bead onto the wire and position in your loop.
-
 Step 5
Using chain nose pliers to grip the loop right below where the wires cross, wrap the horizontal wire around the vertical wire 2-3 times.
-
 Step 6
Trim the excess of the wrapped wire, and then bend the vertical wire 90 degrees.
-
 Step 7
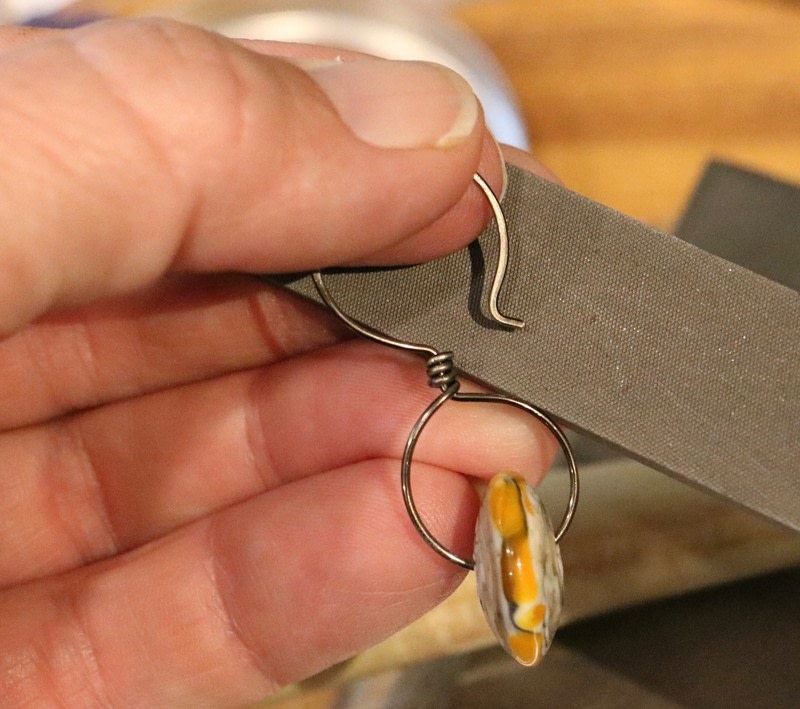
Use the wrap and tap pliers or your sharpie to form a similarly sized loop, so it looks like a figure 8.
-
 Step 8
Trim the excess wire, a little past were the circle meets.
-
 Step 9
Then use chain nose pliers to bend the end out a little. I find this makes getting the earrings into your ear easier.
-
 Step 10
Using a chasing hammer and bench block to gently flatten the top/ear part of the earring – this will harden it. Take care not to hammer your bead!
-
 Step 11
You can also gently file the end to smooth it out and make it more comfortable to put in your ear
-
 Step 12
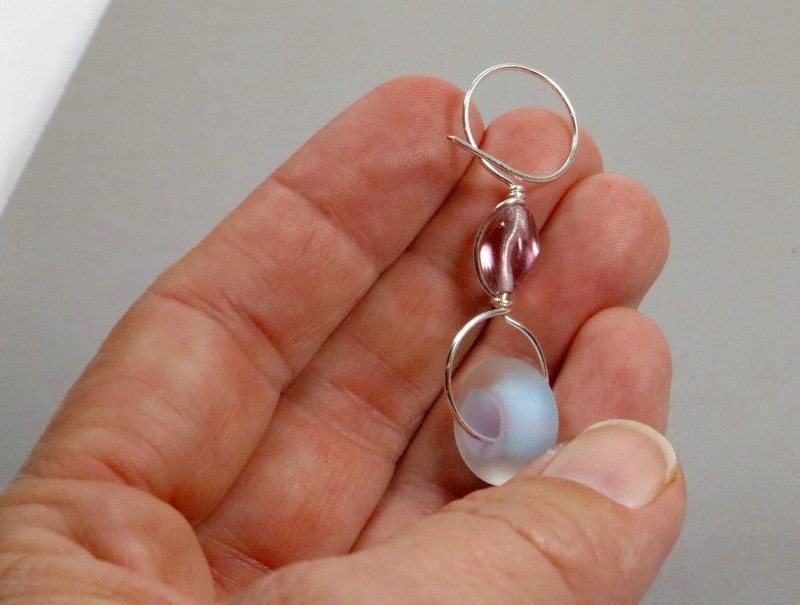
The two bead version starts the same way, only start with a little more wire and make your bend at about the 1/3 mark. Use the 2/3 side to make your loop, and wrap it 1 or 2 times after putting your bead on the loop.
-
 Step 13
Then put our accent bead on the short/vertical wire.
-
 Step 14
Pull the horizontal wire up and around the accent bead, and then wrap around the vertical wire 2 to 3 times. The wired wrapped around your accent bead doesn’t need to be too tight. Trim off the excess and bend the vertical wire 90 degrees with your chain nose pliers.
-
 Step 15
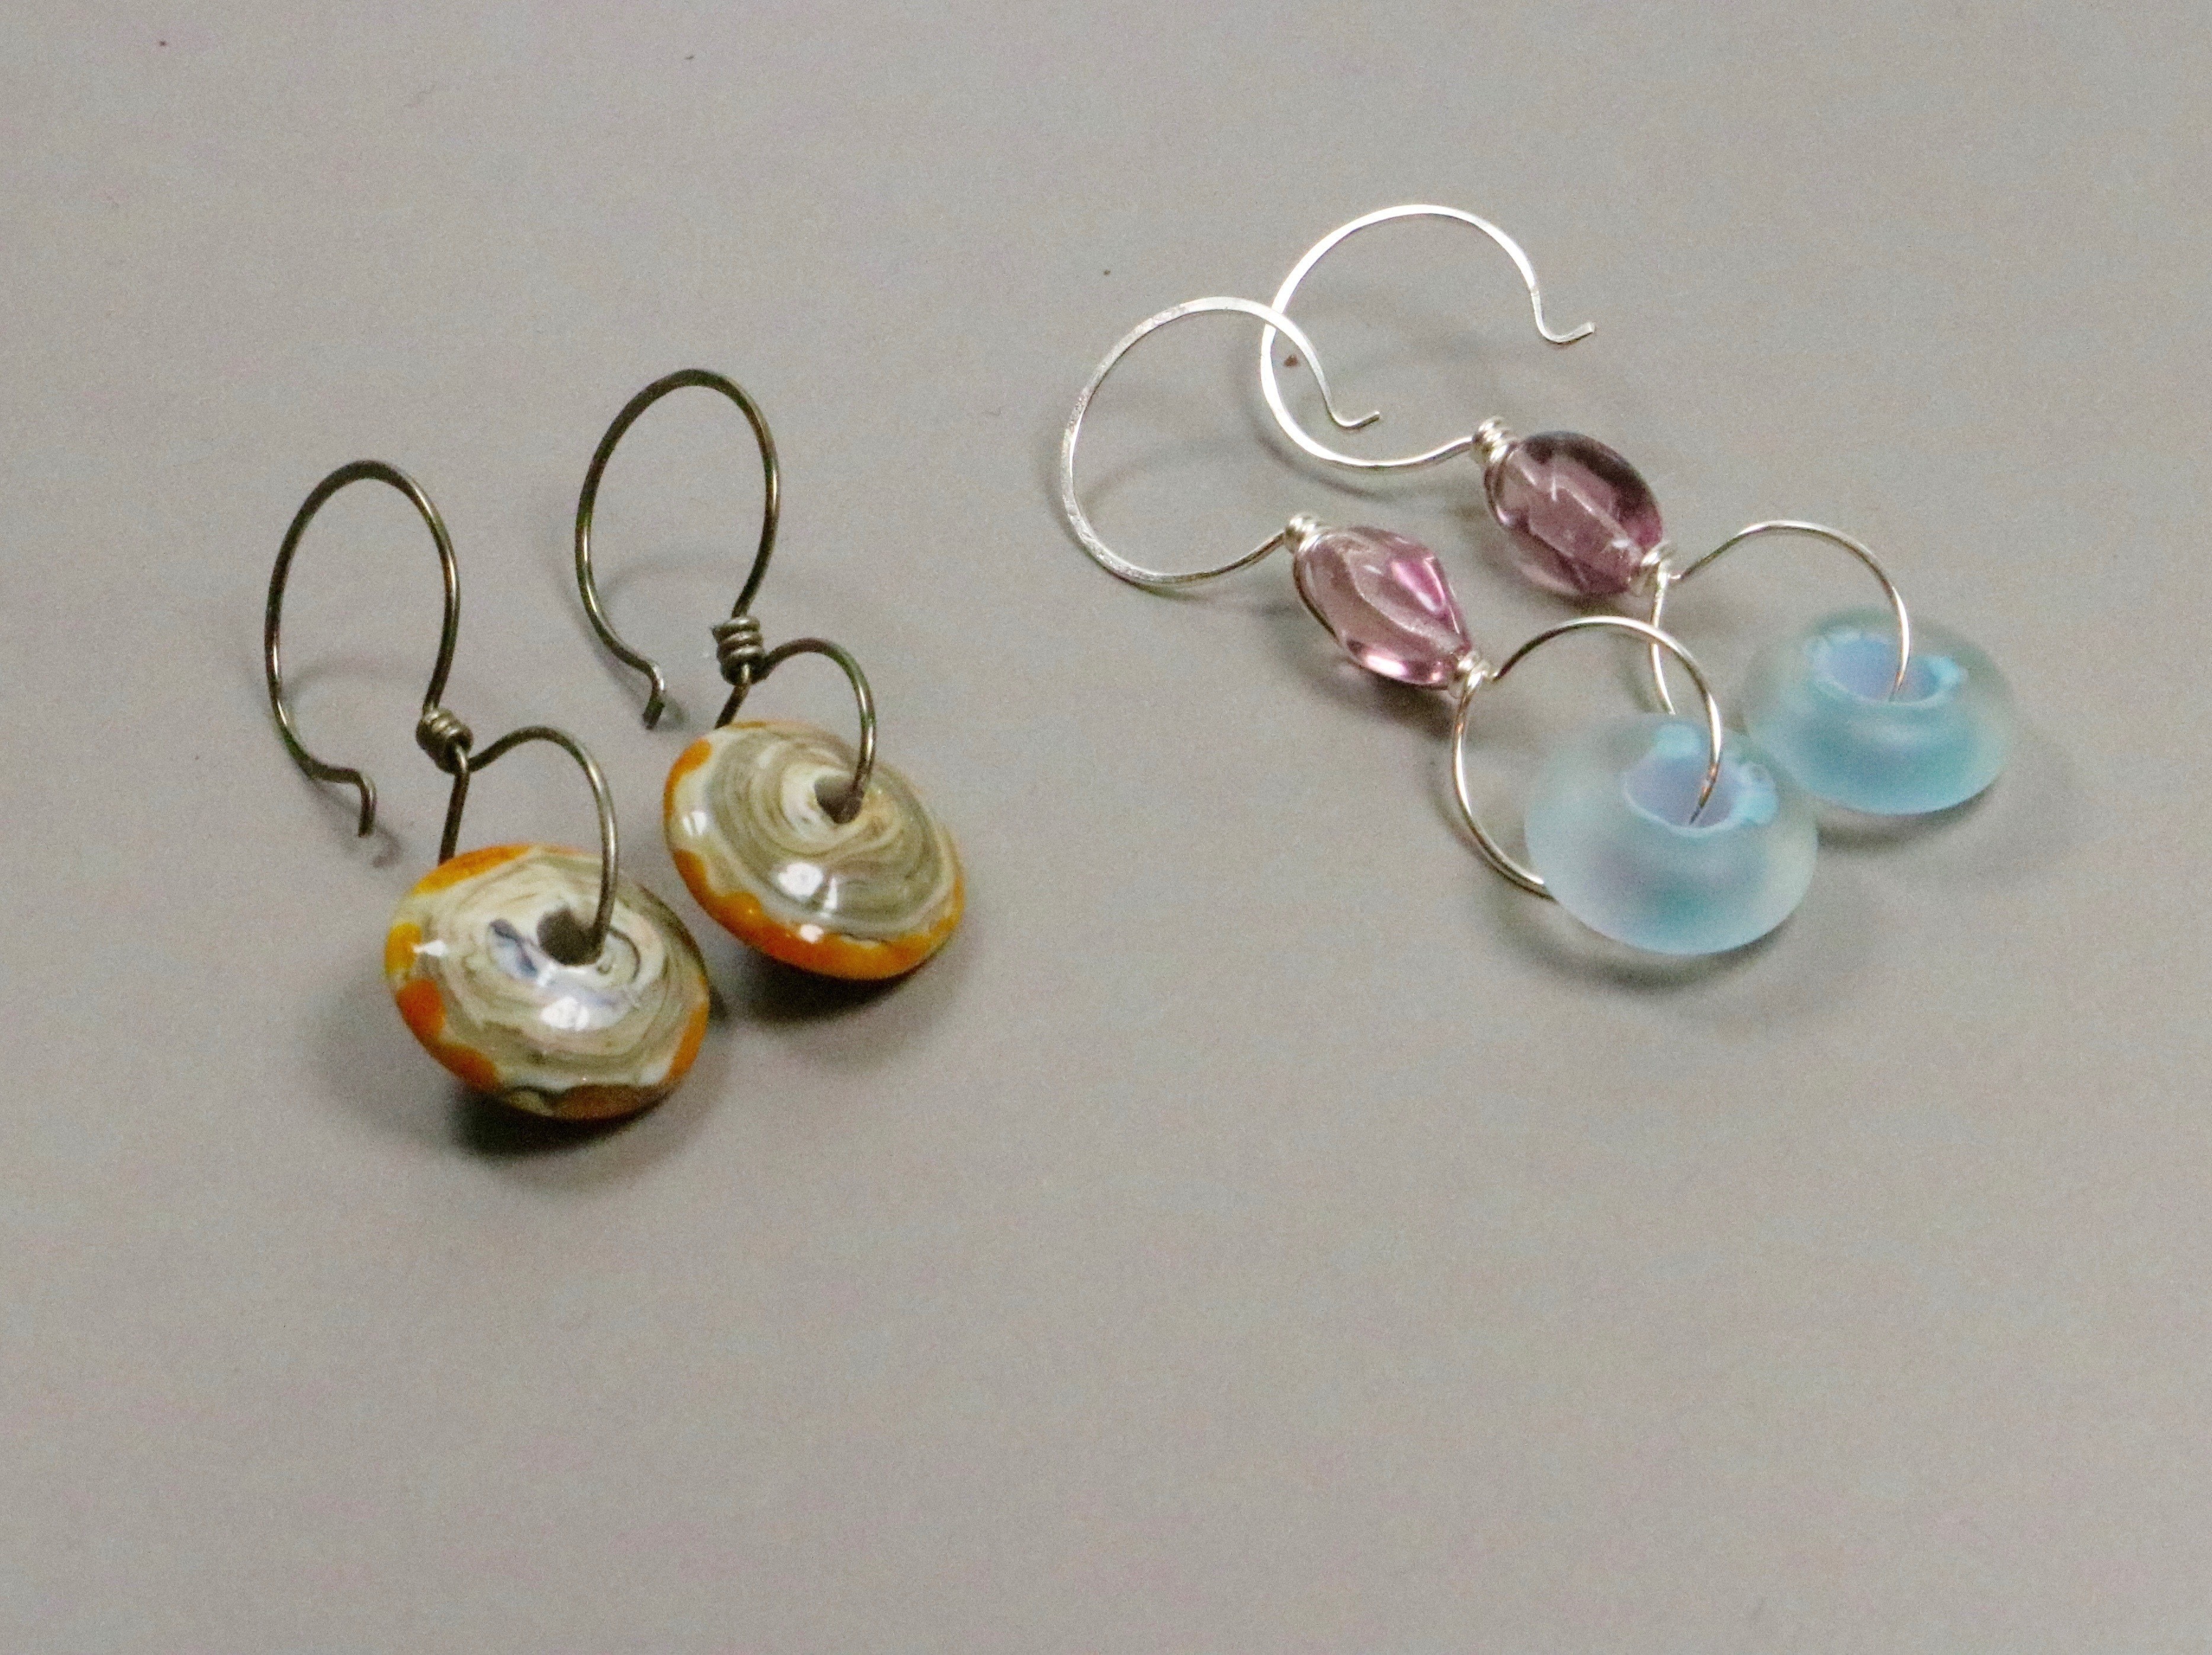
Finish the earring as you did the other style by forming the second loop, trimming excess wire, hammering and filing.
-
 Step 16
Enjoy!