About
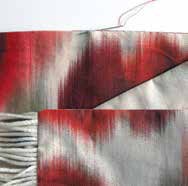
make a unique scarf - a perfect gift to make from a small amount of treasured fabric
Choose a colour from your patterned fabric to determine your dye colour. make in wool fabric for a winter muffler, a soft silk for a summer evening scarf.
-
 Diver added Dip Fringed Scarf to 12
29 Oct 02:00
Diver added Dip Fringed Scarf to 12
29 Oct 02:00
-
 jemima schlee published her project Dip Fringed Scarf
23 Apr 09:00
jemima schlee published her project Dip Fringed Scarf
23 Apr 09:00
-
 Step 1
To make your fringing: cut your cotton yarn into 24cm lengths – I wrapped mine around a book, which measured roughly half that length to speed this up.
Cut two pieces of white tape 36cm long and, using a long stitch on your machine and dark thread, sew from one end to the other along the length of each piece of tape, 5mm from one edge.
Take one piece of tape and, with the stitched line nearest you, and starting 1.5cm in from one end, hook single pieces
of the cotton yarn up through one dark thread stitch and back down through the one next to it. Continue all along the stitched line until you are 1.5cm from the other end . -
 Step 2
Tweak and adjust the lengths of your yarn by pulling them gently back and forth through the dark stitching so that they are as even as you can make them. This lovely soft cotton does have a bit of give to it, so don’t worry if the lengths vary within 5mm to 1cm in length, but trim any longer ones. Now make a tight knot a couple of millimetres from each yarn end.
Repeat steps 3 and 4 with the other piece of tape.
Prepare your dye in a large (8 litre) saucepan or bucket following the instructions on the packaging.
Soak your two lengths of fringing in cold water and squeeze out so that they’re still fairly damp. Hang them around the edge of the saucepan so that the knotted tips of the fringes are submerged in the dye by about 3cm–4cm and leave for 1 hour.
Finish off the dying process by following the washing instructions by hand (don’t be too rough with your fringing) and leave to dry. Do any last minute length adjustments to your fringing before moving on to the next step.
-
 Step 3
To assemble your scarf, first fold your fabric in half so that
it measures 36cm x its original width and press with an iron. Open your fabric out and lay it right side up. Take one piece of fringing and fold in and pin or tack the left hand un-fringed 1.5cm end. Lay it along the selvedge edge of your fabric with the tucked in end on the crease of the central line and the other end aligned with the raw edge. Pin or tack in place. Smooth the fringes out at, with the ones on the raw edge of the fabric pushed over to the left slightly to avoid getting them caught in the seam when you stitch the long edge. Make a line of large stay stitching or tacking a few centimetres below the top of the fringing to prevent it getting caught in the top seam. -
 Step 4
Now fold the left hand half of the fabric over along the central fold line so that all the edges meet exactly and pin or tack in place.
-
 Step 5
Stitch all three seams leaving a 15cm gap at the centre of the long edge for turning out later. Reverse stitch on either side of the turning gap to strengthen.
Trim all seams down to 1cm and snip the corners close to the stitching at a 45 degree angle to avoid bulky corners. Turn your scarf out through the turning gap, carefully pushing out the four corners to make them as sharp as possible. Remove your stay stitching to release the fringing. Tease all the seams by rolling the fabric between your fingers until you have a good sharp edge to press with an iron. At the same time, tuck the raw edges in at the turning gap, press and close with small over stitches by hand.