


About
really simple, cute dress that can be formal or casual :)
k so i had two different polka dot prints, but not that much or each, about 3/4 a yard for one and 1 yard for the other. this is my first tutorial, so i hope the instructions are clear enough :) i'll post pictures soon, but the main one is from google images and looks somewhat like the finished product. i didnt really use any measurements, and since im kinda beginner, so i just used an elastic for fit :D the whole project is pretty much self explanatory, with only 4 pieces total.
Tags
-
 duckduckpancake added Cute Tube Dress to Easy Fashion
01 Nov 15:00
duckduckpancake added Cute Tube Dress to Easy Fashion
01 Nov 15:00
-
 Lee S. favorited Cute Tube Dress
20 Apr 19:27
Lee S. favorited Cute Tube Dress
20 Apr 19:27
-
 Keila M. favorited Cute Tube Dress
08 Apr 03:51
Keila M. favorited Cute Tube Dress
08 Apr 03:51
-
 Lilly replied to a comment on her project Cute Tube Dress
24 Feb 05:40
Lilly replied to a comment on her project Cute Tube Dress
24 Feb 05:40
-
duckduckpancake favorited Cute Tube Dress
07 May 13:22
-
 midnighthime666 favorited Cute Tube Dress
27 Feb 16:03
midnighthime666 favorited Cute Tube Dress
27 Feb 16:03
-
 nhothman89 commented on Cute Tube Dress
08 Feb 13:07
nhothman89 commented on Cute Tube Dress
08 Feb 13:07
-
nhothman89 favorited Cute Tube Dress
08 Feb 13:05
-
 signe P. added Cute Tube Dress to tøj
23 Dec 22:23
signe P. added Cute Tube Dress to tøj
23 Dec 22:23
-
 rouge s. favorited Cute Tube Dress
10 Nov 03:12
rouge s. favorited Cute Tube Dress
10 Nov 03:12
You Will Need
-
Step 1
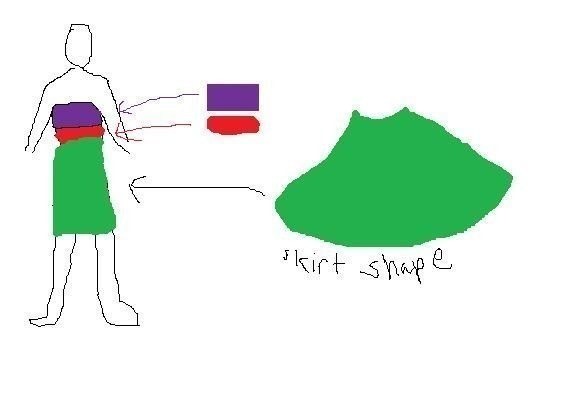
cut 2 rectangles, one for over the bust and the other for the sash-looking thing. then cut out a skirt that is kind of like the shape in the picture. the top rectangle and the skirt are the same print, the middle rectangle will be the same print as the back. you can make the skirt however long you like. i made it just above the knee :)
-
 Step 2
step 1
-
Step 3
sew all three pieces together, and hem the top bodice part.
-
Step 4
lay out front part you just sewed onto the same print fabric as the middle rectangle. cut out roughly the same shape. at the top of the back, make a casing and slip the elastic through so its tight around... that place above your boobs? i dont have a large vocabulary haha :O make sure the back is wide enough so your able to slip through without a zipper!
-
 Step 5
step 4
-
Step 6
sew the front and the back together.
-
Step 7
it should be somewhat flowy, kinda babydoll-ish but if you don't like that you can always add a sash before you sew the front and the back together.
-
Step 8
hem the bottom :)
-
Step 9
or, if you want it to be a bubble dress, make a casing at the bottom and slip an elastic through.
-
 Step 10
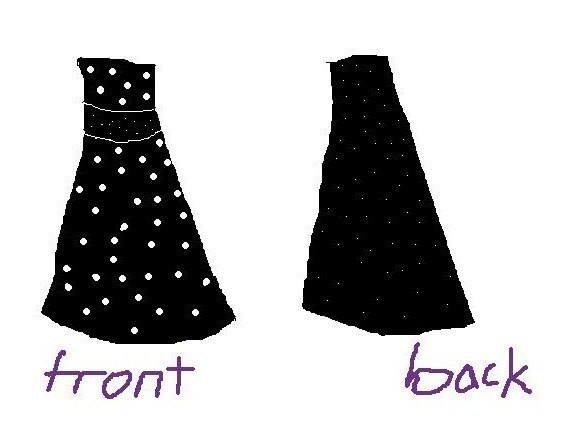
mine looked like this (kinda) :D


Do you have any simple ideas how we could the bust area a bit more fitted? maybe use some kinds of elastics, or some kinds of cutting; while preserving the simplicity of the dress :/
Good job btw!