


You Will Need
-
Step 1
To suit child 3mth-1yr
Level-Intermediate
Time - 5-6 hrs
Notes
- Some rounds on the leaves may require more/less stitches depending on the thickness/thinness of the wools you are using . Here you must use your own judgment
- Change the colour of your wool as you desire.Abrev. and stitches used
SlSt - Slip stitch
Ch - Chain
Dc - Double crochet
Sc - Single crochet
St - Stitch
Inc - Increase -
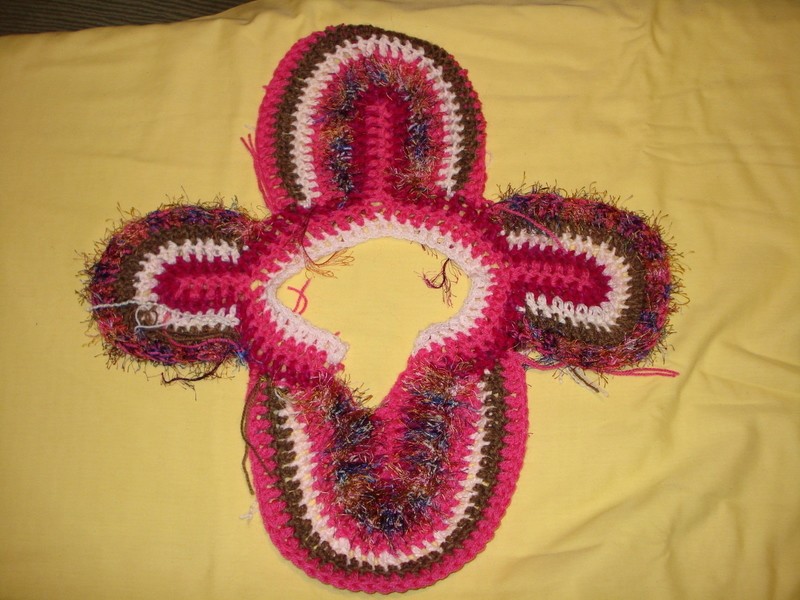
 Step 2
Rnd 2 - Dc second chain from hook and cont. till end.
Rnd 3 - Ch 2, Dc in 2nd St, 9 Dc, Ch 7, Miss first Ch, Dc back down Ch to base of Ch, Slst in base of Ch (6Dc). Cont Dc in to Rnd 2 (10 Dc), Ch 10, miss first Ch and Dc back down Ch as before, SlSt in base of Ch, Cont. Dc into Rnd 2 (10 Dc), Ch 7 Ch 7, Miss first Ch, Dc back down Ch to base of Ch, Slst in base of Ch (6Dc). Cont Dc in to Rnd 2 (10 Dc), Ch 10, Turn work over,miss first Ch and Dc back down Ch as before, SlSt in base of Ch.
Rnd 4 - Ch 2, Dc 9 in to Rn 3, SlSt into base of extended Ch stalk, Dc up Ch stalk at the end of stalk place roughly 9 St as you work around the end, Dc back down other side of Ch, Slst in final St of Ch, Cont Dc into Rnd 3 and treat eash Ch stalk in the same manner, (See pic)
When arriving at the end Ch 4, Slst into 4th St on first Ch Stalk. This creates a V for the neck hole. Cont working up Stalk with Dc around the end and SlSt in to start of Rnd 4.
Beware -do not place twist in rounds. -
 Step 3
Working “Leaves”
Next Rnd (5) - SlSt 1 Ch away from base of one Ch Stalk, Dc into bottom of leaf, work around the leaf in Dc, inc around the tip as required. SlSt into first St of Rnd 4 at the base of Ch stalk. Cast off.
Next Rnd (6) - Slst into Rnd 4 in next availiable St (2nd St from Ch stalk) Dc into top of SlSt from last round. Cont round leaf as before. Slst into Rnd 4 2nd St from stalk. Cast off
Continue working leaves in this manner untill the gaps beteween
leaves are closed.
Place more rows on longer leaves (roughly 5 rows) and less on shorter leaves (rougly three). Generally the same colours are used in the same rows on the larger leaves and again on the shorter leaves.
Tip - if leaves are curling on the ends then more st are generally
required. If the ends are wrinkling into waves then less are required. -
Step 4
Joining Round
Turn work to wrong side. Slst into Rnd 4 where the leaves meet. Join
Two leaves together with Sc in back loop of touching leaves untill leaves start to leave each other. Roughly 6-7 St. Cast off and join rest of leaves together. -
Step 5
Final Round
SlSt into a join of two leaves Dc around edge of garment. Do not DC in join of leaves but Slst. Continue till end. Slst into start of round. Cast off
Use the same colour to Sc around edge of the top of the garment. Inc. the V neck. -
Step 6
Final Round
SlSt into a join of two leaves Dc around edge of garment. Do not DC in join of leaves but Slst. Continue till end. Slst into start of round. Cast off
Use the same colour to Sc around edge of the top of the garment. Inc. the V neck.
Finishing
Work in edges and sew on button at top of V. The V can be worn at the back of garment or at the front. Button fits through a loop in garment between two Dc.
Congratulations.


Thanks for letting me know.
Free PDF download of this pattern available at http://michellewalkerdesigns.blogspot.com/