About
Tilly and the Buttons: Stretch!
Make a drapey cowl neck for snuggling up in when the weather gets cold. I love wearing my cowl neck with a brooch pinned to the drapes. If you’re making the sweater version or your fabric is 115cm (45in) wide, you’ll need 0.4m (½yd) of extra fabric.
-
 Nahina Nizam favorited Cowl Neck
23 Apr 01:27
Nahina Nizam favorited Cowl Neck
23 Apr 01:27
-
 Mackenzie V. favorited Cowl Neck
20 Mar 23:04
Mackenzie V. favorited Cowl Neck
20 Mar 23:04
-
 Crafterella featured Cowl Neck
16 Mar 23:00
Crafterella featured Cowl Neck
16 Mar 23:00
-
 Kimya J. favorited Cowl Neck
15 Mar 16:00
Kimya J. favorited Cowl Neck
15 Mar 16:00
-
 Quadrille published her project Cowl Neck
12 Mar 09:00
Quadrille published her project Cowl Neck
12 Mar 09:00
You Will Need
-
 Step 1
Cut two pieces of fabric on the fold using the cowl neck pattern piece (included on the pattern sheets), and snip notches at either end of the fold. Cut the bodice neckline using the
lower cowl neckline (marked on the pattern), and snip a notch at the centre of the neckline on both front and back bodices. Stabilize and sew the shoulders. -
 Step 2
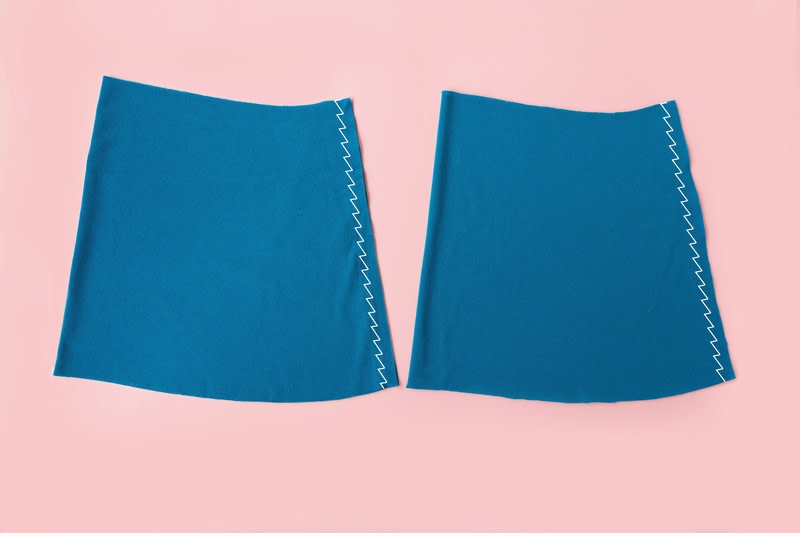
Fold each cowl neck piece widthwise, right sides together, and pin together the diagonal seams opposite the fold. Stitch or overlock (serge) the seams. Trim the seam allowances if you used a regular sewing machine and press them open or to one side.
-
 Step 3
Turn one cowl neck piece right sides out and slip it inside the other, which is wrong sides out, so they are right sides together. Pin them together around the long top edge, matching notches and seams. Stitch or overlock (serge) the seam. Trim the seam allowances if you
didn’t overlock them, and press them open or to one side. -
 Step 4
Fold the two pieces wrong sides together along the edge you just stitched and press the
fold. After stitching the shoulder seams on the bodice, pin both raw edges of the cowl neck to the right side of the bodice neckline, matching notches and lining up the back seam with the centre back notch. The necklines on the cowl neck and bodice are the same size, so you don’t need to stretch them. Stitch or overlock the cowl neck to the bodice neckline. -
 Step 5
Trim the seam allowances if you didn’t overlock them, grading the bodice layer slightly smaller than the other layers to reduce bulk. Press the seam allowances to the inside of the bodice and press the cowl neck away from the bodice. With the bodice right side up, topstitch the seam allowances to the bodice close to the seam line using a 2 x 2mm or 2.5 x 2.5mm zigzag or a twin needle.
-
Step 6
STABILIZING SEAMS TECHNIQUE
One of the things to be aware of with stretch knit fabrics is that they can sometimes stretch
out in places you’d rather they didn’t! If you’ve ever had your favourite sweater or T-shirt
become saggy at the shoulders the more you wore it, you’ll know what I’m talking about. To stop this happening, you can attach a strip of stabilizing tape to the shoulders on the back
bodice before stitching them.
I’m going to show you how to stabilize seams such as the shoulders that don’t need to stretch much. For seams that do need to stretch so you can get them on and off, such as the Joni dress waistline seam, see Stabilizing with Clear Elastic technique on page 166.
1 There are lots of things you can use as a stabilizer, though it needs to be something
that will hold its shape. Try stabilizing tape or “stay tape”, clear elastic tape, satin ribbon, or
cut strips of knit interfacing. I like to use ribbon as it’s easy to get hold of and comes in pretty colours that add a special touch to the inside of my homemade clothes. Around 6–8mm (¼in) is a good width to sit within the trimmed
seam allowances. Cut a strip of stabilizer for each area you need to stabilize, slightly longer than the seam you’ll be attaching it to.
2 Attach the stabilizing tape to the wrong side of the fabric, lining up the inside edge of the
tape so it’s just less than 15mm (5⁄8in) from the edge – close enough to the stitching line so that it will sit within the seam allowances once they’re trimmed, but not overlapping the
stitching line as it can make knit fabrics bulky and difficult to press.
If you’re using fusible tape, press it in place with an iron. If you’re using non-fusible, stitch it in place with a 2.5 x 2.5mm zigzag down the centre of the tape. Trim the ends of the stabilizer.