

About
Delight in the Seasons
Even though this card is designed to celebrate a wedding, it could easily be used for any holiday or special occasion with a few simple changes. Instead of using the romantic cameo shown here, accent the center of the card with an embellishment more appropriate for the occasion you’re celebrating. Try other chipboard shapes, altered chipboard embellishments or even buttons. I’m sure you will come up with so many fun ways to use this card.
If white is not the color choice for you, you can easily tint
the seam binding and white organza rose trim using Maya Mist or another spray ink. Tinting or dyeing your trims allows you to color coordinate them for any of your projects.
-
 tiffany.robinson.900 favorited Chipboard Cameo
11 Jun 12:43
tiffany.robinson.900 favorited Chipboard Cameo
11 Jun 12:43
-
 HylianWriter534 favorited Chipboard Cameo
25 Feb 19:31
HylianWriter534 favorited Chipboard Cameo
25 Feb 19:31
-
 Ksew favorited Chipboard Cameo
30 Jan 15:48
Ksew favorited Chipboard Cameo
30 Jan 15:48
-
 Jaybird favorited Chipboard Cameo
25 Jan 19:44
Jaybird favorited Chipboard Cameo
25 Jan 19:44
-
 Juliet J. added Chipboard Cameo to Jewels
24 Jan 13:18
Juliet J. added Chipboard Cameo to Jewels
24 Jan 13:18
-
 Romana S. favorited Chipboard Cameo
24 Jan 11:54
Romana S. favorited Chipboard Cameo
24 Jan 11:54
-
 pink favorited Chipboard Cameo
23 Jan 06:50
pink favorited Chipboard Cameo
23 Jan 06:50
-
 Ana M. favorited Chipboard Cameo
21 Jan 23:47
Ana M. favorited Chipboard Cameo
21 Jan 23:47
-
 Alissa B. favorited Chipboard Cameo
21 Jan 23:30
Alissa B. favorited Chipboard Cameo
21 Jan 23:30
-
 Step 1
Paint the ornate chipboard piece and let the paint dry completely.
-
 Step 2
Ink the ornate chipboard piece with creamy brown ink.
-
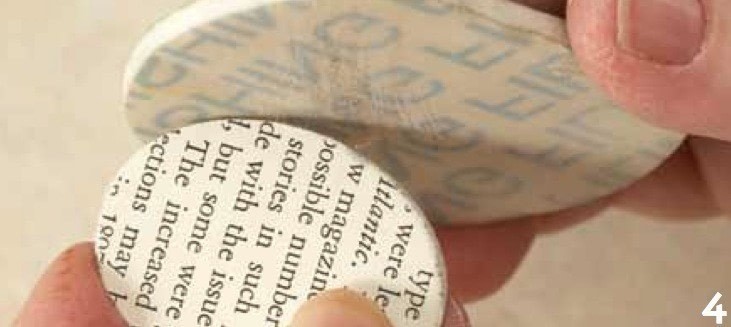
 Step 3
Apply a glue stick adhesive to the chipboard oval and place the oval glue side down on patterned paper. Use a craft knife to trim around the edge of the chipboard piece.
-
 Step 4
Sand the edges of the chipboard oval. Ink the edges of the piece as well.
-
 Step 5
Paint the chipboard silhouette. Allow the paint to dry completely.
-
 Step 6
Use a liquid adhesive to attach the chipboard oval on top of the ornate chipboard piece. Adhere the chipboard silhouette to the chipboard oval.
-
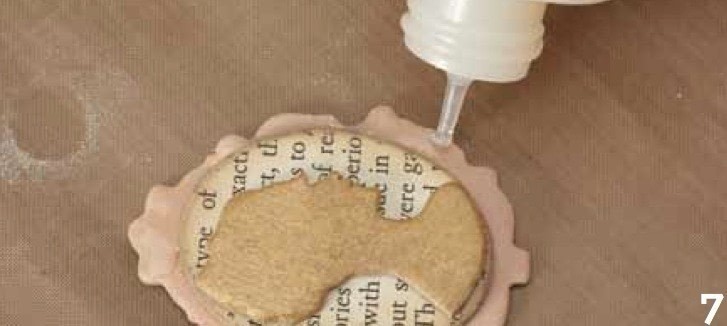
 Step 7
Apply gloss medium to the exposed edges of the ornate chipboard piece.
-
 Step 8
Using white ink, ink the entire chipboard flower, then ink the edges of the flower using light brown ink.
-
 Step 9
Accent the center of the chip- board flower with a self-adhesive pearl. Apply glitter glue to the chipboard flower. Allow the glue to dry completely.
-
 Step 10
Use a liquid adhesive to attach the flower to the silhouette. Create a
necklace on the silhouette using 3 self-adhesive pearls. -
 Step 11
Accent the edges of the ornate chipboard piece and the
chipboard oval with glitter glue. -
 Step 12
Cut a 6" (15cm) length of seam binding, fold it in half and snip the ends on a diagonal. Use fabric adhesive to attach the seam binding to the back of the cameo.