


About
You'll want to make this super cute Bow Waist Belt in every color and pattern.
I've been seeing these cute bow waist belts all over the place. I am so in love with them! The only problem is, some of them are pretty pricey. I decided to try my hand at making one and it came out great!
-
 Key West Witch favorited Bow Waist Belt
06 May 02:38
Key West Witch favorited Bow Waist Belt
06 May 02:38
-
 Rachel B. favorited Bow Waist Belt
29 Nov 07:12
Rachel B. favorited Bow Waist Belt
29 Nov 07:12
-
 Chudames favorited Bow Waist Belt
31 Jul 00:13
Chudames favorited Bow Waist Belt
31 Jul 00:13
-
 Creative F. added Bow Waist Belt to Ill try
06 Sep 15:45
Creative F. added Bow Waist Belt to Ill try
06 Sep 15:45
-
 Dee D. added Bow Waist Belt to clothes
14 Jul 08:34
Dee D. added Bow Waist Belt to clothes
14 Jul 08:34
-
 Crafterella added Bow Waist Belt to Katy Perry
23 Jun 14:57
Crafterella added Bow Waist Belt to Katy Perry
23 Jun 14:57
-
Maya W. favorited Bow Waist Belt
18 Jan 23:24
-
Maya W. commented on Bow Waist Belt
18 Jan 23:23
-
 Shaneece M. favorited Bow Waist Belt
13 Jan 21:33
Shaneece M. favorited Bow Waist Belt
13 Jan 21:33
-
 jennfer c. favorited Bow Waist Belt
10 Nov 16:04
jennfer c. favorited Bow Waist Belt
10 Nov 16:04
You Will Need
-
 Step 1
You'll need to take your waist measurement. A waist belt sits at belly button level. Make sure the measuring tape isn't too snug. If you want your belt to sit lower, measure where you'd like it to sit.
-
 Step 2
Add 5 inches to your waist measurement. Your belt will be 4 inches wide so add 1/4 inch for seam allowances. Cut two.
-
 Step 3
Measure out a 6 inch by 7 inch square. Cut two. This will be your bow.
-
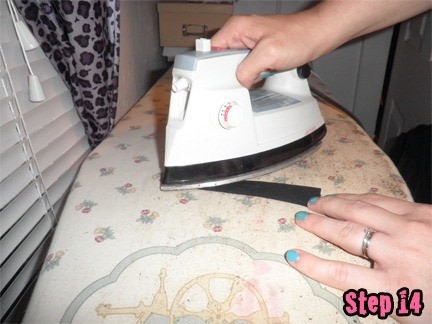
 Step 4
Now measure out a 2 1/2 inch by 6 inch rectangle. Cut 1. This will be the tie for the bow.
-
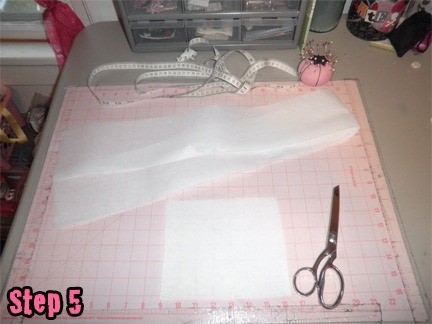
 Step 5
You will need to cut 1 belt piece and one bow piece out of the Craft Fuse (extra firm iron on interfacing). I usually just use the pieces I've already cut out as pattern pieces. Just lay them on top of the Craft Fuse and cut!
-
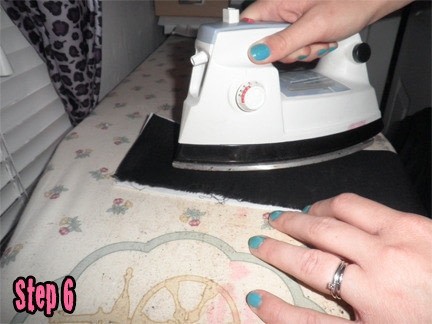
 Step 6
Iron the Craft Fuse onto one piece of the belt and one piece of the bow. Make sure you iron the Craft Fuse onto the wrong side of the belt and bow piece.
-
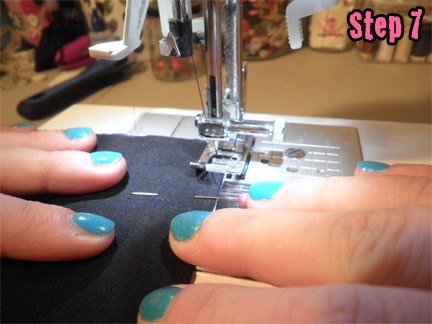
 Step 7
With right sides together, stitch along the outside edge of the belt pieces. Make sure to leave a small hole for turning the belt right side out. I left my turning hole along one of the long sides of the belt.
-
 Step 8
Using pinking shears, cut the excess seam allowance off. Make sure you don't cut into your stitches.
-
 Step 9
Now turn the belt right side out. You can use your iron to press the edges of the belt flat.
-
 Step 10
Topstitch along the outside edge of the belt. This gives the belt a nice finish and also closes your turning hole. Set the belt aside.
-
 Step 11
With right sides together, stitch the bow pieces together. Make sure to leave a turning hole.
-
 Step 12
Turn the bow right side out and use your iron to flatten the edges. Topstitch along the outside edge of the bow.
-
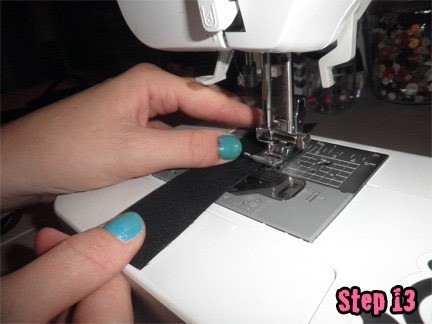
 Step 13
Now, fold the bow tie in half so it's width is now about an inch. Stitch down the long side of the piece.
-
 Step 14
Turn the bow tie right side out and press flat. I usually press this piece so the seam is in the center of the back of the piece. Set the bow pieces aside.
-
 Step 15
Try the belt on and position the velcro where you'd like. Pin.
-
 Step 16
Stitch the velcro to the belt.
-
 Step 17
Now grab the large part of the bow. Gather the bow by sewing a running stitch down the middle of the bow. Gather, then wrap the excess string around the center of the bow a few times.
-
 Step 18
Now stitch the bow tie around the center of the bow.
-
 Step 19
Put the belt on again and position the bow where you'd like. Pin. Stitch the bow onto the belt.


now i get to have as many as i want
<333
I need to make this. It'll go with my bag.
btw were did u get the shoes?