

About
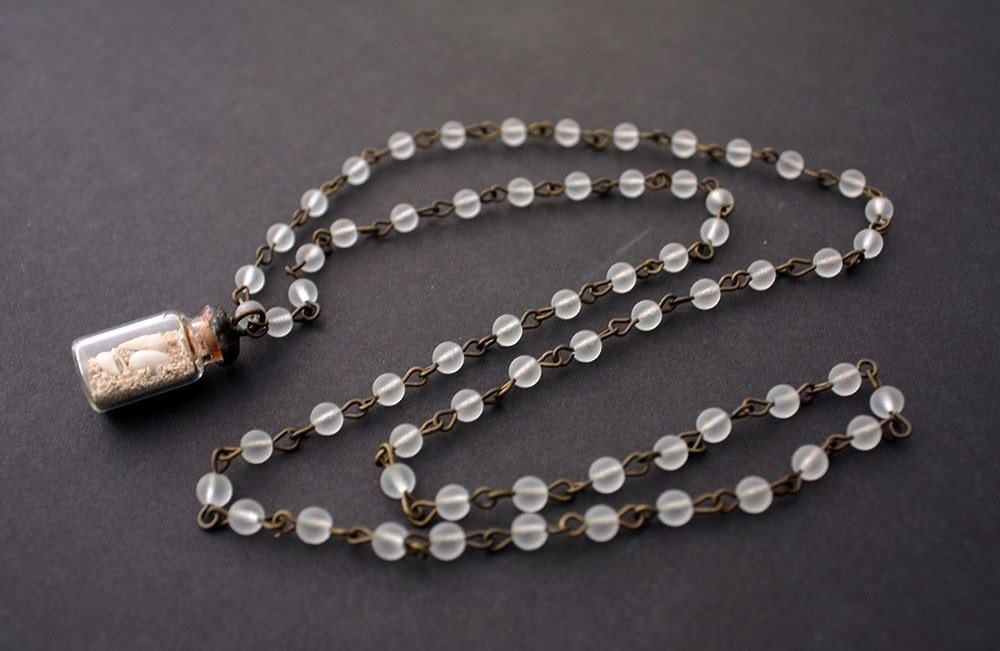
Small treasures can be displayed and worn with this necklace.
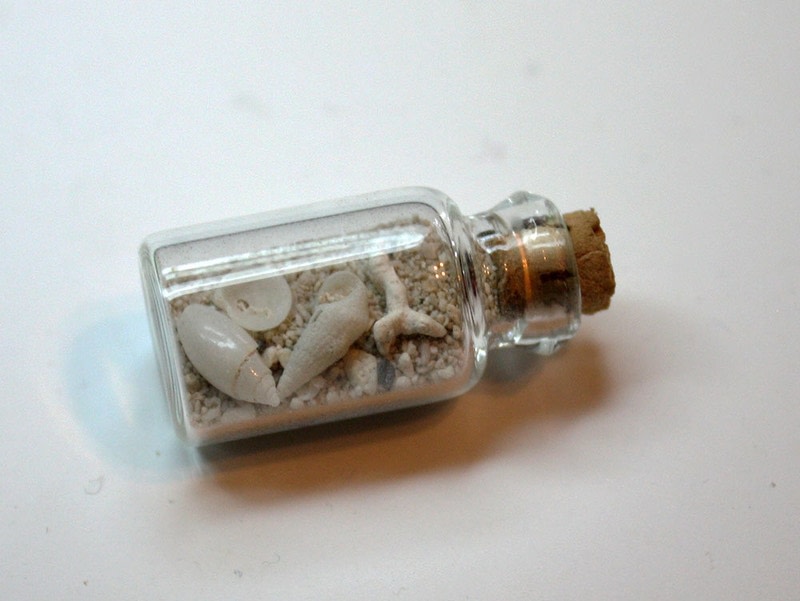
It’s nice to have mementos and memories with us at all times. This necklace gives you the chance to preserve and even wear small bits of those memories. For this pendant, I used sand and tiny shells from a memorable vacation. However; glitter, beads, leaves, rocks, watch parts, rhinestones, dirt, a lock of hair, or any other small items that you can get to fit in an appropriate sized jar/bottle would work just as well.
-
 Lisa H. favorited Bottled Treasure Necklace
09 Apr 12:33
Lisa H. favorited Bottled Treasure Necklace
09 Apr 12:33
-
 Kathy C. favorited Bottled Treasure Necklace
10 Apr 11:36
Kathy C. favorited Bottled Treasure Necklace
10 Apr 11:36
-
 Kinhime Dragon favorited Bottled Treasure Necklace
13 Feb 15:54
Kinhime Dragon favorited Bottled Treasure Necklace
13 Feb 15:54
-
 CraftyHope entered her project Bottled Treasure Necklace to The Little Bullet Book
29 Jan 00:14
CraftyHope entered her project Bottled Treasure Necklace to The Little Bullet Book
29 Jan 00:14
-
CraftyHope entered her project Bottled Treasure Necklace to Harmonee's Creations
16 Jul 13:53
-
 Sandy B. added Bottled Treasure Necklace to jewelry Creations
26 Nov 14:00
Sandy B. added Bottled Treasure Necklace to jewelry Creations
26 Nov 14:00
-
 Joanne M. favorited Bottled Treasure Necklace
03 Nov 14:18
Joanne M. favorited Bottled Treasure Necklace
03 Nov 14:18
-
CraftyHope published her project Bottled Treasure Necklace
27 Oct 09:00
-
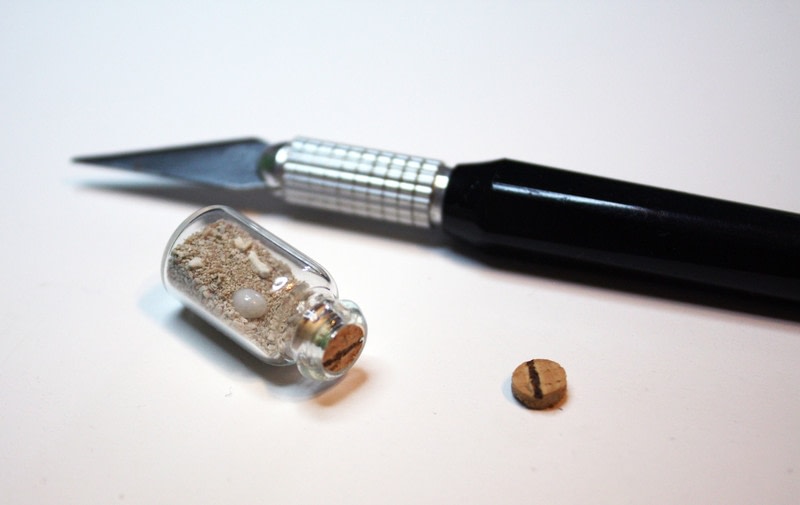
 Step 1
Place treasures inside jar.
-
 Step 2
(optional) Cover the opening of the bottle/jar with something that isn’t sticky on the underside. (A small piece of paper would work.) Since my jar had a cork insert, I pushed it in as far as it could go and trimmed it even with the opening. This prevents the sand from sticking to the copper tape.
-
 Step 3
Cover the opening and the sides of the container’s top with copper tape. Burnish (rub down) the copper tape to itself and the glass.
-
 Step 4
Set up soldering station. This includes finding a way to stabilize the bottle. (I found that mine sat nicely in a set of large pliers.)
-
 Step 5
Apply flux to the copper tape.
-
 Step 6
Using the soldering iron, cover the copper foil with solder. Place some flux on a jump ring then solder the ring to the top of the jar
-
 Step 7
Wipe the soldered areas clean of any remaining flux before adding patina.
-
 Step 8
Create the chain for the necklace using 4mm beads and eye pins as such: String a bead onto an eye pin, bend the pin 90 degrees, trim the pin, form a loop, connect it to other beads.
-
 Step 9
Repeat the above process to create one long strand of 64 beads (or whatever length you desire) (Pictured, I have two strands of 32 beads. These were connected later)
-
 Step 10
Attach the ends of the bead chain to the jump ring on top of the jar by opening one of the end loops, looping it onto the ring, and closing the loop. Repeat for the other loop.
-
 Step 11
Additional notes:
* I used a jar purchased at the craft store. However, any small glass jar would work. In my collection, there are food coloring jars, perfume bottles, medicine containers, and jars from the craft store.
*You can save the trimmings from your eye pins to create more With these small beads, I really only needed 32 eye pins as I used the trimmings of the first 32 to create the eye pins for the second 32.
* I’ve found it best to work in stages: string all the beads onto the eye pins, bend all the eye pins, trim all the eye pins, etc. This seems to make the work move faster since I don’t have to switch pliers as often.
*I created a long necklace that slips over the head easily, so no clasp was added. If you desire a shorter necklace, remember that a clasp will be needed.