

Blouse Front
Extract from Vintage Knit • By Marine Malak and Geraldine Warner • Published by Laurence King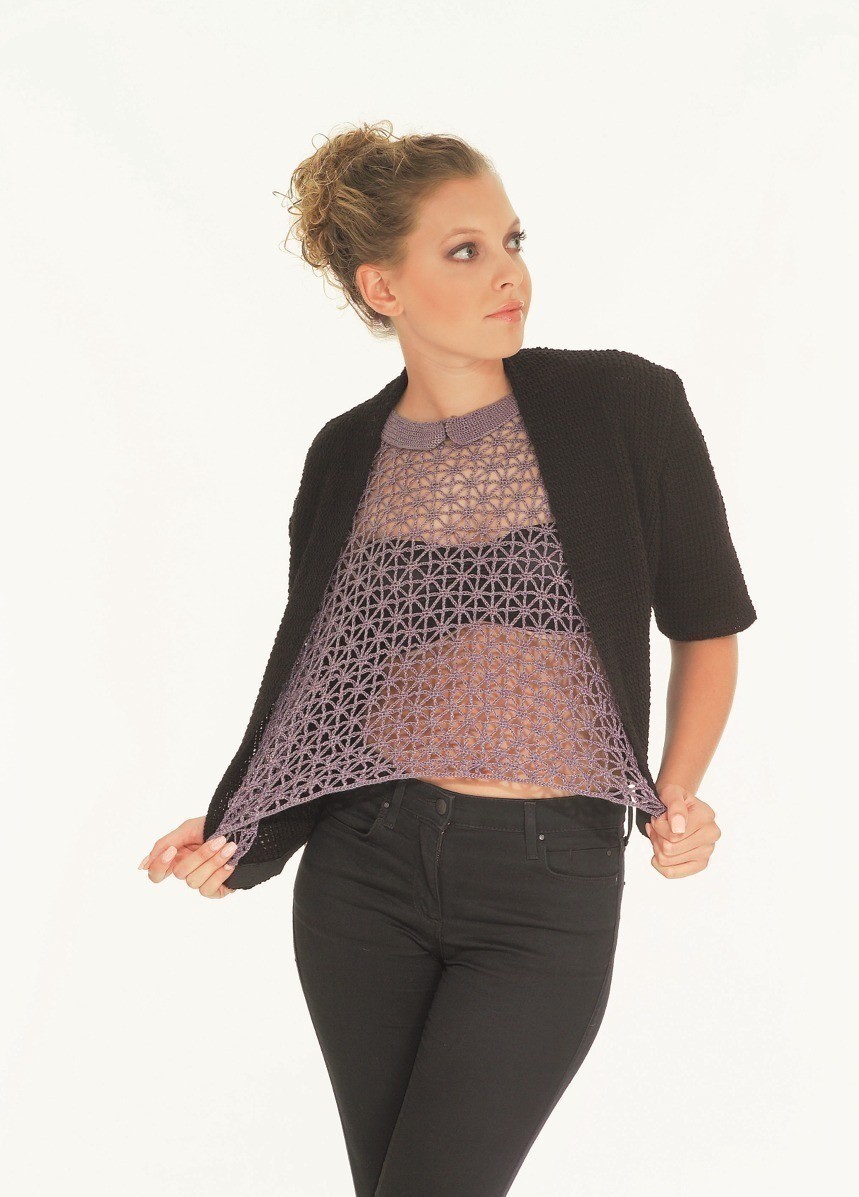


About
Vintage Knit
Blouse fronts were an economical and popular solution during the yarn-rationed war years. A knitted or crochet sleeveless front with a net or fabric backing was worn under a jacket or cardigan to create the illusion
of a complete garment. This delicate crochet 1940s example is a backless halterneck, but you could add a back, if liked.
materials
BC Garn Jaipur Fino, 100% mulberry silk, 328yds (300m) per 50g, as follows: 2 [2] x 50g in Shade #H58 (Mauve)
3mm (US #2–D/3) crochet hook
1 button
sizing
to fit sizes
34–36in / 38–40in (85cm–90cm / 95–100cm)
actual finished measurements
Width
18in / 21in (45cm / 52.5cm)
Length (shoulder–hem) 18in / 21in (45cm / 52.5cm)
tension
1 pattern repeat = 11⁄5in (3cm) square. abbreviations
See page 11
pattern & stitch notes
10 ch makes up 1 pattern. The blouse front is a simple square in shape.
The pattern is written in UK crochet terms with the US equivalent in brackets.
-
 Lotusburger favorited Blouse Front
11 Jan 13:32
Lotusburger favorited Blouse Front
11 Jan 13:32
-
 Xfluffy_unitatoX favorited Blouse Front
19 Nov 22:21
Xfluffy_unitatoX favorited Blouse Front
19 Nov 22:21
-
 Xirimpi favorited Blouse Front
31 May 17:16
Xirimpi favorited Blouse Front
31 May 17:16
-
 FashionistaTalia favorited Blouse Front
27 May 02:41
FashionistaTalia favorited Blouse Front
27 May 02:41
-
 C T. added Blouse Front to Clothes! x
05 Apr 00:37
C T. added Blouse Front to Clothes! x
05 Apr 00:37
-
 Sarah Kim added Blouse Front to TO DO
06 Jan 18:56
Sarah Kim added Blouse Front to TO DO
06 Jan 18:56
-
Sarah Kim favorited Blouse Front
06 Jan 18:55
-
 Elise S. favorited Blouse Front
14 Dec 22:51
Elise S. favorited Blouse Front
14 Dec 22:51
-
 MissCindy favorited Blouse Front
21 Nov 14:53
MissCindy favorited Blouse Front
21 Nov 14:53
-
 Shelynn T. added Blouse Front to Things I`ll Make Eventually
16 Nov 09:49
Shelynn T. added Blouse Front to Things I`ll Make Eventually
16 Nov 09:49
-
Step 1
Front
Make 152 [172] ch. -
Step 2
Row 1
Miss 1 ch, 1 dc (sc) into each ch, 1 ch, turn. -
Step 3
Row 2
1 dc (sc) into first dc (sc), 1 dc (sc) into next dc (sc), *5 ch, miss 3 dc (sc), 1 dtr (trc) into next dc (sc), 5 ch, miss 3 dc (sc), 1 dc (sc) into each of next 3 dc (sc); rep from * ending row with 2 dc (sc) instead of 3 dc (sc). -
Step 4
Row 3
8 ch, *1 dc (sc) into 5th ch next to dtr 59 (trc), 1 dc (sc) into dtr (trc), 1 dc (sc) into
next ch, 4 ch, 1 dtr (trc) into 2nd dc (sc),
4 ch; rep from * omitting the
4 ch at end of row. -
Step 5
Row 4
9 ch, *1 dc (sc) into each of 3 dc (sc),
5 ch, 1 dtr (trc) into dtr (trc), 5 ch; rep from * ending row with 1 dtr (trc) into 4th of the 8 ch and omitting last 5 ch. -
Step 6
Row 5
1 ch, *1 dc (sc) into dtr (trc), 1 dc (sc) into next ch, 4 ch, 1 dtr (trc) into 2nd dc (sc), 4ch,1dc(sc)into5thch;repfrom*, ending row with 2 dc (sc) into ch. -
Step 7
Row 6
1 ch, *1 dc (sc) into each of 2 dc (sc), 5ch,1dtr(trc)intodtr(trc),5ch,1dc (sc) into next dc (sc); rep from * ending row with 1 dc (sc) into last dc (sc).
Rep from Row 3 to Row 6 until work measures 15 [18]in (37.5 [45]cm), ending with a 3rd patt row. -
Step 8
Shape neck
Next row
19 ch, *1 dc (sc) into each of 3 dc (sc),
5 ch, 1 dtr (trc) into dtr (trc), 5 ch; rep from * 4 [5] times more, 1 dc (sc) into each of 3 dc (sc), 5 ch, 1 dtr (trc) into dtr (trc), 1 dtr (trc) into next dc (sc), turn and work on this piece only for one side of neck. -
Step 9
Next row
1 ch, 1 dc (sc) into 2nd dtr (trc), 1 dc (sc) into next ch, work in patt to end of row.
Work 4 more rows decreasing in the same manner as these 2 rows (11⁄2 patts will be decreased), then cont without shaping on 5 [6] patts in width until work measures 18 [19]in (45 [47.5]cm), ending with a 3rd or 5th patt row. Break off. Rejoin yarn so that 2 patts are left in centre, rejoining yarn into 3rd of 3 dc (sc). -
Step 10
Next row
5 ch, 1 dtr (trc) into dtr (trc), work in patt to end. -
Step 11
Next row
Work in patt ending row with 1 dc (sc) into last dtr (trc).
Work 4 more rows decreasing in the same manner as last 2 rows (11⁄2 patts will be decreased), then complete to match other side. -
Step 12
Collar
Begin in centre front of neck and work 40 dc (sc) evenly around right half of neck up to shoulder, make 30 ch, turn.Row 1
Miss 2 ch, 1 dc (sc) into each ch,
1 dc (sc) into each dc (sc), 2 ch, turn. -
Step 13
Row 2
*2 dc (sc) into dc (sc), 1 dc (sc) into each of next 3 dc (sc); rep from * to end, 2 ch, turn. -
Step 14
Row 3
1 dc (sc) into each dc (sc), 2 ch, turn. -
Step 15
Rows 4-5
As Row 3. -
Step 16
Row 6
*2 dc into dc (sc), 1 dc (sc) into each
of next 9 dc (sc); rep from * ending with 5 dc (sc), 2 ch, turn.
Work 7 more rows as Row 3. Break off. Make 28 ch, then work 40 dc (sc) evenly around other half of neck beginning at shoulder.
Work to match first side of collar, reversing the shaping rows, as follows:Row 2
*1 dc (sc) into each of 3 dc (sc), 2 dc (sc) into next dc; rep from * to end. -
Step 17
making up
Pin the piece out to the correct dimensions, then spray with water and allow to dry. Do not press. The original pattern instructions give you the option to starch the piece, but it’s not advisable when using silk yarn.
Sew a button to one side of collar and make a loop on the other side
by inserting the crochet hook into the top of the neckband fabric from front to back, draw yarn through and make enough chains to go around the button securely. Insert hook through fabric and sl st to work. Darn in ends.


