
About
This design was inspired by the intricate lace patterns of crocheted doilies and autumn leaves.
Downloads
- Protractor_Template.jpg 62.7 KB [ Download ]
-
 Lee B. favorited Autumn Leaves Doily
18 Aug 03:20
Lee B. favorited Autumn Leaves Doily
18 Aug 03:20
-
 Ada B. added Autumn Leaves Doily to Home Decor
14 Apr 12:23
Ada B. added Autumn Leaves Doily to Home Decor
14 Apr 12:23
-
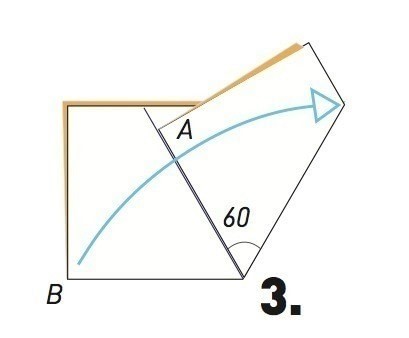
 Step 1
With the colored side of the paper up, fold the square in half (bottom to top) to create a large white rectangle. Bring corners A and B together and pinch to mark the center on the folded edge.
-
 Step 2
Place the rectangle on the Protractor Template (download attachment), aligning the pinched center with the protractor’s center. Draw a light line from the pinched center to the 60o line and from the 120o line to the pinched center.
-
 Step 3
Fold corner A along the 60o line and corner B along the 120o line. The angle between the folding lines is 60o.
-
 Step 4
Transfer Pattern 9. Be aware of the folding lines.
-
Step 5
Cut along the cutting lines.
-
 Step 6
Carefully unfold the paper to reveal the design.