


About
zipper, outsapop, necklace, accessories, jewelry, trashion, reuse
So many of you liked my zipper necklace I made a few months ago. I decided to make a tutorial on it so you can make one for yourself. You´ll need long jacket zippers and two packs of pins and a fitting dummy.
I have to be honest this project is not for beginners since you have to style the piece on to a dummy and hand sew the whole thing together. This project is timeconsuming, but so woth all the trouble and hard work when finished!!
This tutorial is veeery long, but I´ve tried to photograph as much steps and detail shots as possible to make it easier for you to follow up on the process.
-
 Florence B. favorited Zipper Necklace
06 Sep 07:10
Florence B. favorited Zipper Necklace
06 Sep 07:10
-
 shelly.anderson.547 added Zipper Necklace to Jewelry
13 May 05:32
shelly.anderson.547 added Zipper Necklace to Jewelry
13 May 05:32
-
shelly.anderson.547 favorited Zipper Necklace
13 May 05:32
-
 HerNameIsAlixx favorited Zipper Necklace
25 Nov 15:58
HerNameIsAlixx favorited Zipper Necklace
25 Nov 15:58
-
 Ziv J. favorited Zipper Necklace
12 Jun 15:16
Ziv J. favorited Zipper Necklace
12 Jun 15:16
- JaydeyLikesMac&Cheese favorited Zipper Necklace 04 Jun 16:43
-
 Stacie G. added Zipper Necklace to Iris Apfel
08 May 20:07
Stacie G. added Zipper Necklace to Iris Apfel
08 May 20:07
-
 Fifi favorited Zipper Necklace
22 Feb 23:12
Fifi favorited Zipper Necklace
22 Feb 23:12
-
 Anna S. favorited Zipper Necklace
22 Feb 15:50
Anna S. favorited Zipper Necklace
22 Feb 15:50
-
 carlyjcais added Zipper Necklace to DIY the Look: Tilda Swinton
14 Feb 18:51
carlyjcais added Zipper Necklace to DIY the Look: Tilda Swinton
14 Feb 18:51
You Will Need
-
 Step 1
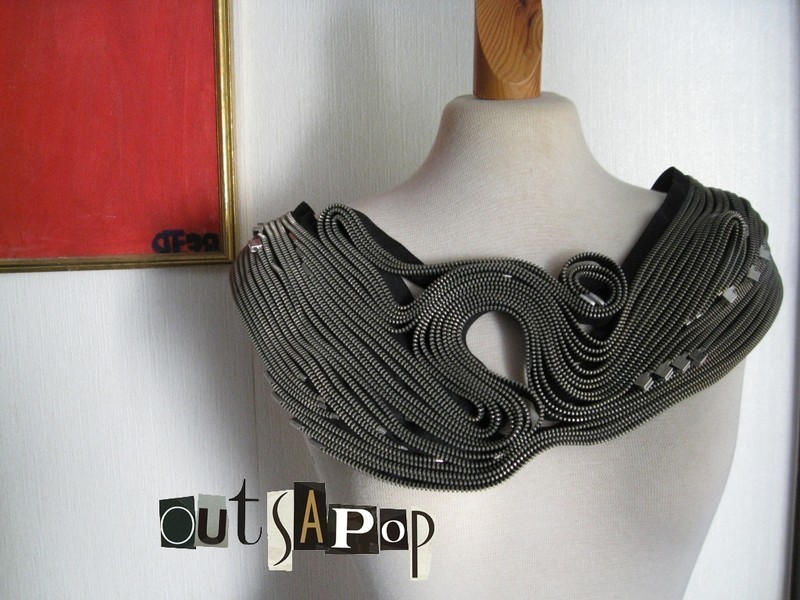
Before and after. Next the zippers will be taken apart and pinned on a dumy to get the organic form. The collar on the right is the one I made for myself previously.
-
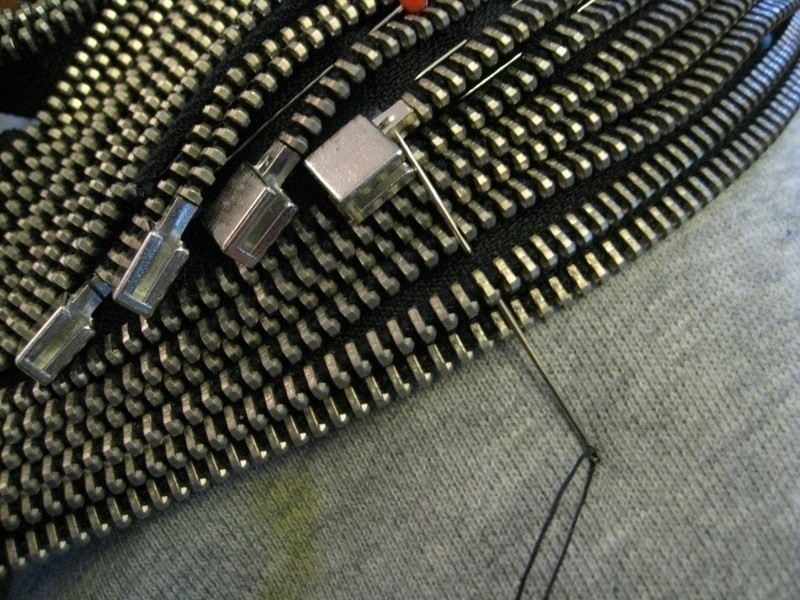
 Step 2
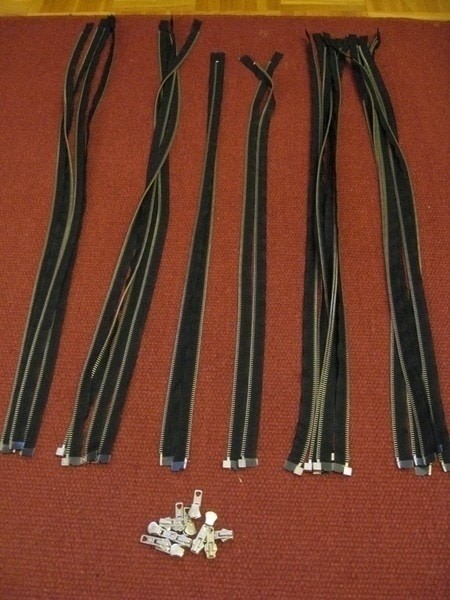
The zippers are now opened and organized to by side and length. The zipper pullers can be used to make earrings or put into other projects as decorative details so save them!
-
 Step 3
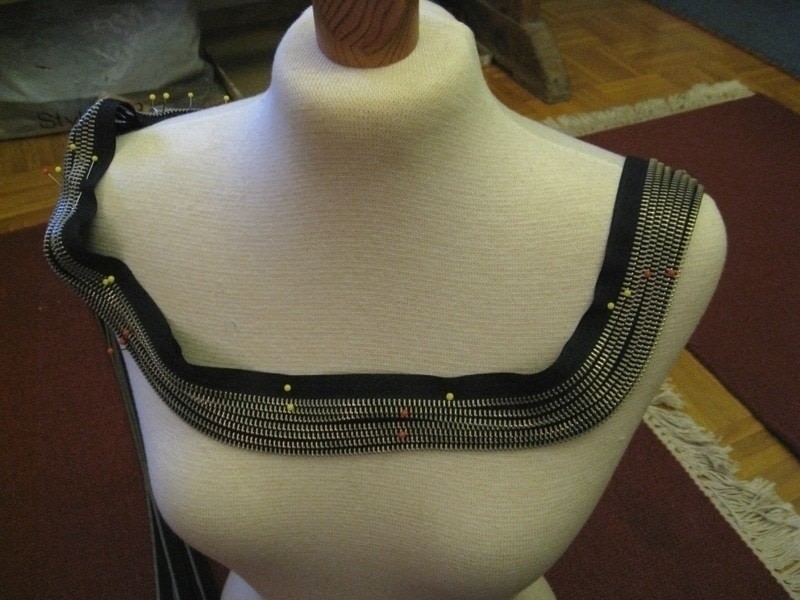
1st layer:
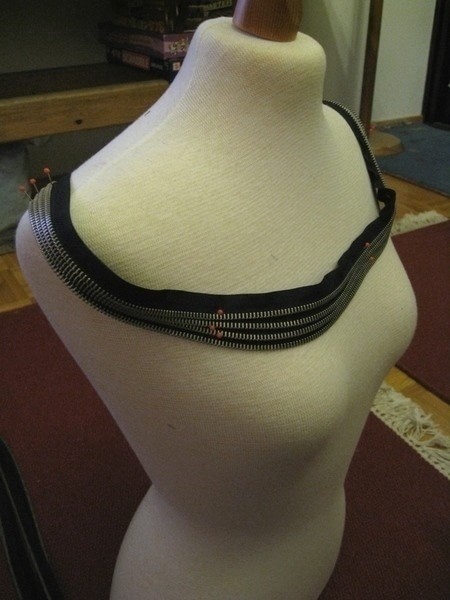
I always work the zippers on groups of 2-4. This makes the pinning faster and also you are able to see the form better as the piece progresses.Always start pinning with the ends that have those plastic edges. They need to be hidden beneath the next layers.
-
 Step 4
The first layer will outline the pieces outer circle roughly.
-
 Step 5
2nd layer:
Again I started with the zipper sides with the metal square and plastic edges in the end. -
 Step 6
2nd layer:
Now you should start making the zippers curve in some places as you pin the on the 2nd layer. This is hor the necklace will get its 3D look. -
 Step 7
2nd layer:
Now you should start making the zippers curve in some places as you pin the on the 2nd layer. This is hor the necklace will get its 3D look. -
 Step 8
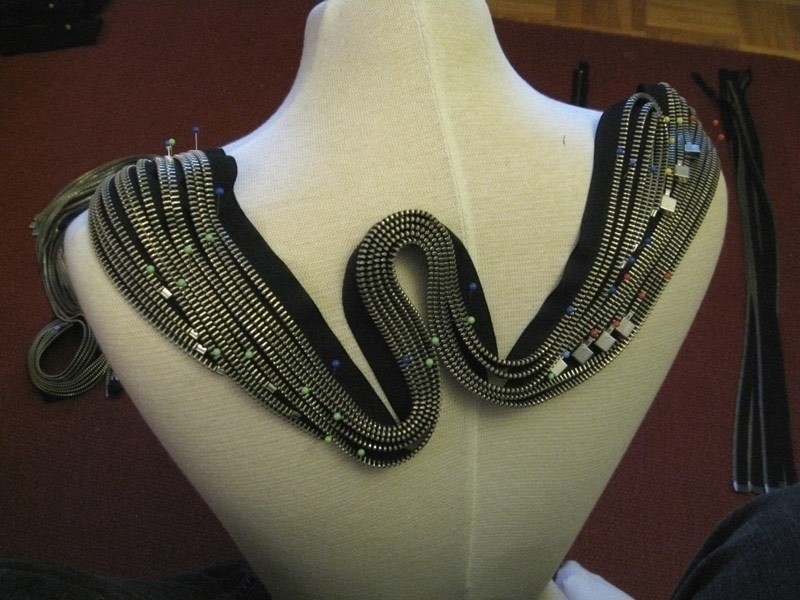
3rd layer as previous. I had all the left over lengt from layers 1 and 2 unattached. I decided to do a U-curve in the back to get a more intresting shape.
-
 Step 9
3rd layer as previous. I had all the left over lengt from layers 1 and 2 unattached. I decided to do a U-curve in the back to get a more intresting shape.
Basically you can stop pinning in any time. Remember that the more zippers you add the more heavy the necklace will get.
-
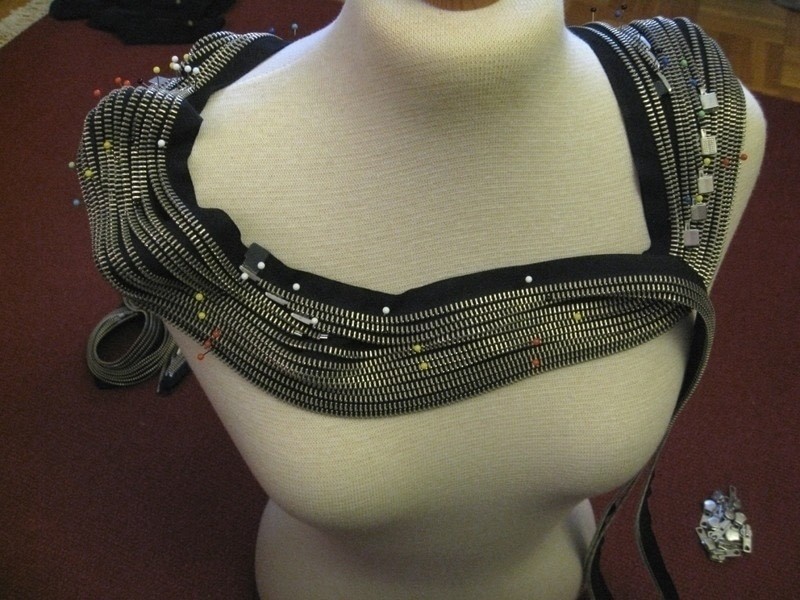
 Step 10
The zipper ends (with extra canvas, no plastic) had to be turned under layer 3 to hide the canvas ends. See a close up of the shoulder.
This is the trickiest aspect of making these necklaces - all zipper ends have to be hidden beneath other layers. This also forces you to create curves and loops in the necklace.
-
 Step 11
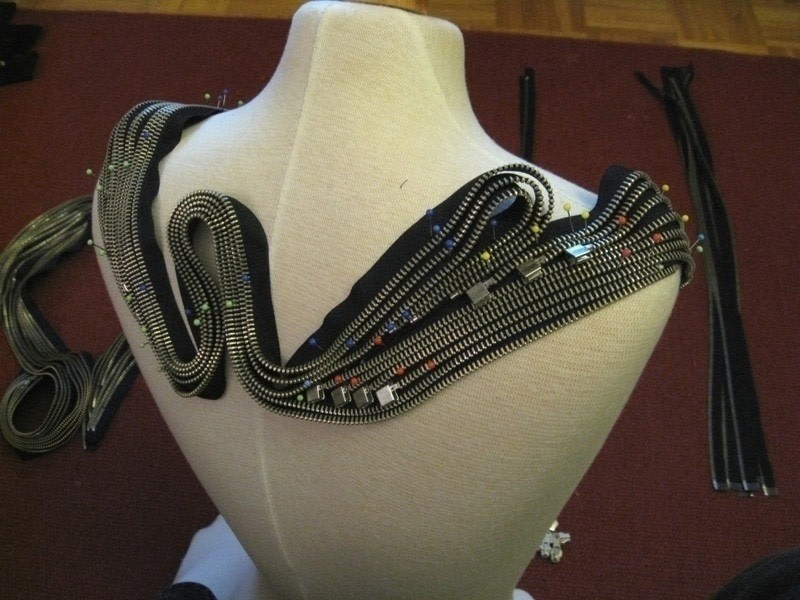
4th layer will begin from the root of the loop to again hide the plastic edges in the zipper ends.
-
 Step 12
5th layer I will begin pinning from the other shoulder to make the necklace more balanced.
-
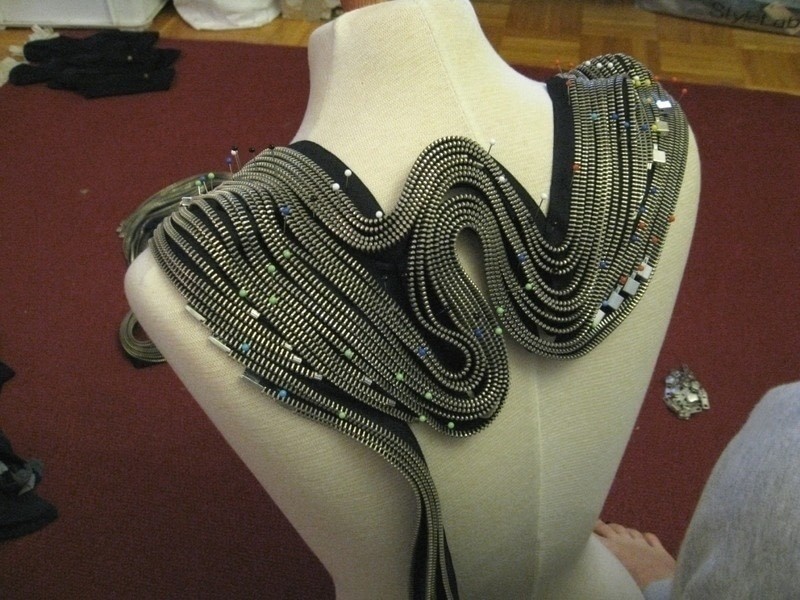
 Step 13
This layer givesmore mass to the U-curve in the back.
-
 Step 14
5th layer will also go over the loop.
-
 Step 15
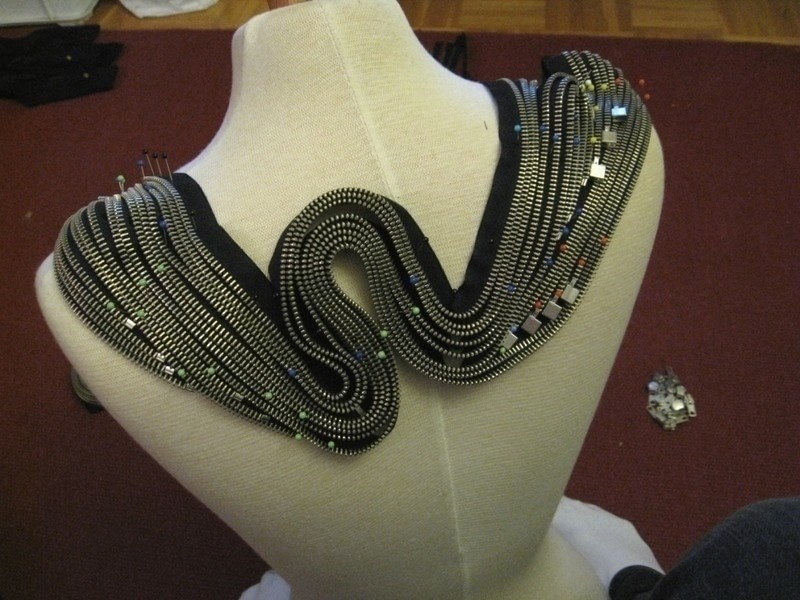
6th layer:
Started from the front because it did not have any extra detail yet. 5th layer has ended in the same place. -
 Step 16
7th layer:
The inner circle was getting small (maybe too small so my head will not fit through) so I decided to add the remaining zippers to the outer circle. -
 Step 17
7th layer will also go under the big U-curve in the back to help keep it in shape when he necklace is worn.
-
 Step 18
I had to adjust in inner layer, make a loop on the left side and a swirl on the rightside to hide the zipper ends. This also made the inner circle a bit bigger because I was woried that my head would not fit through.
All the layer adjustments have to be made BEFORE the necklace is detached from the dummy.
-
 Step 19
The final zipper ends in the front I folded.
-
 Step 20
Now starts the detaching part. You have to change all vertical pins to horizontal.
-
 Step 21
The horizontal pins will slightly change and harden the shape but don´t worry about it.
-
 Step 22
This is how the pins should look like when detaching is finished.
-
 Step 23
The necklace will look quite different when taken off the dummy.
-
 Step 24
Start sewing from the big U-curve. I use denim thread.
I want the layers to stay vertical and lose so they are sewn like this. Like an S-motion. Don´t try to get all the layers at once, but rather sew them together in groups of 3 to 5.
Sew as many threads as you need to hold the shape. Remember to do knots a lot.
-
 Step 25
The U-curve layers should be together like this after sewing. They look ike they are together tightly, but there is rom between the layers. This way the necklace will move when worn and adapt better to your body.
-
 Step 26
When the curve is sewn, start sewing the rest. Start from the outer layer. Hide the know between layers.
I have taken some pins out before I sew an area because that enables me to move the zippers to place as I sew them.
-
 Step 27
The needle comes down just on the other side of one zipper tooth line. This way the thread is "hidden" between zipper teeth and therefore is hardly visible. Push the needle down through all layers.
-
 Step 28
Push the needle up again through all layers at the next tooth line and continue.
I have taken some pins out before I sew an area because that enables me to move the zippers to place as I sew them. Remember to tie plenty of knots as you sew.
-
 Step 29
The idea is NOT to sew everything together, but to leave certain areas un-sewn. This will make the necklace move better when worn and adapt better to your body. If you sew the layers together all over the place the necklace will be very stiff and not very comfortable.
-
 Step 30
This is the reverse side. You can see how I´ve moved around with the needle. The reverse will stay like this and not be lined in any way. The layers are formed so no metal will touch skin.
-
 Step 31
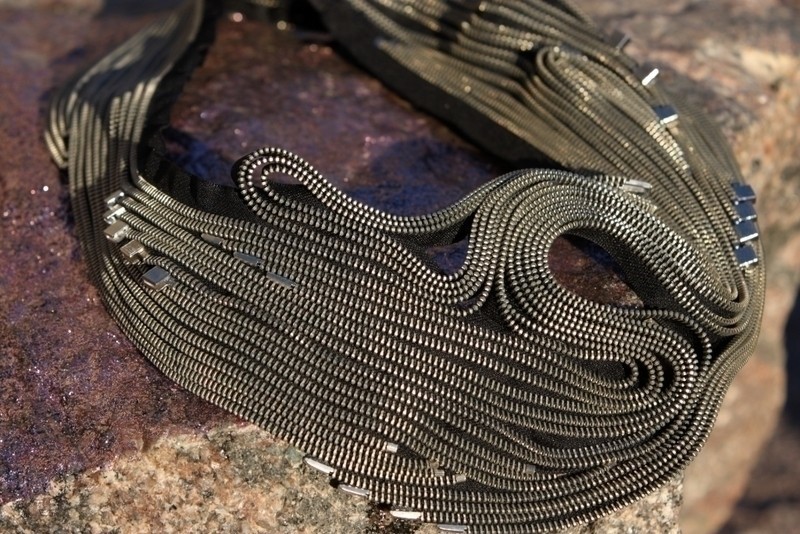
Here is a close up on the sewing. I have marked all the places where thread is visible from the front. It disaphrears beautifully between the zipper teeth.
-
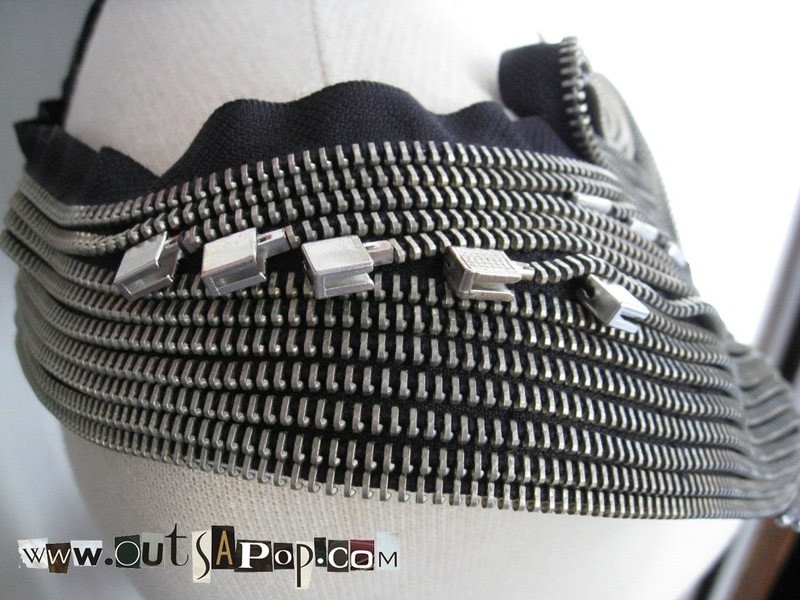
 Step 32
More detail shots from the finished necklace.
-
 Step 33
More detail shots from the finished necklace.
-
 Step 34
More detail shots from the finished necklace.
-
 Step 35
More detail shots from the finished necklace.
-
 Step 36
FINISHED!
For more images go to my Flickr galleries at:
http://www.flickr.com/photos/outsapop/sets/72157602058853821/http://www.flickr.com/photos/outsapop/sets/72157605830614822/
-
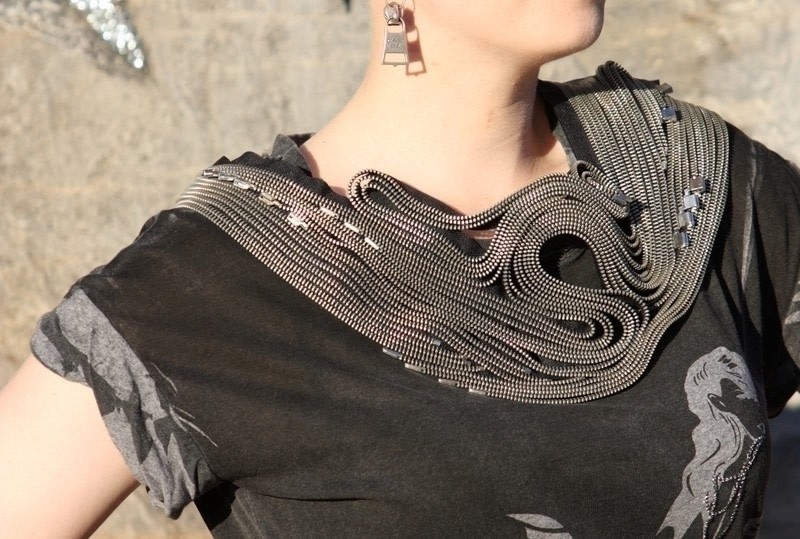
 Step 37
This piece is made from 12 jacket zippers handswen together. The best way to wear them is attach them to the garment with safety pins to keep it in place.
12-zipper necklace is heavy for a piece of jewelry, 525 g (= 1,15 lb / 18,5 ounces). But after you attach it to your garment with safetypins (so it does not move) you can hardly notice it because the weight is distrbuted evenly around your shoulders. I´ve worn these with t-shirts and ball gown dresses.
-
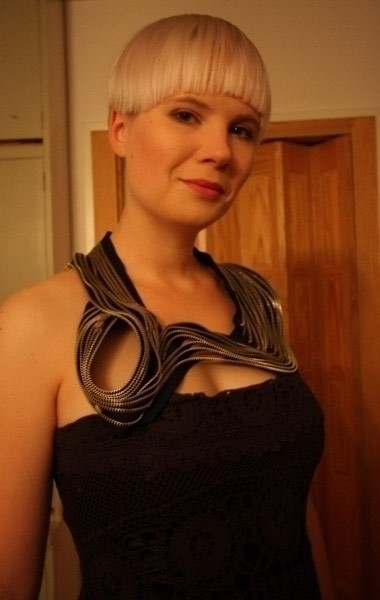
 Step 38
As you can see The necklace can be worn in many ways. Detail in front, back, under one arm (with asymmetrical one-shoulder dresses) and so on. There really is no "right way" to wear it. My necklaces are very adaptable to different kinds of outfits.
-
 Step 39
So go create!!!


AMAZING! I could use this for Burning Man. Best get started
Too bad this really needs a fitting dummy to make this necklace.
So do you sell these?
And have you had men try these too??