

Tie Down Brooch
Extract from The Naughty Secretary Club: The Working Girl's Guide to Handmade Jewelry • By Jennifer Perkins • Published by F+W Media

About
Do you ever feel as if you are literally tied to your job?
Do you ever feel as if you are literally tied to your job? I know the feeling. In response, I have designed the Tied Down Brooch. Take that symbol of masculine authority, the tie, and cut it down to size. Turn the concept of male-as-boss upside down, and you'll end up with one sassy accessory that will make you the belle of the office ball.
-
 Brittney S. added Tie Down Brooch to Jewelry
07 Jul 05:59
Brittney S. added Tie Down Brooch to Jewelry
07 Jul 05:59
-
Brittney S. added Tie Down Brooch to Clothing
07 Jul 05:38
-
 Emma H. favorited Tie Down Brooch
01 Apr 12:43
Emma H. favorited Tie Down Brooch
01 Apr 12:43
-
 clarisse.cramer favorited Tie Down Brooch
29 Mar 20:28
clarisse.cramer favorited Tie Down Brooch
29 Mar 20:28
-
 Crafterella added Tie Down Brooch to Carrie Bradshaw
05 Dec 19:18
Crafterella added Tie Down Brooch to Carrie Bradshaw
05 Dec 19:18
-
 Alecia B. favorited Tie Down Brooch
01 Aug 16:56
Alecia B. favorited Tie Down Brooch
01 Aug 16:56
-
Layla O. added Tie Down Brooch to My To Do's...
03 Jan 17:43
-
 Kelsey B. favorited Tie Down Brooch
13 Sep 22:40
Kelsey B. favorited Tie Down Brooch
13 Sep 22:40
-
 Cat Morley favorited Tie Down Brooch
01 Sep 22:49
Cat Morley favorited Tie Down Brooch
01 Sep 22:49
-
 Step 1
<b>Choose Ties</b>
Pick up 3 coordinating ties and lay them out together. -
 Step 2
<b>Cut out rectangles</b>
Cut up the backs of the ties to open up the fabric. Cut 9 rectangles out of the widest part of the ties. (Each rectangle should be twice as wide as it is tall so it makes a square when folded in step 3.) -
 Step 3
<b>Sew Squares</b>
With right sides together, fold each rectangle in half to make a square. Sew along one of the edges adjacent to the fold. Repeat for all 9 rectangles. -
 Step 4
<b>Trim Triangles</b>
Turn each sewn square right-side out, and trim along the open edge to form a triangle. Repeat for all 9 squares. Iron each triangle. -
 Step 5
<b>Pin and sew triangles</b>
Lay out all the triangles in a straight line in an order you like. Overlap the triangles slightly and pin them together. Sew along the straight edge of the overlapping triangles with a basting stitch set to a long stitch length, the longest one on your machine. -
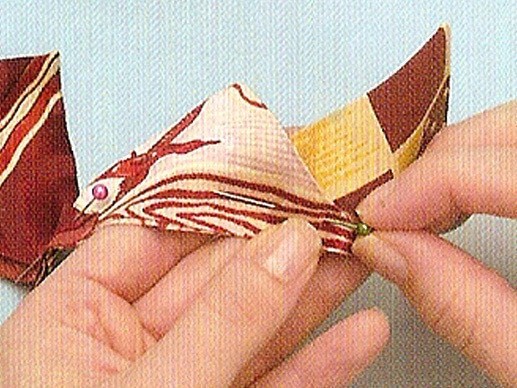
 Step 6
<b>Pull thread to create circle</b>
Tug at the thread tails until the 9-triangle banner curls up on itself to create a circle. This can be slow going. Just be patient, pull a little on the thread, then push the wrinkled fabric, taking care not to break the thread. -
 Step 7
<b>Secure Brooch Shape</b>
Cut out a circle of cotton batting about 2 1/2" (7cm) in diameter. Manipulate the crinkled-up triangles into a 2-layer circle. Pin the 2-layer circle to the felt circle. Handstitch the double-layer circle of petals to the felt circle. -
 Step 8
<b>Cut tie tails and sew on to brooch</b>
Cut 2 tie tails to approximately 11" (28cm) and sew them to the back of the brooch, overlapping them slightly. -
 Step 9
<b>Cover button for brooch center</b>
Cut out a small square of tie fabric and put it right-side down into the plastic cup of the button-covering kit. Slide the button back into the plastic cup and then push down hard with the blue cup to secure the button cover. -
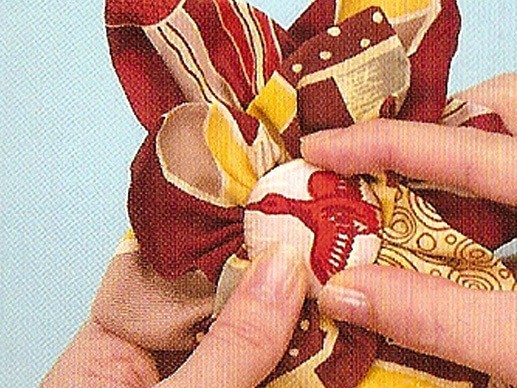
 Step 10
<b>Adhere the button</b>
Position the button on the center of the brooch, in the center of the 2-layers of petals. Glue button on with fabric glue. -
 Step 11
<b>Cover brooch back with fabric circle</b>
Cut out a circle of tie fabric to fit the back of the brooch and cover up the messy stitches. Iron on a circle of interfacing onto the back of the tie fabric. Sew in place with a needle and thread. Attach the pin back with fabric glue.


I am making a skirt out of ties so this will be perfect for the left overs!
I definitely have to try this..Thank you for sharing ;)