


About
The easiest book binding method in the world!
This is a tutorial for my currently favorite book making method. A Japanese style stab stitching cook, it's perfect for making small notebooks, sketchbooks and albums, as well as bigger hard cover books (though I personally haven't tried those.
The benefits of stab stitching books are - since all the pages are stitched together, there are no signatures and so you can bind any number of pages together. Also, there is no glue involve which make this craft a lot less messy (though you won't be able to judge that by how the studio looks right now).
-
 Lisa B. favorited Stab Stitched Notebook
24 Jun 00:16
Lisa B. favorited Stab Stitched Notebook
24 Jun 00:16
-
 MerMeg favorited Stab Stitched Notebook
01 Mar 04:36
MerMeg favorited Stab Stitched Notebook
01 Mar 04:36
-
 Alex B. favorited Stab Stitched Notebook
12 Dec 07:52
Alex B. favorited Stab Stitched Notebook
12 Dec 07:52
-
 MysticRose29 added Stab Stitched Notebook to Book Crafts
30 Mar 16:07
MysticRose29 added Stab Stitched Notebook to Book Crafts
30 Mar 16:07
-
Carly H. favorited Stab Stitched Notebook
23 Feb 19:50
-
 Beto Z. favorited Stab Stitched Notebook
22 Sep 06:12
Beto Z. favorited Stab Stitched Notebook
22 Sep 06:12
-
 Shae B. favorited Stab Stitched Notebook
15 Sep 21:15
Shae B. favorited Stab Stitched Notebook
15 Sep 21:15
-
 Kath Flo R. favorited Stab Stitched Notebook
30 Aug 23:46
Kath Flo R. favorited Stab Stitched Notebook
30 Aug 23:46
-
 Casey C. favorited Stab Stitched Notebook
23 Aug 20:20
Casey C. favorited Stab Stitched Notebook
23 Aug 20:20
-
 Step 1
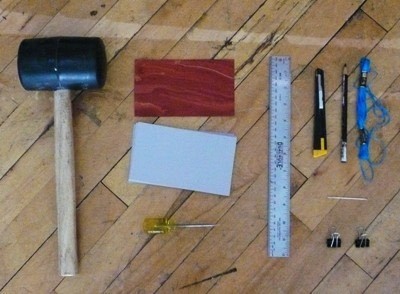
Materials, from left top:
rubber mallet or a hammer
2 pieces of patterned paper cut to size
20-30 pieces of plain paper cut to size
awl
ruler
craft or Exacto knife
pencil
floss
needle
clips -
 Step 2
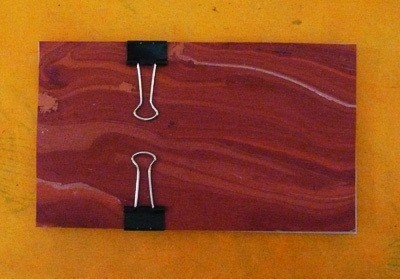
Attach all the pages together using the clips, put the clips in about a third from the top, leave at least 1"-2" clear to work on.
-
 Step 3
with the ruler and the pencil, mark a straight line on the top part of the book (where the stitching will go). Mark 5 points in equal intervals.
-
 Step 4
Using the awl and mallet, puncture 5 holes where you made the marking. make sure the awl made it all the way through all layers of paper and that the holes are nice and even. If you down have an awl, this can also be done with a nail.
-
 Step 5
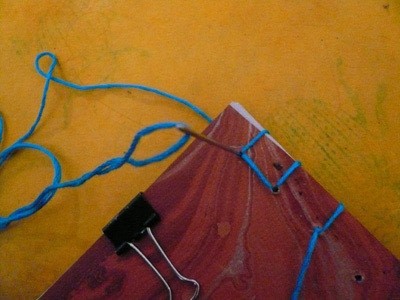
make a knot at the end of your floss and thread it through a needle. Start by passing the needle through the center hole from the back of the book to the front, then loop around the top part of the book and insert the needle again through the same hole.
-
 Step 6
Then, pass the needle through the hole to the right of the center hole, and loop around the top part again. turn the book to the back part and move to the next hole to the right (the last one) and loop around it as well. Loop around the side of the book and insert the needle through the first hole to the right again. Then stitched back to the center.
-
 Step 7
Repeat step 6 to the left side of the book, then tie a knot at the end and trim the floss.
-
 Step 8
Ta-Da! the book is done, you can decorate it with rubber stamps, bits of paper, beads, drawings or whatever you like. Or, if you are too lazy, you can hop on to my store and buy one. Writing the instruction is honestly more complicated then actually making one, there are very few options to where the needle can go and it's really really easy to make.


Good idea - I might try it later this week and make another tutorial for that!
CO + K User
thank you really like it