


About
Resin Hard Paperbeads (what 2 Do With Leftover Resin)
I love makin paper-beads, cheep,cheerful and very therapeutic!They save paper and you can wear your fave wrapping paper!
And with this idea they last much longer!
Okay lets start!first of all cut your paper in2 strips!I used an old book bought from the charity shop, cos it has some lovely thick pages.But you can use anything!Last time I used all the kebab flies that came thou our door!
-
 Susie F. favorited Resin Covered Paper Beads
15 Jan 05:57
Susie F. favorited Resin Covered Paper Beads
15 Jan 05:57
-
 Christen S. favorited Resin Covered Paper Beads
24 Dec 16:28
Christen S. favorited Resin Covered Paper Beads
24 Dec 16:28
-
 Linda L. commented on Resin Covered Paper Beads
29 Mar 21:33
Linda L. commented on Resin Covered Paper Beads
29 Mar 21:33
-
Kathy R. added Resin Covered Paper Beads to Beas How to's
23 Apr 19:55
-
Nicky Frazier N. favorited Resin Covered Paper Beads
21 Jul 17:15
-
Annemarie H. favorited Resin Covered Paper Beads
20 Jul 18:44
-
marie e. favorited Resin Covered Paper Beads
02 Jul 04:50
-
 SuperCool and Really Trendy entered their project Resin Covered Paper Beads to Glue Contest
16 Apr 19:37
SuperCool and Really Trendy entered their project Resin Covered Paper Beads to Glue Contest
16 Apr 19:37
-
SuperCool and Really Trendy entered their project Resin Covered Paper Beads to Brini Maxwell
19 Dec 15:12
-
SuperCool and Really Trendy entered their project Resin Covered Paper Beads to Mix Tape Zine
16 Jul 12:01
-
 Step 1
Cut as many paper strips as u require for the amount of beads you require for your project!
Keeping them the same (unless u want them all different!) Keeping them the same length will make them the same thickness when rolled!
If you don't you'll end up with some skinny ones that won't lie next 2 a fat 1 very well! Try it see what I mean!
I used a book from the charity shop that cost 50p and I haven't used half of it yet! -
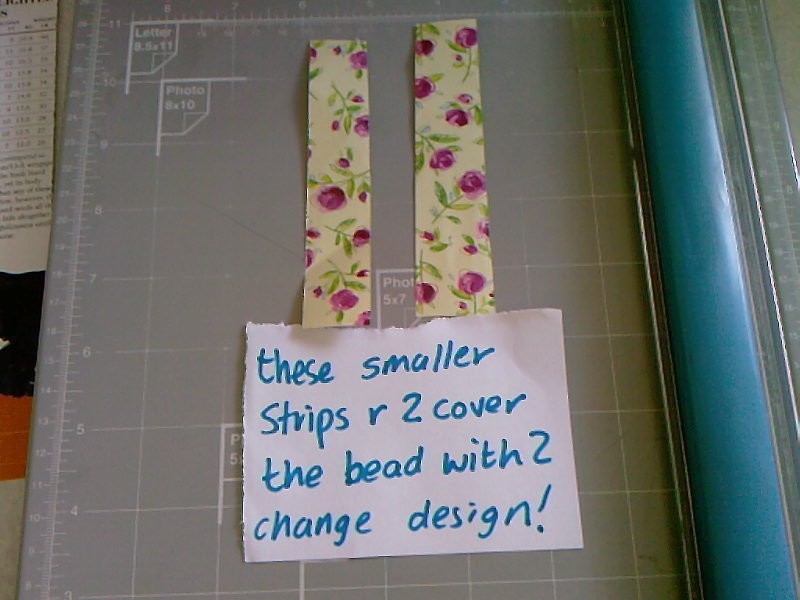
 Step 2
I also cut up some wrapping paper in2 strips so I could wrap it around the paper beads I had made to make them all the same! It made like a top covering...and didn't use to much! I call it a jacket!
-
 Step 3
Now roll your strip of paper on2 a cocktail stick and glue the end of the paper so they don't unroll!
-
 Step 4
If you have trouble gettin the end 2 stick down tear the end of the paper 2 break out some of the fibers, or rough up the finish and u will find the paper stick so much better!
-
 Step 5
As I said b4 if you want loads of paper-beads all the same wrap around a small amount of your fave paper....then all the beads will match!
-
 Step 6
Now I usually heat emboss my paper beads to make them more weatherproof, you could cover them in nail-polish,pva glue or similar!The more layers you put on the better and harder the beads will b!
-
 Step 7
But as it say in the picture 2day I'm gonna try some left over resin, about half a cup as you will see! (In fact I tried resin, but didn't like it 2 much so I have half a tin left!I will use it 1 way or another!!!)
-
 Step 8
Dipped and left 2 drain....this was taking way 2 long.....must find a tatty old paint brush!
-
 Step 9
This is way 2 hard.....where is that paint brush, not looking good! I shall put down dippin as FAILED!But it was worth tryin...and 4 u 2 if you want 2!LOVE messing it's just that resin is really crap stuff!Sticks all stuff to all stuff!Better than super glue!!!Scary!
-
 Step 10
I painted them instead, I smoothed out the drips from the ones I had aready done!(The ones on the meat tray) and stuck them all in a block of polystyrene foam (From some packing)and waited for them 2 dry!
-
 Step 11
They were not dryin very quickly, I was thinking the resin was mixed wrong!
And my kitchen was gettin pongy from the stuff!So I put them outside on one of the few sunny evenings so far and went for a walk!
Silly me I left them out all night! -
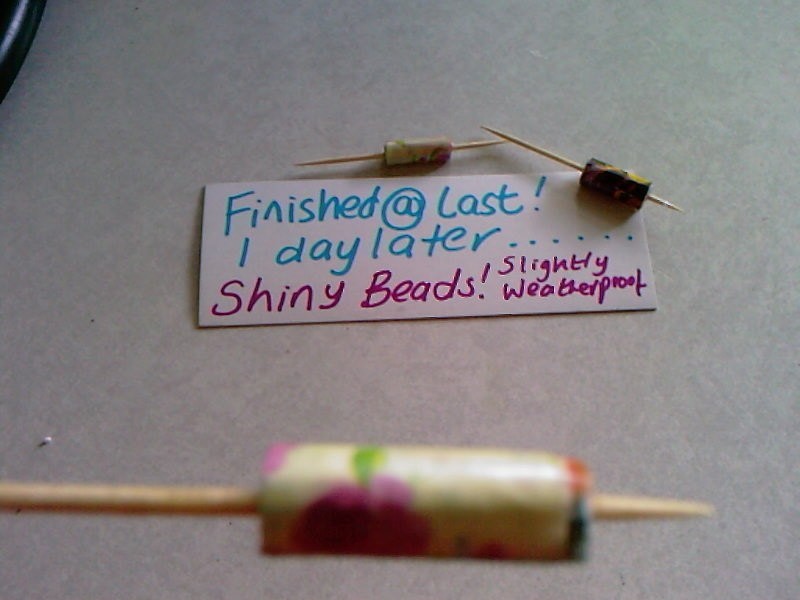
 Step 12
But I got up thios morning to a very sunny day and it's like my birthday (Well it is really!my birthday) And the best thing ever! My paper-bead are rock hard!Shinny! And a successes as far a I can tell! Yippeee!
Oh! yeah, please 4give any spelling mistakes in the piccies....I cannot b a good speller and messer 2 or can I???No worries.
Lol.Cath


Versions


Comments


