

Polka Dot Perfection Skirt
Extract from Sew Cool, Sew Simple: Stylish Skirts • By Valerie Van Arsdale Shrader • Published by Lark Crafts


About
Whip up a new look with a simple pattern, a fabulous fabric, and a little attitude.
Project from the book Stylish Skirts by Valerie Van Arsdale Shrader. Read our review.
-
 Key West Witch favorited Polka Dot Perfection Skirt
07 Aug 21:02
Key West Witch favorited Polka Dot Perfection Skirt
07 Aug 21:02
-
 Theresa K. favorited Polka Dot Perfection Skirt
15 Jun 05:54
Theresa K. favorited Polka Dot Perfection Skirt
15 Jun 05:54
-
 zjowies h. favorited Polka Dot Perfection Skirt
06 Apr 10:28
zjowies h. favorited Polka Dot Perfection Skirt
06 Apr 10:28
-
 Sarah Kim favorited Polka Dot Perfection Skirt
25 Jul 17:54
Sarah Kim favorited Polka Dot Perfection Skirt
25 Jul 17:54
-
 MaicsGrachie favorited Polka Dot Perfection Skirt
24 Dec 03:56
MaicsGrachie favorited Polka Dot Perfection Skirt
24 Dec 03:56
-
 Triceratops favorited Polka Dot Perfection Skirt
22 Aug 03:39
Triceratops favorited Polka Dot Perfection Skirt
22 Aug 03:39
-
Step 1
Cut out and mark the skirt according to your pattern’s instructions. Remember to finish the seam allowances of your skirt, using the method of your choice.
-
 Step 2
Stitch the skirt front and back sections together at the side seams, right sides together, matching the notches.
-
Step 3
In the next step, you’re going to make a casing for the elasticized waist. First, to save yourself the frustration of getting the elastic stuck in the seam allowances when you insert it in the casing, begin by basting the upper 3 or 4 inches of the side seam allowances to the skirt.
-
 Step 4
Make the casing by pressing 1 inch of the upper edge of the skirt to the inside. Press under 1⁄4 inch on the raw edge. Stitch close to the lower edge of the casing, leaving an opening to insert the elastic. Note the line of basting stitches from step 3, visible at the seam.
-
 Step 5
Cut a piece of elastic to fit your waist, plus 1 inch.
-
 Step 6
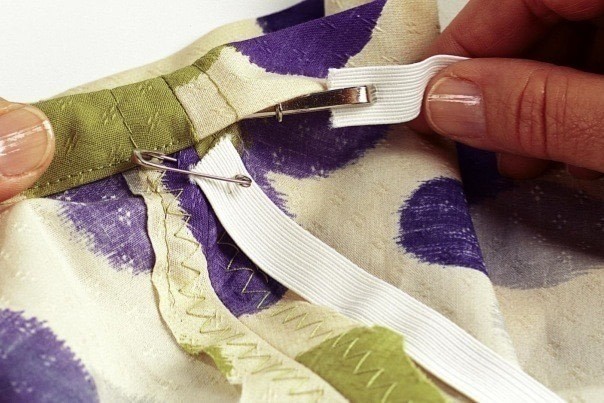
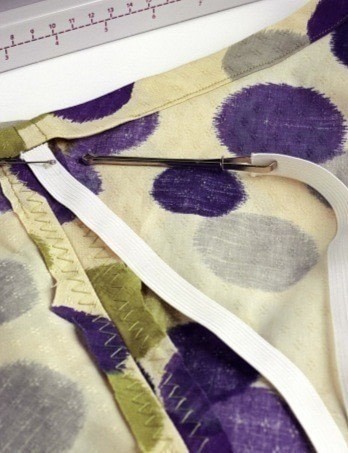
Pin the free end of the elastic to the skirt so it doesn’t disappear inside the casing and insert the other end of the elastic through the casing using a bodkin. Overlap the ends and pin them together so you can try on the skirt. Adjust the elastic to fit if necessary.
-
 Step 7
Stitch the ends of elastic together securely and stitch the opening closed. Distribute the fullness evenly through the waist. Remove the basting stitches at the seam allowances. (If you want, you can secure the elastic in place by stitching through the casing at each side seam.)
-
 Step 8
Let the skirt hang overnight. Try it on and mark the
desired length. If necessary, trim the depth of the hem evenly, allowing 3⁄8 inch for a narrow hem. Stitch 3⁄8 inch from the lower edge of the skirt. Press up the hem along this line of stitching, then tuck under the raw edge to meet the line of stitching. Press. Stitch the hem in place.Why?
When you cut woven fabric on the bias, it drapes beautifully because this is the direction in which the fabric has the most stretch. A skirt cut on the bias needs to hang to relax to its maximum length before you hem it.


Comments

