


About
Don't Buy DIY: Men's Shirt to Cute Summer Dress OR 2 Days to Make the Dress; 4 Weeks to Write the Tutorial...
Isn't that how it always is, for goodness' sakes??
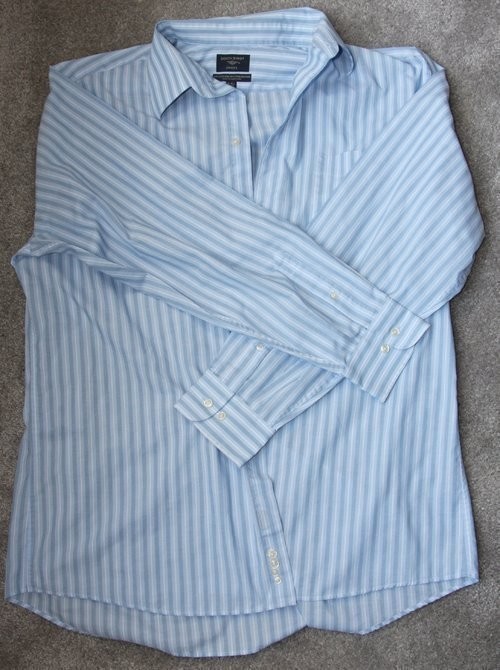
Hub had bequeathed me two of his old Dockers work shirts since the cuffs and collars were slightly frayed. (This is irksome because no one would actually notice the fraying and the rest of the shirt was still serviceable, but whatevs.) Yours truly had some great raw material to work with - and if you have a guy in your life who's parting with any of his button-downs (or you feel like thrifting one for cheap at the Goodwill), so will you!
NOTES:
[I'm a Misses' 4/6 dress size; I started with a L shirt and used almost all of the fabric...though I would have liked to work with the XL since I wanted a little more length. I'm 5'6". Calculate accordingly.]
*Note: this is a pull-on style tube dress. You have to be able to get into it, so you don't want to make the bodice too fitted or the bodice top elastic so tight that you can't shimmy the dress over your hips. Just sayin.' Or maybe you could put it on over your head...? You don't want to rip anything, so make sure you have enough wiggle room!
-
 Adrienne S. added Men's Shirt To Cute Summer Dress to Sewing Projects
30 Apr 02:40
Adrienne S. added Men's Shirt To Cute Summer Dress to Sewing Projects
30 Apr 02:40
-
 Morgan C. added Men's Shirt To Cute Summer Dress to DIY The Look
28 Apr 00:28
Morgan C. added Men's Shirt To Cute Summer Dress to DIY The Look
28 Apr 00:28
-
 Jessica K. favorited Men's Shirt To Cute Summer Dress
27 Nov 15:13
Jessica K. favorited Men's Shirt To Cute Summer Dress
27 Nov 15:13
-
 Orsolya K. favorited Men's Shirt To Cute Summer Dress
26 Aug 12:45
Orsolya K. favorited Men's Shirt To Cute Summer Dress
26 Aug 12:45
-
 Katzilla commented on Men's Shirt To Cute Summer Dress
18 Sep 04:12
Katzilla commented on Men's Shirt To Cute Summer Dress
18 Sep 04:12
-
Katzilla favorited Men's Shirt To Cute Summer Dress
18 Sep 04:08
-
 Roughwaters44 favorited Men's Shirt To Cute Summer Dress
08 Jul 04:20
Roughwaters44 favorited Men's Shirt To Cute Summer Dress
08 Jul 04:20
-
 bemeself favorited Men's Shirt To Cute Summer Dress
15 Jun 19:32
bemeself favorited Men's Shirt To Cute Summer Dress
15 Jun 19:32
-
 Dee D. added Men's Shirt To Cute Summer Dress to clothes
05 Jun 20:50
Dee D. added Men's Shirt To Cute Summer Dress to clothes
05 Jun 20:50
-
Evelyn C. favorited Men's Shirt To Cute Summer Dress
16 Feb 21:28
-
 Step 1
Button the shirt all the way up.
1. Cut according to the picture:
-the sleeves off at the armscye seam
-the cuffs off the sleeves
-each sleeve open down the sleeve seam-the collar off the shirt at the collar seam
-the pocket off the front of the shirt (ripping the stitches carefully...we want to use the pocket fabric so keep that and the shirt intact when removing)-the shirt straight across from underarm to underarm (both back and front of shirt)
-the button placket (button side only) from the top half of the shirt
-the back yoke from the remaining back of the shirt (if it has a back yoke; if not, do not cut)
-the shoulder seams openWhat you should have left is the picture on the right above. Now we have to create each piece of the dress from the parts of the shirt we've just cut.
-
 Step 2
SHIRT BOTTOM ----> SKIRT
1. Turn shirt bottom inside out. Sew both sides together with a line of stitching just outside the stitching of the button placket. (We don't want the button placket to show on the finished piece - and all we're doing is sewing the two sides together to create a finished skirt - since there's that handy button placket, no need to pin!) Cut off button placket to create seam allowance on inside. This seam is now the skirt CENTER BACK (CB) seam). -
Step 3
2. Turn shirt bottom right side out. Cut straight across bottom to create hem (or leave as is if you like the "shirt-style" hem). I stitched 1/4" on inside of hem so that the fray wouldn't go all the way up my garment. I left the raw edge cuz I liked it like that. You can leave the hemming until later, once you out it on and adjust the length, or you can even add a little ruffle onto the bottom for more length if you have enough fabric (I didn't).
Now I know, I know, by turning the front to the back and not adjusting the side seams makes the skirt a wee bit too wide in the back and not wide enough in the front. But all you pattern nazi's - shove off! This is what refashioning's about. -
 Step 4
SHIRT SLEEVES ----> BODICE [BACK]
1. Sew sleeve cuff placket closed by topstitching the open side down to the sleeve, using the same color thread, spi, and seam allowance as the other side of the placket (which is likely topstiched). We don't want that sleeve slit opening up! (Repeat for other sleeve)
-
Step 5
2. Place sleeves, right sides together, with the (former) cuff edges together. Sew cuff edges together, matching placket lines, leaving a 3/8" seam allowance. Open - you'll see that the sleeve cuff plackets create this sort of faux "vest" appearance in the back of the bodice.
-
 Step 6
SHIRT SLEEVES ----> BODICE [FRONT]
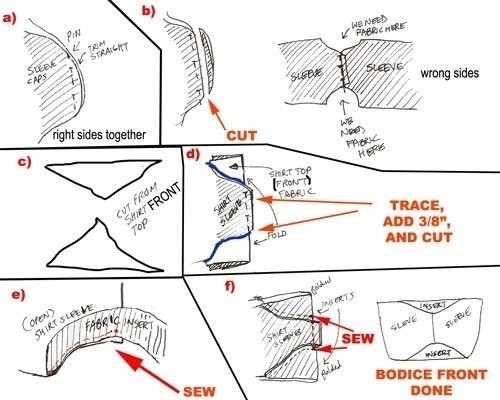
The front of the bodice is more complicated, since unless you're extremely tiny (and using an XL or larger shirt], there won't be enough fabric to go around. We're going to have to salvage fabric from other parts of the shirt and sew it into the bodice. First, wrap the bodice around your top, remembering that it needs to be slightly loose in order to get it on. If the two end of your shirt sleeves (i.e., the sleeve caps) can meet in the center with a 3/8" overlap for seam allowance, this is how we'll do it below: (If they don't meet, you'll have to calculate how much fabric you'll need to add and then cut out a piece from your shirt top to fill it in.)
a) You'll need two pieces of fabric, roughly triangles. First pin your sleeve caps together (right sides together) and b) trim your seam allowance straight so we know what we're working with.
c) [Just to explain, if you open the sleeves flat (keeping pins in there), you'll see two big gaps at the top and bottom of your bodice. We're trying to cut two pieces of fabric to fill in those gaps.] Now you can probably get each piece of fabric from each side of the shirt top. You might be able to get both from one side.
In any case, now's the time to cut off one (or both) of the shirt top front pieces from the shirt top back. Fold the piece in half, and matching stripes/pattern, place your pinned sleeves on top, matching pin line to fold line.
d) Trace around the edge of your sleeve cap for the lower gap (onto the shirt top front fabric below). Draw a straight line from the sleeve edge all the way to the fold of the shirt front fabric. Move your shirt sleeve so you can get the best placement for the next piece of fabric - do the same for the upper gap. Take off the sleeve.
Add 3/8" seam allowance around your tracing on the sleeve cap part only. Then cut each piece out, cutting through both layers of the folded shirt top fabric.
e) Remove pins from shirt sleeves and separate. Take one fabric gap-filler and pin one side of the triangle to one side of one of your sleeve cap, leaving 3/8" seam allowance. Sew, stopping at dot in picture (3/8" from edge of sleeve cap below). Place other sleeve cap underneath in a similar manner, this time folding the 3/8" SA under the line you just sewed. Stitch filler to second sleeve cap, again stopping at center dot. This should create a filler sewn to the top of the two sleeve caps - that are still not connected to each other down the CF line. Their 3/8" seam allowance should still be free and have no stitches tacking it down to the filler piece. I hope that makes sense.
f) Repeat for the top sides of the 2 sleeves. Now you have the sleeve caps connected by those little fabric fillers we just made - but not in the center, right? Now's the time to match those sleeves together, placing flat - and sew that center seam, reinforcing at the top and bottom (which are the points of those triangles - i.e., godets - that we just made). [between the arrows and the word "SEW" in the diagram above, but NOT BEYOND, lest ]
Note to all those finicky grain-matching people out there: by turning the sleeves sideways to use as a bodice, and keeping the shirt bottom vertical to use as a skirt, this means that the bodice stripes are going to be horizontal and the skirt stripes will be vertical. Deal with it! This is what refashioning's all about..and besides, it looks kinda cute this way.
-
 Step 7
SKIRT + BODICE --->DRESS
Turn bodice inside out and pin bottom of bodice to top of skirt (with right sides together, skirt on the inside). Sew together.
Overlap 1" of your waistband elastic, secure ends together with a stitched square with an "X" going through it, to make a big elastic circle. Place circle over waist seam that you just sewed on your dress, and sew elastic to dress. (Of course, if you're super-talented, you probably don't need to sew the bodice to the skirt first in a separate step; you could just attach the elastic in one fell swoop. I hate you.)
Make a similar elastic loop with your over bust elastic (for the top of your bodice). Stitch to top edge of bodice, fold under twice, and stitch again to completely encase the elastic with fabric.
Measure height of CF of bodice; cut shirt front button placket piece you cut way back in step one to this height, leaving about 1/2" extra on both top and bottom (to turn under). Make sure the button placement will be attractive when the placket is sewn to the bodice.
-
 Step 8
MAKE THE RUFFLES
Cut two pieces of fabric from your leftover shirt back. (Mine were 2 7/8"" wide by 20" long.) Sew a narrow hem on each ruffle edge, turn, then sew again to encase any raw edges.
Triple-knot a double-length of thread and hand-baste other side of each ruffle with 3/8" long stitches. Once done the length of each ruffle, pull on your thread to gather ruffle length attractively and match it to length of shirt front button placket you cut in the previous step. Pin ruffles to underside of placket (with about a 1/4" to 3/8" underlap), leaving 1/2" at top and bottom of placket sans ruffles. (Pins shown in diagram above in red.) Fold under bottom of placket. Place placket + ruffle decoration on top of bodice front. Repin same area to bodice front (going thru all 3 layers), centering placket on CF, removing earlier pins as you go. (Make sure that bottom of the placket stays folded under, matching fold to waist seam!!) Topstitch through all layers, vertically down each side of button placket - approximately 1/8" from edge.
Fold down top of button placket to wrong side of bodice front; topstitch horizontally at top edge to keep in place.I also (since I'm completely anal) was irritated by the ruffle not sitting flat on the bodice - so I tacked the ruffle down in various places by just handstitching with one or two stitches here and there to the bodice.
I also made straps from extra fabric from the shirt (about 3/8" wide) that I tacked onto the inside of the bodice. They can tie around the neck halter-style, or can be tucked into the bodice when I just want to wear it like a tube dress. I put a snap on each end, and another 2 snaps on the inside of the bodice back - so the straps can also be snapped down and look like regular spaghetti straps.
-
 Step 9
Plus, I made some accessories from the leftover shirt fabric, but that's definitely, definitely another post! Hope you have as much fun making your dress as I did!
Happy DIY'ing!
xoxo
Carly


xoxo
Carly
Have fun making your dress!
xoxo
Carly
I have a spare shirt lying around so I know what I am going to be doing this weekend... ;) xx
xoxo
Carly
P.S. I am a misses SMALL and I used a Men's XL shirt and the skirt area is still a little short for me. I'm 5'6". Calculate accordingly!
but one quick question: should the shirt be able to fit you comfortably or should it be a size larger when making the dress?